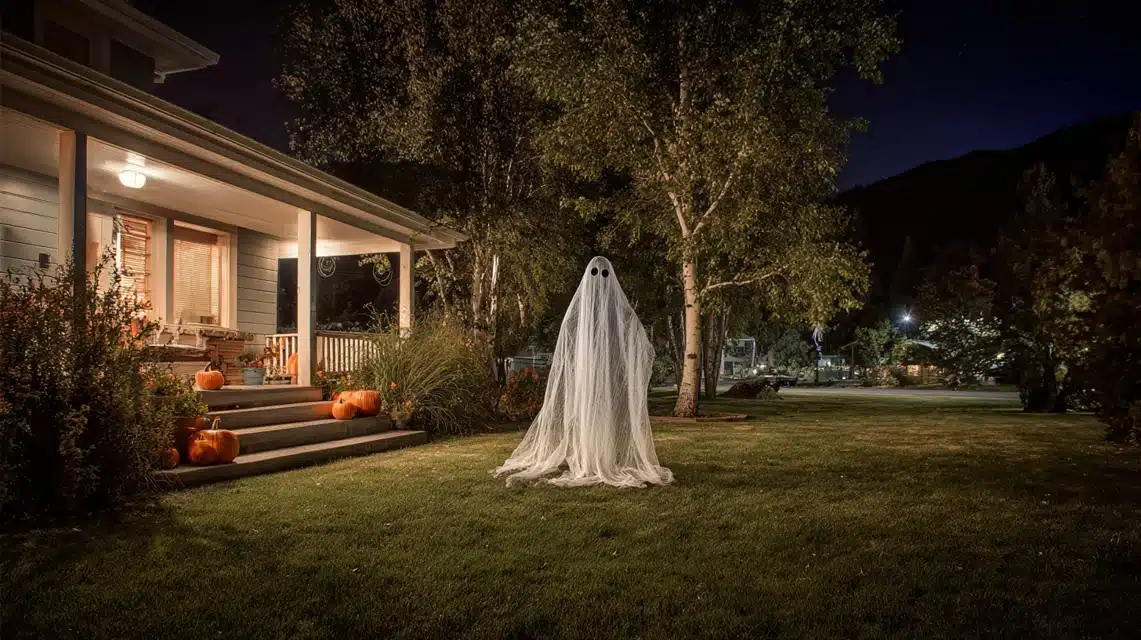
Halloween decorations feel more special when you build them yourself. If you’ve wanted something eye-catching without spending much, a chicken wire ghost is the perfect project.
It looks spooky at night, is light enough to move around, and can be shaped into almost any size you want.
With a bit of wire, some simple tools, and creativity, you can set up a ghostly figure that stands out in your yard or even inside your home.
In this guide, I’ll show you what you need, how to build it step by step, and ways to make it unique. Ready to create a ghost that everyone notices.
Understanding Chicken Wire Ghosts
A chicken wire ghost is a Halloween figure shaped entirely from wire mesh. The open grid creates a see-through silhouette that looks especially eerie when lit up at night.
These figures can be built in life-size form to stand in a yard, garden, or porch, where they greet trick-or-treaters with a haunting outline.
Smaller versions also work well indoors as party decorations or table centerpieces.
Many crafters customize their ghosts by wrapping them in gauze, spraying them with glow-in-the-dark paint, or weaving string lights through the mesh.
This flexibility makes each ghost unique while still keeping the core look simple and spooky.
DIY Chicken Wire Ghost Tutorial
Follow this step-by-step guide to shape, secure, and decorate your DIY chicken wire ghost for both indoor and outdoor Halloween displays.
Materials and Tools for DIY Chicken Wire Ghosts
- Chicken Wire Roll: 36″ × 25′ (about half needed for one ghost).
- Tie Wire: Reuse the roll wrap wire for seams.
- Cutting/Gripping Tools: Wire cutters or needle-nose pliers with built-in cutters.
- Eye Protection: Safety goggles to avoid injury.
- First Aid: Band-aids for scratches.
- Head Form (Optional): Mannequin head, styrofoam, or small ball.
- Measuring Help (Optional): Tape measure or ruler.
Step 1: Shaping the Frame
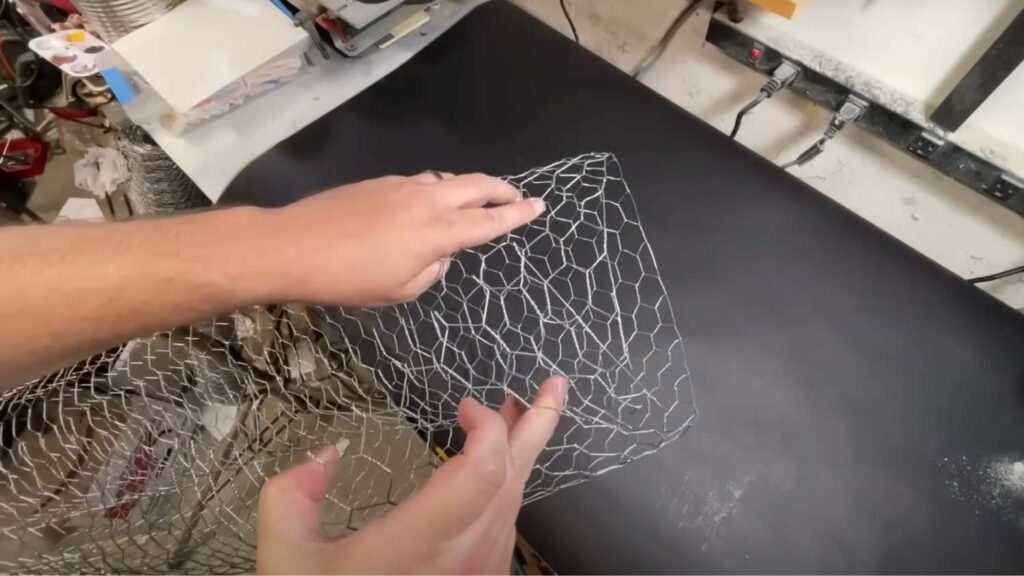
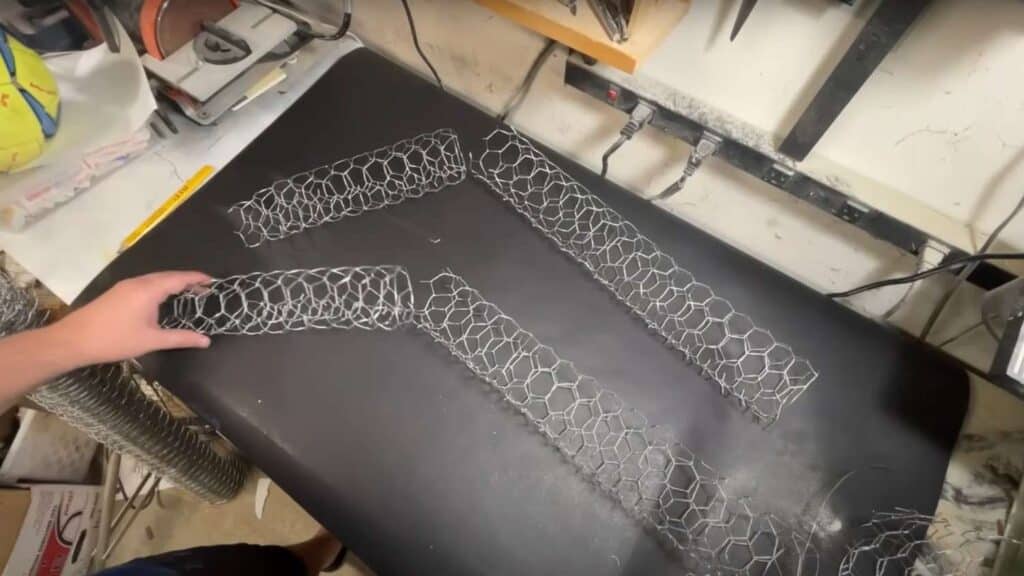
Cut a rectangle of chicken wire about three feet wide and trim off the folded edge for safety. Overlap the edges at an angle to create a cone shape instead of a straight cylinder.
Trim the piece to around eighteen inches long, then press it flat front to back to mimic a torso shape. Measure about twelve inches from the bottom and cut vertical slits upward on both sides.
Add small horizontal relief cuts every two inches along the slits, fold flaps inward, and wire them to create rounded shoulders.
Step 2: Building the Ghost’s Body
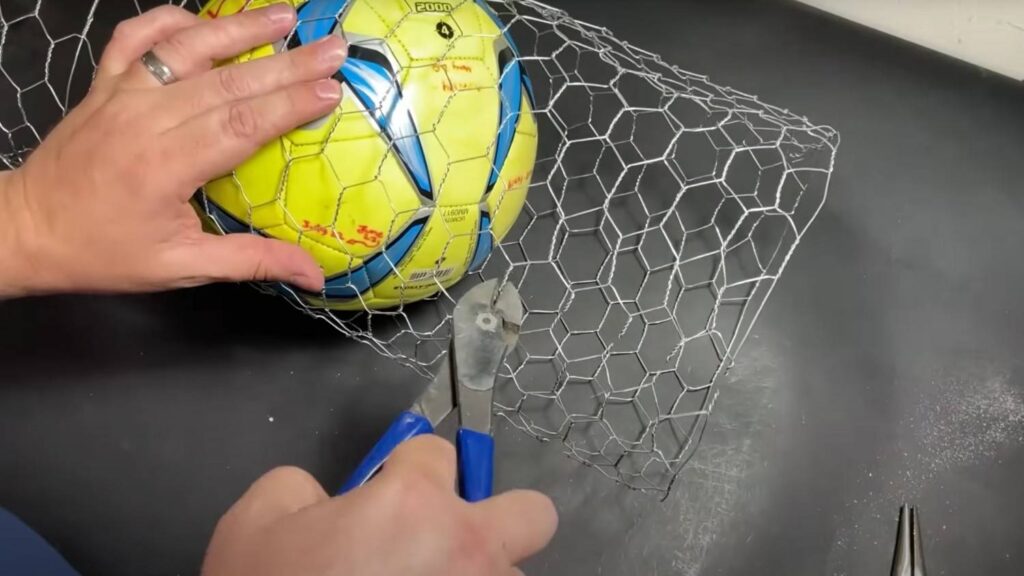
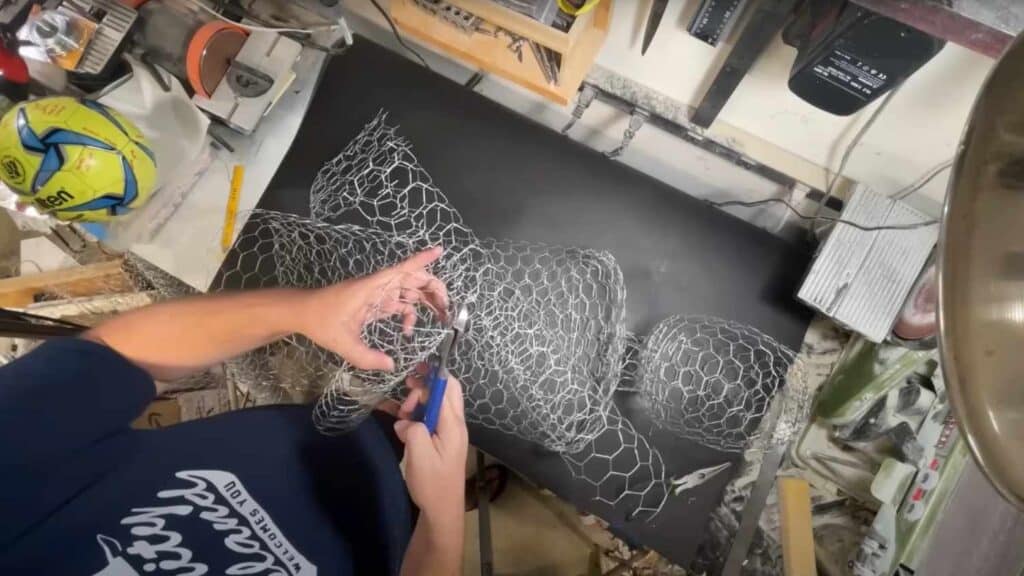
Form the head by wrapping wire around a ball or mannequin head, then secure the seam. Cut several strips six to seven inches long, fold them inward over the ball, and wire for a rounded top.
Repeat at the opposite end for the jaw, aiming for a seven to eight-inch-tall head. Shape it slightly oblong for realism. Create a short neck cylinder, cut the top at an angle, and attach it between the torso and head.
For the pelvis, roll a three-and-a-half-foot strip into a tapered cone opposite the ribcage and wire it to the torso.
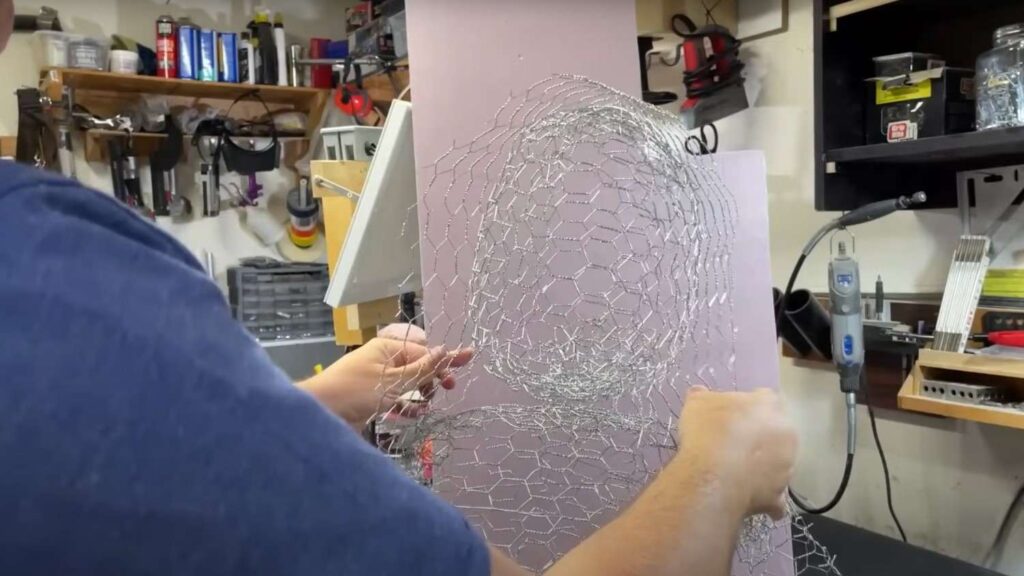
Step 3: Adding Arms and Features
Cut a twelve-inch by three-foot strip for the upper arm, then trim so the elbow aligns just below the ribcage.
Roll it into a cylinder and secure it with a wire. For the forearm, reuse the offcut, making a tapered cone with a smaller wrist.
Create hands by folding flat shapes slightly larger than your own hand, rounding the corners for a basic outline. Attach hands to forearms, forearms to upper arms, and wire arms at the shoulders.
Position the hands at the waist and wire them in place, giving the ghost a natural, posed appearance.
Step 4: Securing and Anchoring
Inspect each seam and add tie wire wherever the joints feel loose. Reinforce major connections, including the head-to-neck, neck-to-torso, and all arm joints. Use extra stitches at elbows, wrists, and waist to prevent sagging or collapse.
Keep checking that the pose holds as you go. For outdoor stability, add ground stakes or secure the base to a platform.
The tighter the wiring, the sturdier your chicken wire ghost will be when displayed. This step is key to ensuring the ghost keeps its intended shape and can withstand handling or outdoor conditions.
Step 5: Painting or Decorating
Keep your ghost bare wire for the transparent look, or personalize it with decorative touches. Add a small folded rectangle of wire to the top of the head to suggest hair. Shape and attach a chest panel if you’d like a more feminine silhouette.
Spray paint or gauze fabric can be used to give a glowing or textured effect. Glow-in-the-dark paint or white spray paint also helps improve visibility at night.
Decorating lets you customize the ghost to suit your style and adds extra personality to your Halloween yard or indoor setup.
Watch the full video tutorial below to see each step in action:
Size and Proportion for Chicken Wire Ghosts
When planning your DIY chicken wire ghost, size makes a big difference in both look and material use.
Small tabletop or porch ghosts only need short strips, often less than a quarter of a roll, making them quick to build.
Child-sized ghosts work well for doorways or small yards and usually require about a third of a roll.
Life-size adult ghosts, perfect as a centerpiece in the yard, may take nearly half a standard roll.
Choosing the right size helps balance effort, cost, and display impact while ensuring your ghost fits the space where it will stand.
Innovative DIY Chicken Wire Ghost Variations
Experimenting with creative variations lets you make each DIY chicken wire ghost unique, adding personality and fitting different Halloween display settings.
1. Dancing Ghosts
Shape multiple figures with bent arms and tilted heads, then arrange them in a circle. Secure hands together so they look like they’re spinning or dancing under the moonlight.
Adding a spotlight from below emphasizes movement and creates playful shadows, making your display feel lively and interactive for anyone passing by.
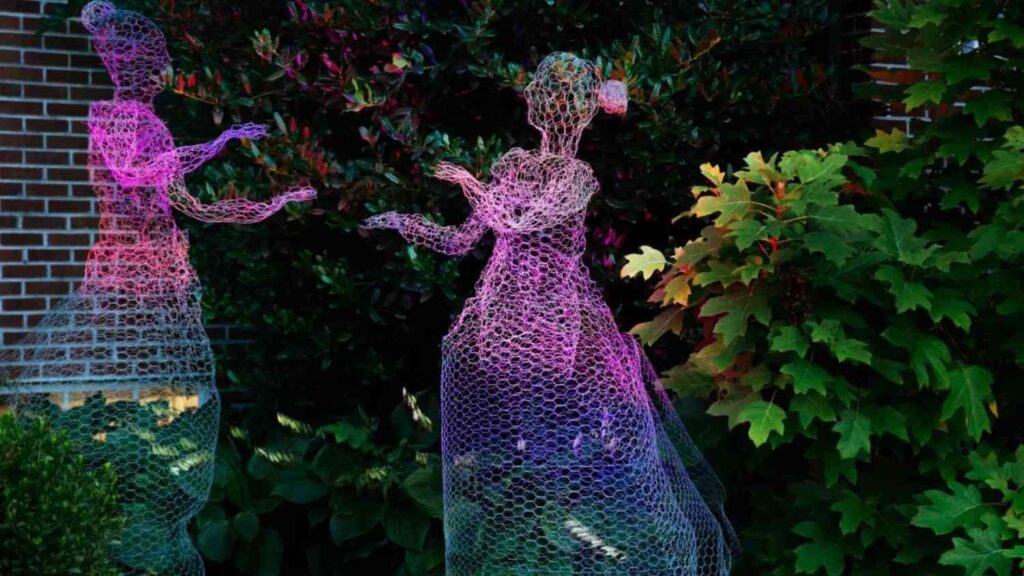
2. Glowing Ghosts
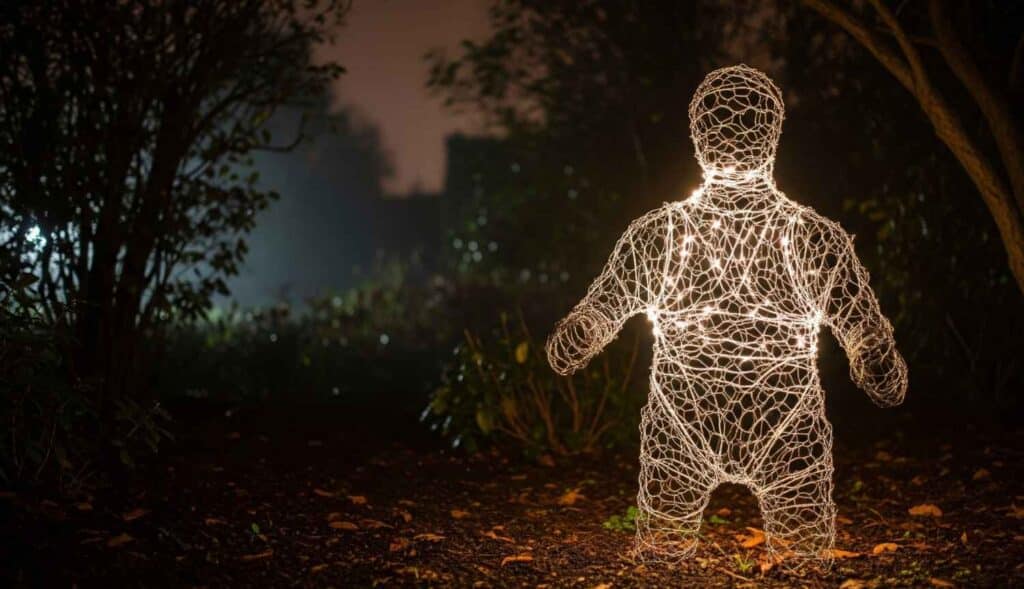
Spray your ghost with glow-in-the-dark paint or tuck LED tea lights inside the frame. This creates a soft glow that stands out in darker areas of your yard.
It works especially well in gardens or porches where ambient lighting is low, ensuring your ghost remains visible without losing its see-through effect.
3. Gauze-Covered Ghosts

Wrap gauze loosely around the wire frame to give the ghost a wispy, fabric-like appearance. The material moves slightly in the wind, adding eerie motion.
This version blends wire stability with a cloth finish, making it look more traditional while keeping its structure intact. It’s perfect for porches or areas with mild breezes.
4. Mini Indoor Ghosts
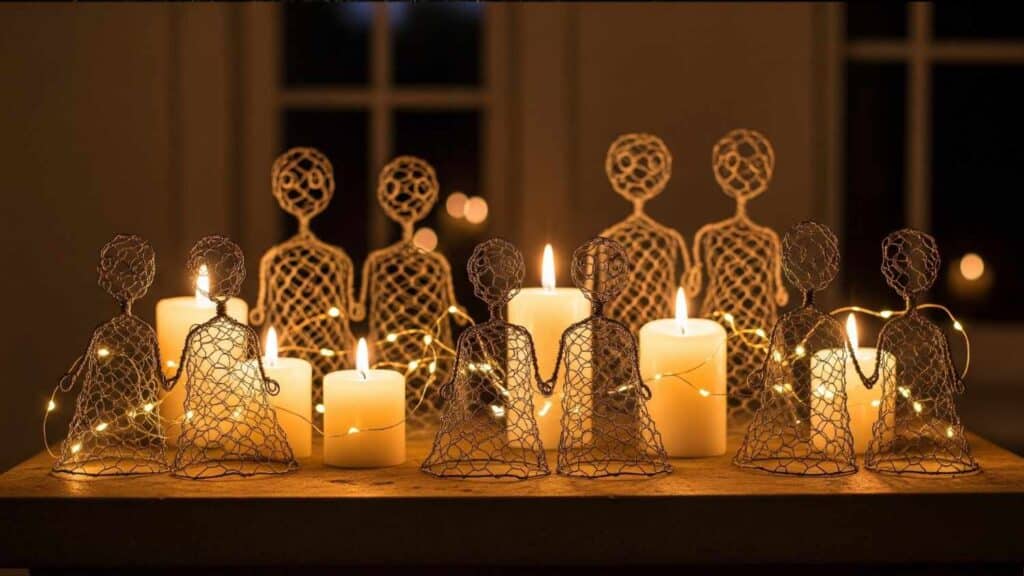
Cut smaller wire sections to make tabletop versions of the ghost. Keep the design simple, focusing on the head and torso. These mini ghosts work well as party centerpieces or mantle decorations.
Pair them with candles or fairy lights for added atmosphere, giving you spooky vibes without taking up much indoor space.
5. Group Displays
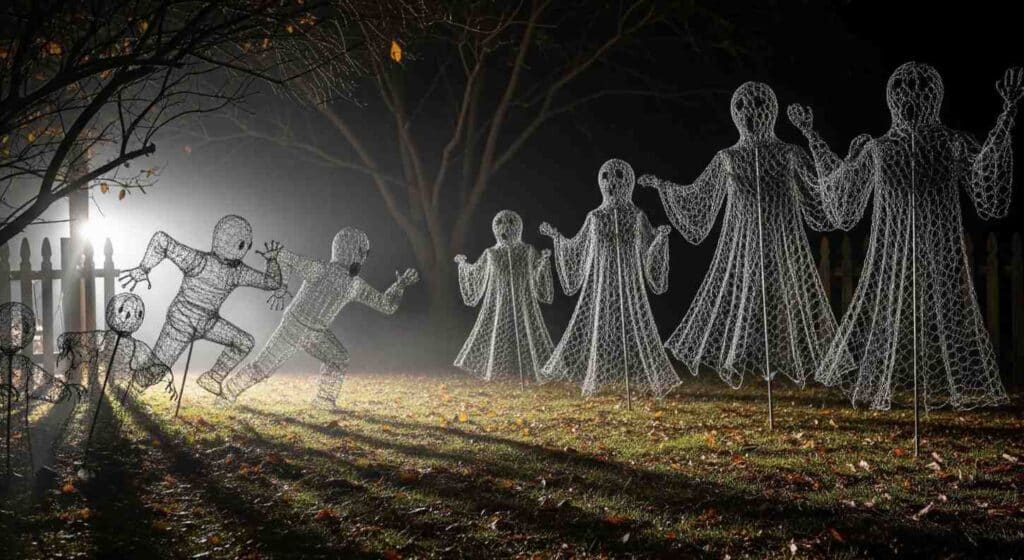
Create several chicken wire ghosts and arrange them in different poses to tell a story. One group might look like they’re chasing, while another seems to be floating together.
Varying sizes add depth, making the scene more eye-catching. A group display works especially well in large yards or community Halloween setups.
Safety Precautions When Making a Chicken Wire Ghost
Building a DIY chicken wire ghost is fun, but safety comes first. Always protect yourself from sharp wire edges.
- Handling Sharp Edges: Bend or fold cut ends inward to reduce scratches and cuts.
- Wearing Gloves and Protective Gear: Use sturdy gloves, goggles, and long sleeves for protection.
- Safe Cutting and Shaping Methods: Work slowly with proper cutters and avoid forcing the wire.
- Keeping Children and Pets Safe: Keep the project area clear of kids and pets until shaping is complete.
Weatherproofing DIY Chicken Wire Ghosts
Outdoor displays face wind, rain, and moisture, so weatherproofing your DIY chicken wire ghost is essential. To prevent collapse in strong winds, secure the figure with ground stakes, heavy bases, or by wiring it to a porch railing.
Anchoring ensures the ghost holds its pose and doesn’t topple over. Protect against rain by spraying the wire with a rust-resistant coating or using galvanized chicken wire. This helps extend the ghost’s lifespan and keeps it sturdy through the season.
When Halloween ends, store the ghost indoors in a dry spot to avoid moisture damage and preserve it for future use.
Indoor vs. Outdoor Chicken Wire Ghost Displays

DIY chicken wire ghosts can be adapted for both indoor and outdoor use with a few adjustments.
Indoors, smaller versions work well on tables, mantels, or porches, where weight should be kept light and size compact. These are perfect as party decorations or temporary accents that can be moved easily.
Outdoor displays, on the other hand, are often larger and designed to be permanent yard fixtures throughout the season. They need stronger anchoring, weather protection, and heavier bases for stability.
Adjusting the weight, height, and finishing touches ensures your ghost looks striking while fitting the environment it’s displayed in.
Lighting Options for Chicken Wire Ghosts
Adding light makes your DIY chicken wire ghost stand out at night and creates different spooky effects for any display.
- Glow-in-the-Dark Paint: Easy to apply, but fades quickly without strong light exposure.
- LED String Lights Inside: Bright and safe, but wiring can be tricky to secure.
- Spotlights or Projectors: Highlight the ghost’s outline, but may need outdoor-rated equipment for safety.
- Best Lighting for Different Settings: Use paint for small displays, LEDs for close viewing, and spotlights for large yard centerpieces.
Fixing Problems With Chicken Wire Ghosts
Even sturdy DIY chicken wire ghosts can run into problems after being displayed outside. The good news is that most issues are easily fixable with a few basic tools.
1. Ghost Losing Shape
Over time, your ghost might sag or look uneven. This usually happens if the wire isn’t secured tightly.
Reinforce seams with extra tie wire or zip ties. Gently reshape the form with your hands, working slowly to avoid bending the frame too sharply.
If needed, add small cross-pieces of wire inside to hold the body in place.
2. Wire Collapsing
If the structure folds in on itself, the wire may not be strong enough to support the size.
Add inner supports, such as wooden dowels, rebar, or thicker gauge wire. Anchor the ghost to the ground with garden stakes so wind doesn’t knock it over.
For larger builds, consider doubling the chicken wire layers to increase strength.
3. Paint Not Sticking
Paint can peel or fail to cover properly if the wire wasn’t prepared. Wash the chicken wire with soap and water, then dry completely.
Lightly sand the surface so the spray paint adheres better. Apply paint in thin, even coats to avoid drips.
4. Poor Visibility at Night
A ghost might look spooky during the day but disappear after dark. Place a small spotlight at ground level to shine upward.
Wrap battery-powered LED string lights inside the frame. Use glow-in-the-dark spray paint for extra nighttime effect.
5. Quick Fixes Before Display
Sometimes problems show up right before guests arrive or on Halloween night. Adjust the pose of the ghost to make it stand taller or look scarier.
Secure loose edges with zip ties or extra clips. Add quick lighting (flashlights, lanterns, or LEDs) to make it stand out.
Conclusion
Making a chicken wire ghost is more than just a craft; it’s a simple way to add personality to your Halloween setup.
You’ve now got the basics for shaping, securing, and lighting your ghost, plus extra ideas to try when you want something different.
I hope this helped you see how easy it is to build a piece that looks spooky without being costly.
Keep experimenting with size, lighting, and poses until you get the perfect look. If you had fun with this project, take a moment to check out my other Halloween DIY blogs for more ideas you can bring to life.