Noticed cracks spreading across your basement walls or water seeping through during heavy rainstorms lately? Those warning signs mean your foundation needs attention before small problems turn into expensive nightmares that threaten your entire home.
Many homeowners panic when they spot foundation issues, but basement wall repair is often simpler than you expect.
I’m here to walk you through exactly what causes wall damage and how to fix it yourself, or when to call professionals. You’ll learn which cracks you can handle yourself and which ones need expert help right away for safety.
By understanding basement wall repair basics, you’ll save money and protect your biggest investment with confidence.
What Causes Basement Walls to Bow or Crack
Bowing or cracking basement walls usually point to one core issue: pressure on your foundation.
That pressure often builds up slowly over time from water, soil movement, and structural weaknesses. Here’s how each factor contributes:
- Hydrostatic Pressure: When the soil around your foundation becomes waterlogged, it pushes against the walls with tremendous force. This pressure is one of the most common reasons for bowing or cracking.
- Poor Drainage: Downspouts or gutters that dump water too close to the foundation keep the surrounding soil constantly wet, increasing stress on the walls.
- Freeze-Thaw Cycles: Repeated freezing and thawing cause the soil to expand and contract. This back-and-forth movement adds strain year after year.
- Structural Settling: As a house ages, the foundation naturally shifts. But when it settles unevenly or was built on poorly compacted soil, cracks can form more easily.
- Design or Construction Flaws: If the foundation wasn’t designed or reinforced properly during construction, even normal soil pressure can cause it to fail over time.
Signs You Need Basement Wall Repair
Your basement walls will show clear warning signs when they need professional repair before the damage gets worse and costs more. Here are the four major red flags that mean you should call a foundation expert soon:
- Horizontal or stair-step cracks: Wide cracks running horizontally across your wall or zigzagging like stairs indicate serious structural pressure that needs immediate attention.
- Inward bowing or leaning: Walls that bulge inward or lean noticeably mean soil pressure is pushing them dangerously close to potential collapse.
- Moisture leaks or dampness: Water seeping through cracks or consistently damp walls signal that your foundation waterproofing has failed and needs fixing fast.
- Gaps around openings: Spaces appearing around windows, doors, or baseboards show your foundation is shifting and pulling away from the house frame.
Ignoring these warning signs only exacerbates the problem and dramatically increases repair costs over time.
DIY Basement Wall Repair: Step-by-Step Guide
Materials You’ll Need
Gathering the right materials before starting your basement wall repair project saves time and prevents frustrating trips to the hardware store. Here’s a complete list of essential materials you’ll need with their typical cost ranges:
| Material | Estimated Cost Range (USD) |
|---|---|
| Concrete patching material | $6 – $48 per kit |
| Grease fittings | $1.20 – $12 per fitting |
| Hydroactive gel | $12 – $36 per tube/bottle |
| Super slurry | $18 – $48 per bag/pail |
| Super crete | $8.40 – $36 per bag |
| Drill and drill bits | $6 – $145 per set |
| Grease gun | $2.40 – $60 per unit |
| Paint or tape for protection | $2.40 – $30 per can/roll |
| Safety gear (gloves, mask, goggles) | $1.20 – $30 per set |
Note: These costs are estimated and may vary based on your location, brand selection, and current market prices at local stores.
Fixing minor basement wall cracks and moisture issues yourself saves money if you follow the right steps carefully. I’ve broken down the complete DIY repair process into five manageable steps you can tackle over a weekend:
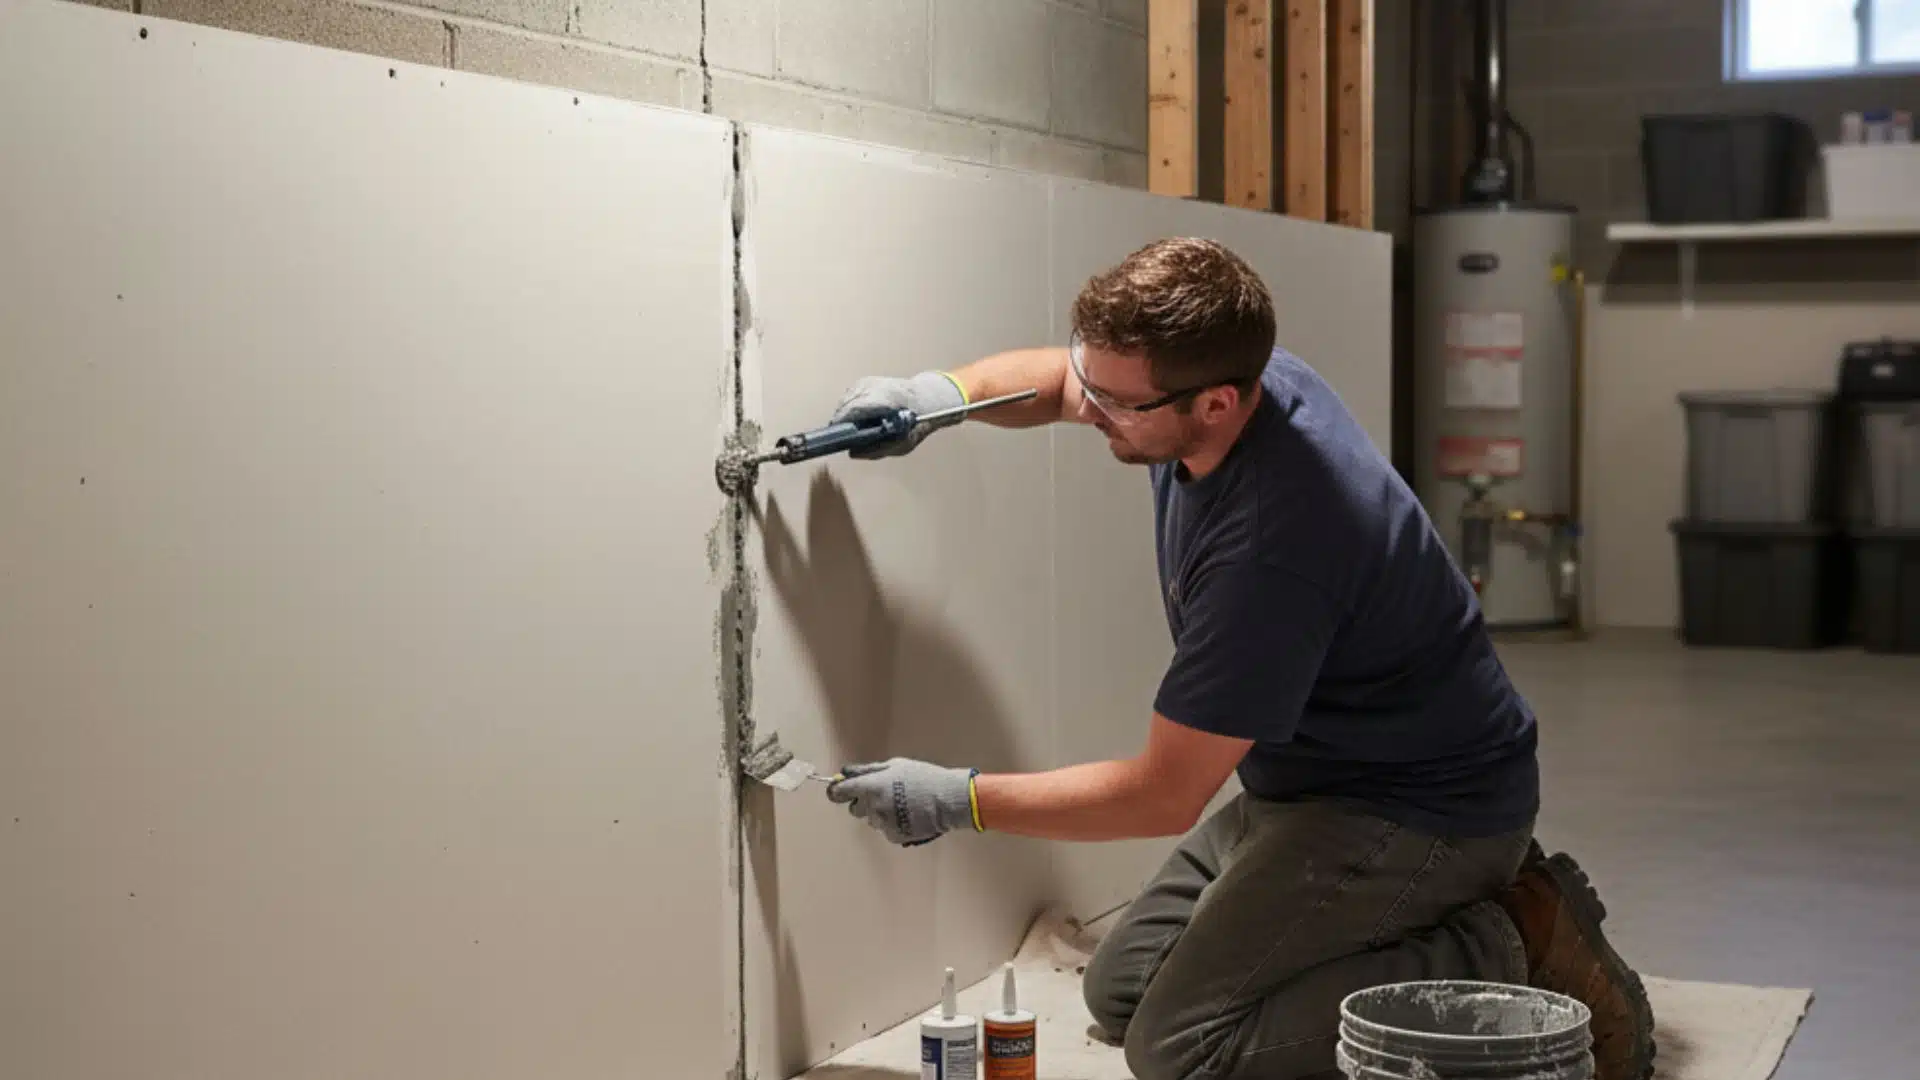
Step 1: Remove the Old Patch and Inspect the Crack

Start by removing any old patching material around the crack. Carefully inspect the crack for moisture, mold, or any damage.
This will help you identify any underlying issues before beginning repairs. It’s important to clean the area thoroughly to ensure that the new repair materials stick properly and the crack is fully sealed when the job is done.
Step 2: Drill Holes for Grease Fittings

Next, drill small holes along the crack in the basement wall. These holes will hold grease fittings, which are essential for pumping a special hydroactive gel into the crack.
Make sure the holes are spaced properly to ensure the gel fills the crack completely. Drilling the holes is an important step to secure the fittings for the gel application.
Step 3: Pump Hydroactive Gel into the Crack

After installing the grease fittings, connect the grease gun and begin pumping the hydroactive gel into the crack. The gel expands as it moves through the crack, sealing it from both inside and outside.
Be sure to continue pumping until the gel reaches the end of the crack. This step is crucial for creating a waterproof barrier that stops moisture from entering.
Step 4: Apply Super Slurry to Seal the Crack

Once the gel is in place, it’s time to apply a super slurry. This slurry is a thick, concrete-like material that fills any remaining gaps and seals the crack completely.
The slurry bonds with the concrete, creating a solid waterproof barrier. Apply it evenly across the crack, making sure to cover all exposed areas to prevent water infiltration.
Step 5: Finish with Super Crete for Extra Strength

Finally, apply a layer of Supercrete over the slurry. This material strengthens the concrete and seals the crack with an extra layer of protection.
Super crete bonds with the slurry and gel to form a durable, long-lasting repair. When it dries, the wall will be more solid and resistant to water, giving you a stronger and safer basement.
For more information, watch the detailed video explanation by American Dry Basement Systems.
Effective Bowing Wall Repair Methods

Several proven repair methods can stabilize and straighten bowing basement walls, depending on the severity of the damage.
I’ve outlined the most effective bowed basement wall repair solutions contractors use to fix foundation problems:
1. Carbon Fiber Straps
How it works: Thin, high-strength carbon fiber straps are bonded vertically to the wall to prevent further movement.
Advantages:
- Space-saving and low-profile (can be painted over)
- Quick installation with minimal disruption
- Permanent reinforcement
Ideal for: Walls with minor to moderate inward movement.
2. Wall Anchors
How it works: Steel rods connect indoor wall plates to anchor plates buried in stable soil outside. Tightening gradually pulls the wall back.
Advantages:
- Actively straightens walls over time
- Works well in clay or moisture-heavy soils
- Minimal interior disturbance
Ideal for: Walls showing significant bowing due to soil or hydrostatic pressure.
3. Steel I-Beams
How it works: Vertical steel beams brace the wall from the floor to the joists above, preventing further movement.
Advantages:
- Strong and long-lasting
- No exterior excavation required
- Excellent for major cracks or shifting
Ideal for: Walls under heavy pressure or showing extensive cracking.
4. Helical Tiebacks
How it works: Large steel rods are drilled diagonally through the wall into stable soil layers and attached to interior plates.
Advantages:
- Can realign walls quickly
- No exterior digging required
- Permanent structural reinforcement
Ideal for: Walls that are leaning or severely bowed due to heavy soil or water pressure.
5. Gorilla Wall Braces
How it works: Adjustable steel braces connect the floor joists to the wall base, applying gradual corrective pressure.
Advantages:
- Easy installation
- Allows controlled straightening over time
- Less invasive than wall anchors
Ideal for: Walls with moderate movement needing progressive realignment.
6. Shotcrete Reinforcement
How it works: A thick layer of concrete is sprayed onto the wall’s interior surface, often reinforced with steel mesh or rebar.
Advantages:
- Creates a new, durable surface
- Excellent for older or crumbling foundations
- Provides internal structural strength
Ideal for: Aging or damaged basement walls need a solid internal rebuild.
7. Poured Concrete Buttresses
How it works: Thick concrete supports are poured perpendicular to the damaged wall, pushing back against soil pressure.
Advantages:
- Extremely strong and permanent
- Reinforces even severely compromised walls
- Ideal for major structural restoration
Ideal for: Severely bowed or failing walls where other systems aren’t sufficient.
Repair Methods at a Glance
| Repair Method | Severity Level | Key Benefit | Space Required | Exterior Work |
|---|---|---|---|---|
| Carbon Fiber Straps | Mild–Moderate | Clean, permanent reinforcement | Minimal | No |
| Wall Anchors | Moderate–Severe | Gradually straightens the wall | Moderate | Yes |
| Steel I-Beams | Severe | Strong bracing | Some | No |
| Helical Tiebacks | Severe | Fast realignment | Minimal | No |
| Gorilla Wall Braces | Moderate | Adjustable over time | Minimal | No |
| Shotcrete Reinforcement | Moderate–Severe | Strengthens aging walls | Some | No |
| Concrete Buttresses | Extreme | Permanent structural fix | High | No |
When to Call a Professional for Basement Wall Problems
Some basement wall problems are too serious for DIY fixes and require a licensed foundation contractor with proper equipment and expertise.
Call a professional immediately if your wall bows inward more than two inches, as this indicates dangerous structural failure.
Major water intrusion that creates puddles or constant dampness needs expert waterproofing systems that you can’t install yourself safely.
Evidence of foundation shifting, like new diagonal cracks, doors that won’t close, or floors sloping, means your entire house needs evaluation.
Horizontal cracks wider than a quarter inch or multiple stair-step cracks signal severe pressure that DIY repairs can’t handle properly.
Foundation issues get worse fast when ignored, so getting professional help early saves you thousands in repair costs later.
Preventing Future Wall Damage
Preventing basement wall damage costs far less than fixing it, so taking proactive steps now saves you serious money later. Here are four essential prevention strategies that keep your foundation strong and dry for years:
- Manage exterior drainage properly: Make sure your yard slopes away from the house and gutters direct water at least six feet from the foundation.
- Install drainage systems: Add a sump pump or French drain to remove groundwater before it builds pressure against your basement walls constantly.
- Control indoor humidity levels: Use a dehumidifier to keep basement humidity below fifty percent and prevent moisture from weakening walls over time.
- Inspect foundation regularly: Check your basement walls twice yearly for new cracks, dampness, or bowing so you catch problems early and cheaply.
Following these simple maintenance habits protects your foundation investment and prevents expensive emergency repairs down the road. Small preventive actions today stop major structural headaches that cost thousands to fix tomorrow.
Wrapping It Up
You now have the knowledge to tackle basement wall repair problems before they spiral out of control and cost you thousands.
Understanding the causes helps you prevent future damage through simple maintenance habits that take minimal time and effort.
Most minor cracks and moisture issues are weekend DIY projects that protect your home without completely breaking your budget.
Serious structural problems require professional contractors, but catching issues early means smaller repairs and lower costs overall.
I recommend inspecting your basement walls every spring and fall to spot problems when they’re still cheap to fix. Drop a comment below sharing your basement wall questions or telling me which fix saved your foundation.


