Soap scum always seemed impossible to deal with, leaving my bathroom looking cloudy and less fresh.
Over time, I found that the best way to remove soap scum is by working with simple, natural cleaners rather than harsh chemicals.
I like to spray a vinegar solution to loosen the film, then follow up with a gentle scrub using baking soda. That combination helps me break down even the most stubborn buildup.
Learning how to get rid of soap scum gave me more confidence in tackling bathroom chores, and now I make it a habit to wipe surfaces dry after each use.
This small change keeps the space cleaner and makes the job much less overwhelming.
What is Soap Scum, and Why is it So Tough to Remove?
Soap scum, also known as lime soap, is the hazy white or gray film that forms when soap reacts with hard water minerals like calcium and magnesium, then mixes with skin oils.
The result is a sticky residue that clings tightly to tiles, shower doors, faucets, and even fabrics. Over time, this buildup thickens, hardens, and can even fuse with mildew, making it especially tough to tackle. That’s why tubs feel grimy and glass surfaces look cloudy, no matter how much you scrub.
Ordinary rinsing won’t easily remove soap scum because of its gritty, bonding nature.
If you’re wondering how to clean years of soap scum, the key lies in using targeted cleaning solutions that dissolve mineral buildup and restore bathroom surfaces to a sparkling finish.
Why Deep Cleaning Years-Old Soap Scum Requires a Strategy?
Years of accumulated soap scum create multiple layers of buildup that standard cleaning methods simply can’t penetrate.
Understanding the complexity of this challenge helps you choose the right approach and set realistic expectations for the cleaning process. Here’s a simple breakdown to help guide the process:
| Challenge | Impact | Solution |
|---|---|---|
| Built-up layers | Standard cleaners can’t penetrate multiple layers | Use stronger solutions with 15-20 minute dwell times |
| Different surface materials | Glass, metal, fiberglass, and grout need different approaches | Test first, match cleaner strength to surface type |
| Combined buildup types | Soap scum mixes with mineral scale and grime | Use combination tactics: acids for minerals, alkaline for soap |
Note: Success requires patience over force. Allow solutions time to work and be prepared to repeat treatments. Gentle, repeated cleaning prevents costly surface damage.
Mild Everyday Solutions To Remove Soap Scum: Best for Light Buildup

These gentle cleaning methods use common household ingredients to tackle everyday dirt and grime without harsh chemicals. Each solution is safe for regular use and effective on most bathroom and kitchen surfaces.
1. Dish Soap + Vinegar Spray
This powerful combination cuts through grease and soap scum while being gentle on surfaces. The dish soap provides degreasing action while vinegar dissolves mineral deposits and adds antibacterial properties.
- Step 1: Mix 1 tablespoon of liquid dish soap with 1 cup of white vinegar in a spray bottle
- Step 2: Add 1 cup of warm water and shake gently to combine ingredients
- Step 3: Spray the solution onto surfaces and let it sit for 2-3 minutes
- Step 4: Wipe clean with a microfiber cloth or soft sponge
- Step 5: Rinse with clean water and dry with a lint-free towel
2. Baking Soda + Vinegar
This classic combination creates a natural fizzing reaction that helps break down stubborn buildup and soap film. The abrasive action of baking soda combined with vinegar’s acidity makes it perfect for tackling tough stains.
- Step 1: Sprinkle baking soda generously over the surface you want to clean
- Step 2: Spray white vinegar directly onto the baking soda to create fizzing action
- Step 3: Allow the mixture to bubble and work for 5-10 minutes
- Step 4: Scrub gently with a soft brush or sponge to lift stubborn residue
- Step 5: Rinse thoroughly with water and wipe dry with a clean cloth
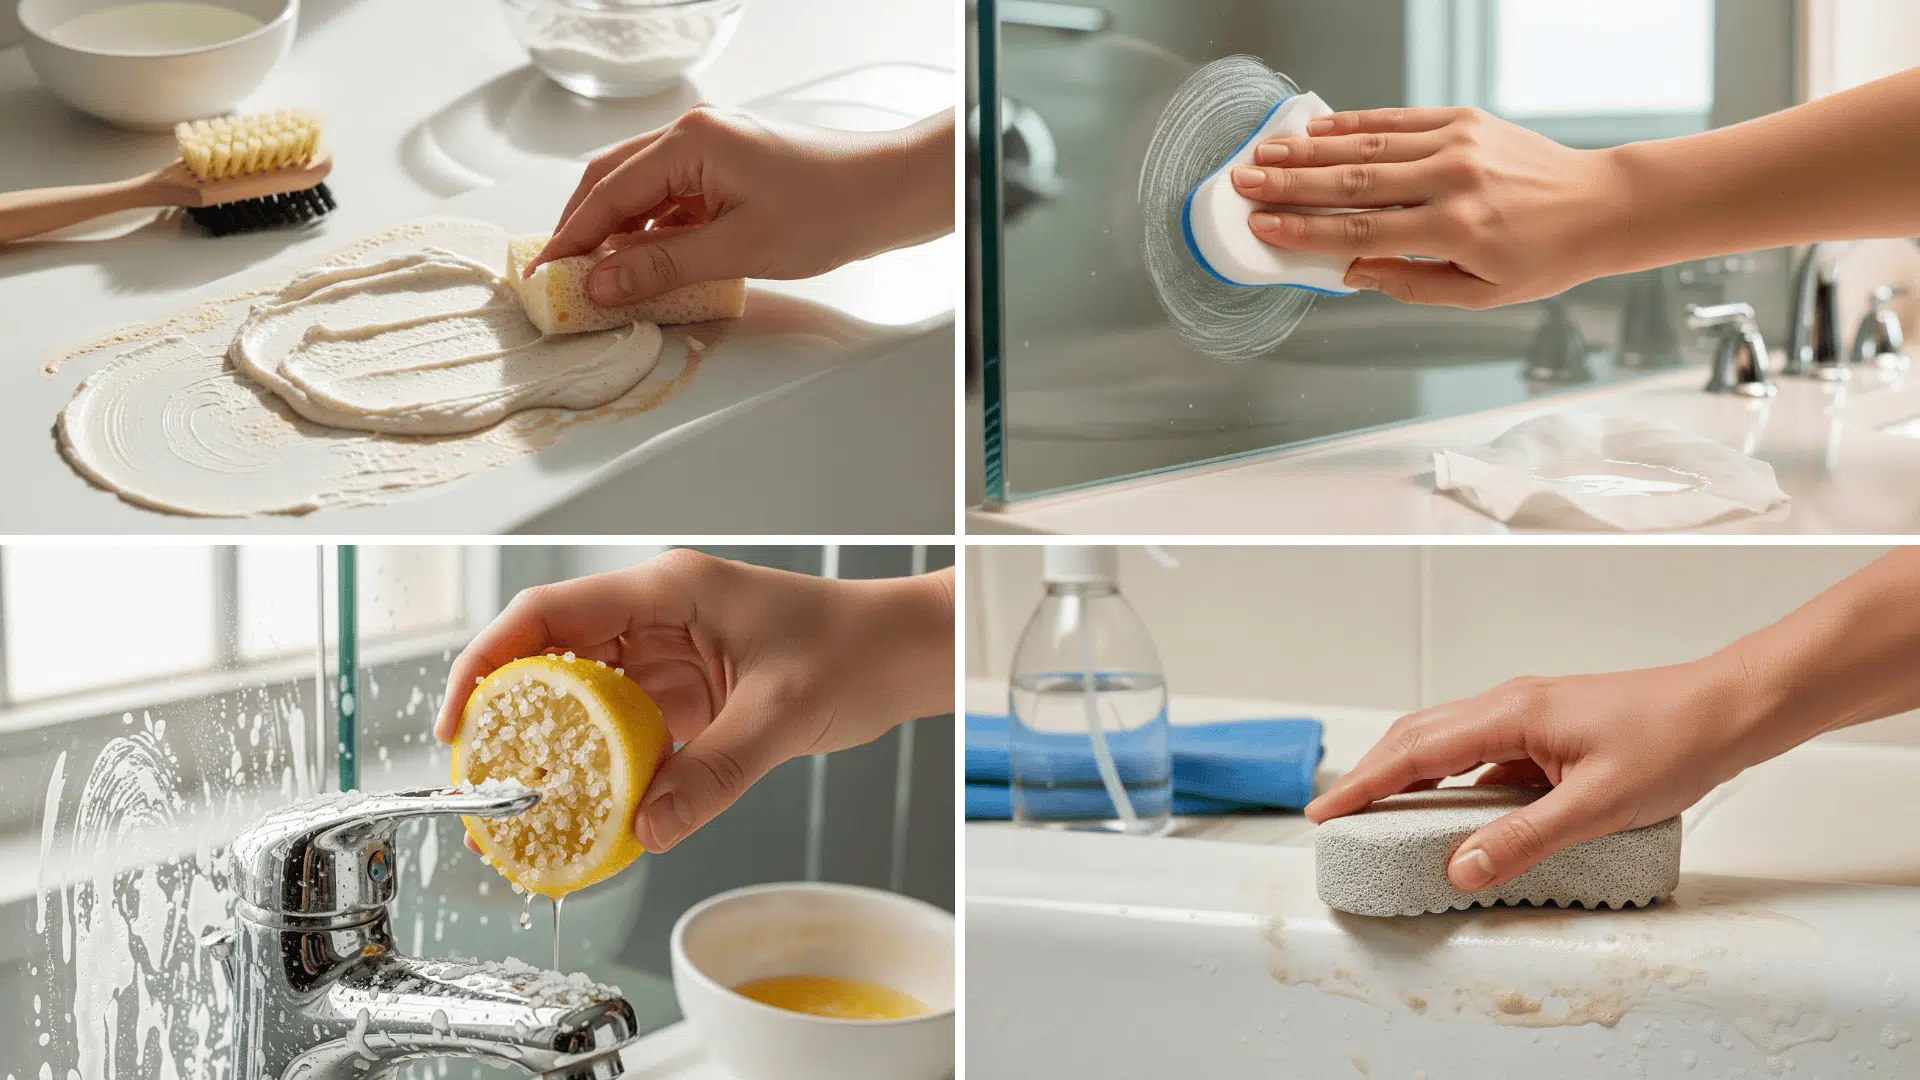
3. Lemon Juice Scrub
The natural citric acid in lemons effectively dissolves soap scum and mineral deposits while leaving a fresh, clean scent. This method is particularly effective on chrome fixtures and glass surfaces without causing scratches.
- Step 1: Cut a fresh lemon in half and dip the cut side in coarse salt or baking soda
- Step 2: Rub the lemon directly onto fixtures, faucets, and glass surfaces
- Step 3: For larger areas, mix 1/4 cup fresh lemon juice with 2 tablespoons salt
- Step 4: Let the natural acids work for 3-5 minutes before scrubbing gently
- Step 5: Rinse with warm water and buff dry for a streak-free, fresh-scented finish
Moderate Cleaning Methods: Best for Stubborn Buildup

When mild solutions aren’t enough, these moderate cleaning methods provide extra strength to tackle persistent soap scum and buildup. These techniques use slightly more aggressive ingredients while remaining safe for most surfaces:
4. Hydrogen Peroxide + Baking Soda Paste
This powerful combination creates an oxidizing paste that breaks down organic buildup and minor mildew. The paste consistency allows it to cling to surfaces longer for deeper cleaning action.
- Step 1: Mix 3 tablespoons of baking soda with 1 tablespoon of 3% hydrogen peroxide to form a thick paste
- Step 2: Apply the paste generously to affected areas using a sponge or your fingers
- Step 3: Let the paste sit for 10-15 minutes to allow the oxidizing action to work
- Step 4: Scrub gently with a soft brush or sponge, adding more paste if needed
- Step 5: Rinse thoroughly with warm water and wipe clean with a damp cloth
5. Vinegar + Cornstarch Spray
This thickened vinegar solution clings better to vertical surfaces, providing extended contact time for stubborn buildup. The cornstarch acts as a natural thickening agent that helps the cleaner stick where you need it most.
- Step 1: Mix 1 tablespoon of cornstarch with 2 tablespoons of water to create a smooth slurry
- Step 2: Add the slurry to 1 cup of white vinegar in a spray bottle and shake well
- Step 3: Spray the thickened solution onto vertical surfaces and let it cling for 10-15 minutes
- Step 4: Scrub with a non-abrasive sponge, working in circular motions
- Step 5: Rinse with warm water and dry with a microfiber cloth
6. Magic Eraser or Dryer Sheets
These household items work through different mechanisms: melamine foam (Magic Eraser) acts as a micro-abrasive, while dryer sheets contain surfactants that help dissolve soap film. Both are gentle yet effective on glass and metal surfaces.
- Step 1: Dampen a Magic Eraser or dryer sheet with warm water (don’t oversaturate)
- Step 2: Gently rub the surface in small circular motions, applying light pressure
- Step 3: For dryer sheets, let the surfactants work for 2-3 minutes before wiping
- Step 4: Continue rubbing until the soap scum begins to lift and dissolve
- Step 5: Rinse the surface with clean water and buff dry with a soft towel
Heavy-Duty Methods: Best for Years of Soap Scum

For severe buildup that has accumulated over the years, these heavy-duty methods provide maximum cleaning power. Use these techniques sparingly and always test on an inconspicuous area first.
7. Borax + Water Paste
This mineral-based cleaner provides strong alkaline cleaning action that dissolves stubborn soap scum and mineral deposits. Borax is particularly effective on porcelain and ceramic surfaces without causing damage.
- Step 1: Mix 1/2 cup of borax powder with enough warm water to form a thick paste
- Step 2: Apply the paste to heavily soiled areas using a sponge or cloth
- Step 3: Allow the paste to sit for 15-20 minutes to penetrate the buildup
- Step 4: Scrub vigorously with a stiff brush, adding more paste as needed
- Step 5: Rinse multiple times with warm water and dry completely with a clean towel
8. Commercial Cleaners (CLR, Kaboom, Scrubbing Bubbles)
Professional-strength cleaners contain powerful acids and surfactants designed for rapid soap scum removal. These products work quickly but require proper ventilation and careful handling according to the manufacturer’s instructions.
- Step 1: Ensure adequate ventilation and wear gloves before applying the commercial cleaner
- Step 2: Spray or apply the product according to package directions, covering all affected areas
- Step 3: Allow the cleaner to work for the recommended time (usually 3-10 minutes)
- Step 4: Scrub with a non-abrasive sponge or brush as directed on the product label
- Step 5: Rinse thoroughly with plenty of water and ventilate the area well
9. Pumice Stone (Wet Only)
This natural volcanic rock acts as a gentle abrasive for the most stubborn, calcified soap scum deposits. Use only on porcelain surfaces and always keep both the stone and surface wet to prevent scratching.
- Step 1: Wet both the pumice stone and the surface thoroughly with warm water
- Step 2: Gently rub the wet pumice stone on the hardened soap scum using light pressure
- Step 3: Keep both surfaces wet throughout the process, rewetting as needed
- Step 4: Work in small sections, checking progress frequently to avoid over-scrubbing
- Step 5: Rinse completely and inspect the surface, repeating if necessary on remaining buildup
Busting Common Myths: What Really Works to Prevent Soap Scum
Soap scum feels like one of those things you can’t avoid, but a lot of what people believe about it just isn’t true.
Knowing the real facts can save you a ton of time and keep your bathroom looking cleaner. Here are things that actually matter:
- Bar soap does cause scum. It reacts with minerals in hard water, while liquid soap leaves less buildup.
- Rinsing isn’t enough. You need to wipe or squeegee surfaces dry after every use.
- Vinegar helps, but not alone. It works best when paired with drying and steady cleaning.
- Water filters aren’t the full answer. A water softener does more because it removes minerals.
- Hot water speeds up the buildup. Heat makes the reaction that causes soap scum to happen faster.
- Smooth glass and tiles show more. Soap scum clings to shiny surfaces quickly than rough ones.
- Quick cleaning makes a difference. Small wipe-downs stop heavy layers from forming later.
- Less soap means less residue. Using only what you need cuts down on buildup.
Keeping these simple truths in mind makes soap scum way easier to manage. Instead of scrubbing hard later, small smart habits now will keep your bathroom cleaner and save you the frustration.
Conclusion
After learning about removing soap scum and how to prevent it effectively, I feel more in control of keeping my bathroom clean and fresh.
It’s not about constant scrubbing but smarter habits: choosing the right soap, drying surfaces, and managing water quality really make a difference.
Now, I tackle soap scum before it becomes a problem and enjoy a brighter, more inviting bathroom every day. If soap scum has been a frustrating challenge, why not try one of these simple tips today?
Take the first step to a sparkle that lasts longer; you might be surprised how easy it is to maintain!