Wiring a light switch might sound a bit tricky at first, but trust me, it’s one of the simpler electrical projects you can take on at home.
If you’ve ever asked yourself how to wire a light switch safely, this guide is here to walk you through it. I’ll show you the tools you’ll need, explain how different switches work, and break down how to connect the wires step by step.
I’ll also share diagrams, point out mistakes you should avoid, and give you quick tips for troubleshooting. By the end, you’ll feel ready and confident to handle a basic switch installation on your own.
What You Need to Know Before Wiring a Light Switch
Before you start wiring a light switch, it’s essential to prepare properly. Safety comes first, so always shut off power at the breaker and double-check with a tester.
Gather your tools in advance, including a screwdriver, wire stripper, voltage tester, and the correct switch. Make sure you understand the three basic wires: hot, neutral, and ground.
Knowing their roles and how to wire a switch safely will prevent mistakes and keep your work safe. With preparation complete, you’ll be ready to move step-by-step without rushing or guessing during the installation.
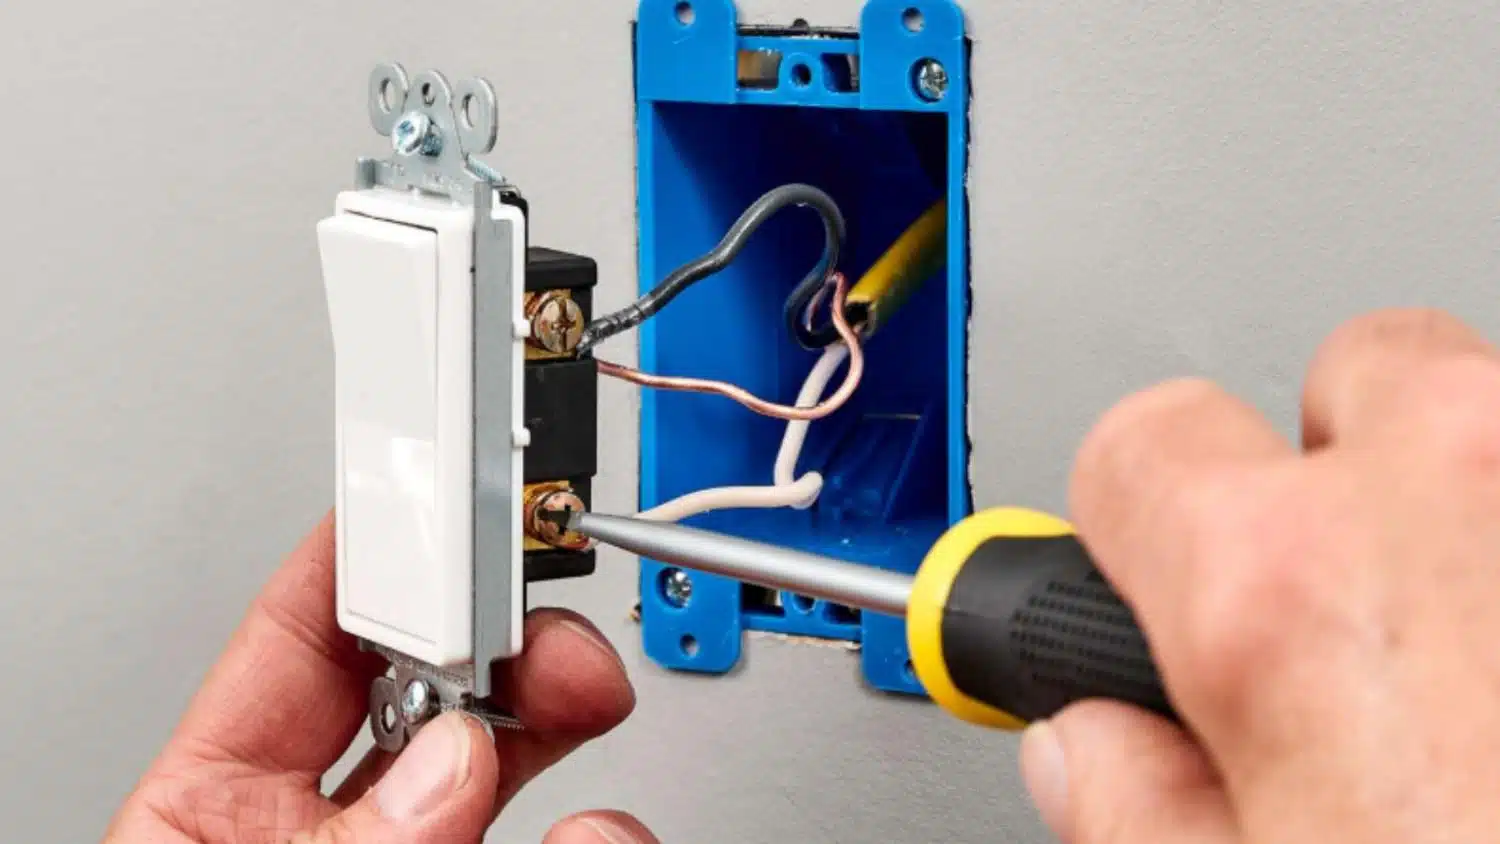
How to Wire a Light Switch

A single-pole switch is the most common household setup. Follow these simple steps to wire it safely and correctly:
Step 1: Turn Off Power
Always start by shutting off the power at the breaker panel. Confirm the circuit is dead with a voltage tester before touching wires. This step prevents electrical shock and ensures you can work safely.
Skipping this step is dangerous and can cause serious injury. Make sure the breaker is labeled correctly, and never assume the power is off until tested.
Step 2: Identify Wires
Locate the three key wires inside the switch box: the hot wire (black), the neutral wire (white), and the ground wire (bare or green). The hot wire carries electricity from the breaker, the neutral completes the circuit, and the ground provides safety.
Correctly identifying each wire avoids mistakes that can trip breakers or damage the switch. If colors aren’t clear, use a tester to confirm.
Step 3: Connect Hot, Neutral, and Ground
Attach the hot wire to the brass screw, the neutral wire to the silver terminal, and the ground to the green screw. Tighten each connection firmly to prevent loose wires, which can cause sparks or failures.
Keep wires neat and positioned correctly. If the box is crowded, gently fold the wires to fit without crimping. Solid connections are critical for safety.
Step 4: Secure Switch and Test
Once wires are connected, carefully push the switch into the electrical box. Fasten it with mounting screws and attach the cover plate. Restore power at the breaker and flip the switch to confirm proper operation.
If the light doesn’t turn on, double-check each wire connection. Testing ensures the job is done safely and correctly before considering the project complete.
Types of Light Switches
Not all light switches work the same way. Knowing the different types will help you choose the right one for your space and make wiring much easier. Here are some types:
| Switch Type | Common Use | Key Feature |
|---|---|---|
| Single Pole | Standard lights or outlets | One switch controls one light/outlet |
| Double Pole | Heavy appliances or 240V circuits | Two hot wires control a higher voltage |
| Three-Way | Hallways, stairs, large rooms | Two switches control the same light |
| Four-Way | Complex lighting setups | Works with three-way switches for multiple switches |
| Two-Way (UK/EU) | Lights from two locations | Similar to a US three-way switch setup |
With a clear view of each switch type, it’s easier to decide which one fits your needs and makes your setup work the way you want.
Comparing Different Light Switch Wiring Setups
Light switch wiring can change depending on the type of switch and how many lights you want it to control. Understanding the setups makes the job easier and helps avoid mistakes.
Single Pole, Three-Way or Four-Way
Single-pole wiring is the simplest and most common for basic lights. Three-way setups let you control one light from two locations, while four-way systems allow even more switches to control the same fixture.
Each option has its purpose, and knowing the differences helps you decide which wiring method is the best fit for your project.
Which Setup Do You Need?
The right setup depends on how many switches will control your lights. If you want one switch, choose a single-pole switch. For two switches in different locations, pick a three-way.
If you need three or more switches for a single fixture, use a four-way system combined with three-way switches. Matching the setup to your space ensures convenience and safety.
Pros and Cons of Each Switch Setup
Every light switch setup has its advantages and drawbacks. To help you see the differences more clearly, here’s a quick breakdown of the pros and cons of each type:
| Setup Type | Pros | Cons |
|---|---|---|
| Single Pole | Simple, affordable, easy to install | Only one control point |
| Three-Way | Two switches control one light, good for stairs | Slightly more complex wiring |
| Four-Way | Allows three or more switches to control a light | Requires more wiring skill and planning |
Wiring Diagrams for Different Light Switch Connections
Now that you understand the basics and the pros and cons of each switch type, let’s look at wiring diagrams. These visuals will help you see how the connections actually come together in practice:
2-Wire Diagram

A 2-wire diagram is the simplest layout. It uses one hot wire and one neutral to control a light fixture. The hot connects to the switch, while the neutral runs directly to the light.
This setup is common in older homes but may lack a ground wire. Understanding this diagram helps beginners recognize a basic switch circuit and its limitations.
3-Wire Diagram

A 3-wire diagram adds more flexibility. It includes a hot wire, a neutral, and a ground wire for safety.
The hot connects to the switch, the neutral goes to the light, and the ground connects to the switch body. This setup is standard in modern wiring and complies with safety codes. It provides a safer, more reliable circuit for everyday lighting.
4-Wire Diagram

A 4-wire diagram is used in more complex setups, such as a four-way switch arrangement. It includes two traveler wires, one hot, and a ground.
The traveler wires allow multiple switches to control the same light fixture. This setup is common in large rooms, staircases, or hallways. Although slightly more advanced, the diagram shows how each wire supports added control points.
Switch and Outlet Combo

A switch and outlet combo diagram shows how to power both devices in one box. The hot wire is split, feeding the switch and the outlet separately.
The neutral wire connects to the outlet, and the ground is shared. This configuration is handy when space is limited or when you want a light switch and outlet together. It requires careful wiring.
Troubleshooting and Common Issues
Even with careful wiring, problems can happen. These points cover the most common issues and how you can fix them:
- Wires not matching colors: Use a tester to identify hot, neutral, and ground instead of relying only on color codes.
- Switch doesn’t work after installation: Double-check connections, ensure the breaker is on, and confirm wires are tightened securely.
- Light flickers or buzzes: Loose connections or incorrect wiring can cause this — retighten screws and verify correct wire placement.
- Breaker keeps tripping: This usually means a short circuit. Disconnect and recheck wiring before restoring power.
When to Call an Electrician
Some wiring projects are best left to professionals. If you face a setup with three-way or four-way switches and feel unsure, an electrician can ensure the job is safe and up to code.
Call for help if breakers keep tripping, wires are burned or damaged, or the box feels too crowded to manage safely. If wire colors don’t match any guide, an expert can identify them correctly.
Electrical mistakes can cause fires or shocks, so when in doubt, hiring an electrician protects your home and your safety.
Where to Buy Switches and Tools
Finding the right place to purchase wiring supplies saves time and ensures quality. You can shop at well-known retailers like Home Depot, Lowe’s, or Amazon, all of which carry a wide range of switches, outlets, and tools.
These stores often provide delivery or in-store pickup, making it convenient to get what you need quickly. When it comes to brands, look for trusted names such as Leviton and Lutron, both known for reliable switches and modern designs.
Buying from reputable retailers and established brands guarantees safer installations and longer-lasting results for your light switch project.
Conclusion
Learning how to wire a light switch is easier when you follow a step-by-step process and keep safety first. You’ve now seen how different wiring setups compare, how to handle a single-pole switch, and what mistakes to avoid.
This knowledge gives you the confidence to complete a simple project or know when to call an electrician. Always double-check power, connections, and tools before finishing the job.
With practice, you’ll feel more comfortable working with switches and small electrical upgrades.
Want more practical help with home wiring and DIY projects? Keep checking my other guides for simple tips that save time and keep your work safe!