Setting up your first reloading bench can feel like a big step, but it’s also exciting. I remember how much smoother everything became once I found a setup that worked for me.
A solid bench isn’t just about having a spot to work. It plays a role in safety, speed, and comfort. The right height keeps your back from aching, and good organization saves time when you’re in the middle of a project.
Here, I’ll share practical reloading bench ideas that work for different spaces and budgets. From compact garages to full-size rooms, you’ll find setups that keep your work safe, efficient, and more enjoyable.
Reloading Bench Ideas for Every Space
Reloading setups don’t have to look the same. The right bench depends on how much space you have, how often you reload, and whether your area is permanent or shared.
Below are several practical ideas to fit different needs and environments:
1. Corner Benches for Small Workshops

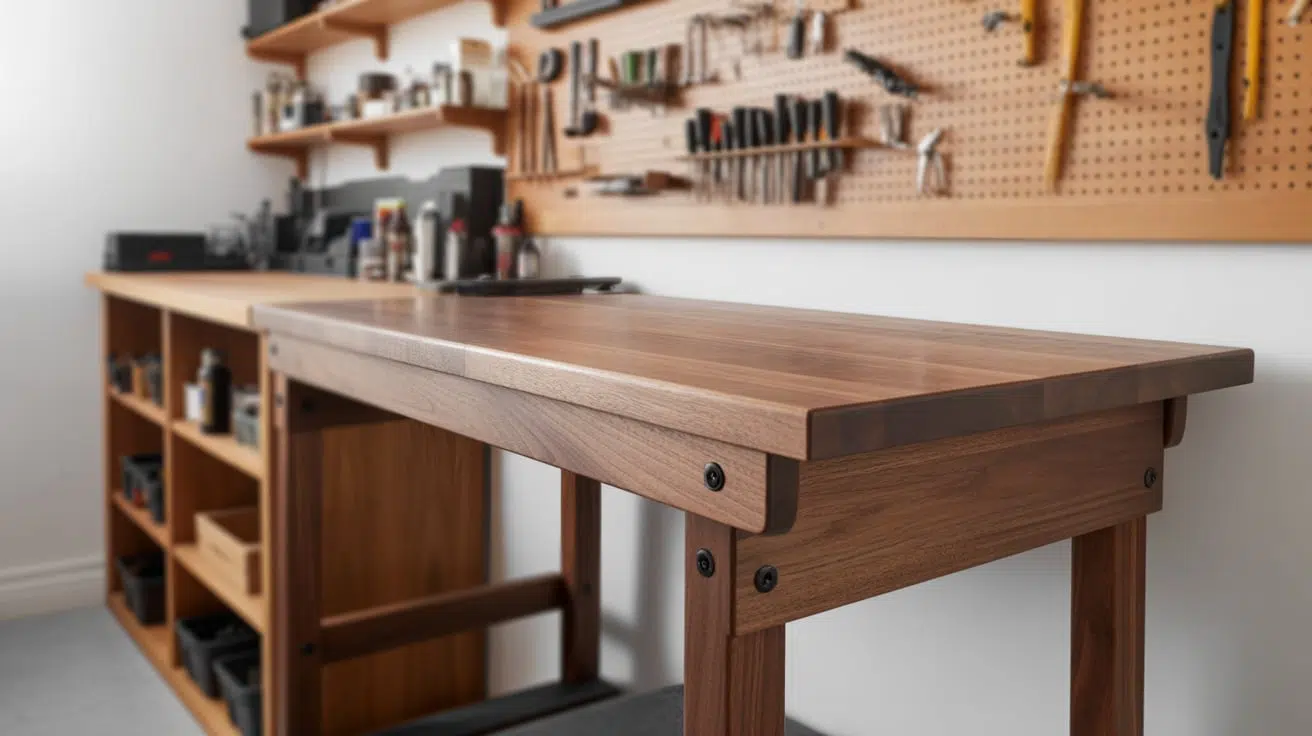
Tight spaces can still support a reliable reloading setup. A corner bench makes efficient use of limited room while keeping tools close at hand. Add wall shelves or pegboards above to maximize vertical space without cluttering the work area.
2. Compact 4-Foot Garage Bench

For single-car garages, a sturdy 4-foot bench is often enough. Position it along the wall to free up floor space and ensure stability under press torque. A narrow shelf above the bench keeps scales, manuals, or powder measures within easy reach.
3. Portable Options for Apartments

Apartment reloaders benefit from mobility and concealment. A rolling cart can serve as a temporary bench that tucks away when not in use. Storage ottoman benches also double as furniture while discreetly holding supplies and tools.
4. L-Shaped Benches for Full-Size Rooms

If you have a dedicated reloading room, an L-shaped bench offers maximum workspace. One side can handle case prep while the other is set up for presses and dies. This separation of tasks keeps the workflow smooth and organized.
5. Folding Benches for Shared Spaces

Shared garages or basements require flexibility. A wall-mounted folding bench stores flat when not needed, freeing up valuable space. Pair it with a toolbox on wheels so you can move equipment easily and set up quickly.
6. Heavy-Duty Permanent Installations

For high-volume reloaders, nothing beats a solid permanent bench. Built from 2×4 framing and thick plywood, these designs handle heavy presses and swaging operations. Anchoring the bench to walls or shelves improves stability and longevity.
7. Modular and Quick-Change Setups

Advanced reloaders often prefer modular systems that allow presses and tools to be swapped quickly. Quick-change mounts, aluminum rails, and adjustable stations make it easy to reconfigure the bench for different calibers or workflows.
How to Build a Reloading Bench: Step-by-Step Guide
A sturdy reloading bench keeps your work safe and steady. The plan below fits most garages and small workshops and can be adjusted to your space.
Tools Required
- Tape measure & carpenter’s square
- Circular saw or miter saw
- Drill/driver + drill bits
- Clamps (4+)
- Socket set or wrenches (for bolts)
- Jigsaw (for cutouts)
- Sander or sanding block
- Pocket hole jig (optional, for drawers/frames)
Step 1: Build the Base and Legs

Cut four 4×4 legs to 34.5″ for a 36″ bench height with a 1.5″ top. Make a 2×4 rectangle for the top support (about 24″×48″ or your target footprint).
Clamp each leg flush, level the frame, and drill for 3/8″ bolts. Set bolt pairs at 45° for better load spread. Flip, square, and tighten all hardware.
Step 2: Make the Benchtop

Rip the rounded edges off 2×12s. Biscuit-glue and screw the boards into a slab. Cut to a 60″ final length. Fill gaps with wood putty and sand smooth.
Add 6″ bump-outs along the front for presses or vises. Drill 1.5″ radius corners, then cut the waste with a circular saw or jigsaw. Mount the top to the base.
Step 3: Add a Back Shelf/Hutch

Build a 43″-wide shelf unit from 1×6 pine. Dado the ends and the center divider for shelves. Glue, nail, square, and clamp to dry. Leave clearances on both sides for powder measures or other tools you’ll mount near the top.
Step 4: Frame the Lower Storage

Create a 2×4 inner frame that fits between the legs so panels sit flush. Use pocket screws for quick assembly. Cut a plywood deck for the bottom if you want a full shelf. Heavier items stored low will add mass and reduce bench flex.
Step 5: Build Drawers and Install Slides

Make drawer boxes from 1×6 with dado grooves for 1/4″ plywood bottoms. Glue, clamp, and pin-nail. Use heavy-duty, full-extension slides to support brass and bullets.
Expect minor tweaks; dimensional lumber varies. Adjust slides until motion is smooth.
Step 6: Skin, Finish, and Final Setup

Rip 1×6 into 1×2 rails and stiles, pocket-screw into frames, and route a notch for wainscoting panels. Add cleats to the legs and fasten the side/front panels.
Stain the base (e.g., dark walnut), then paint for a rustic shop look. Finish the top with Danish oil for easy cleanup. Mount presses on the bump-outs and checks for zero wiggle at full handle stroke.
Quick safety notes: wear eye protection, keep fingers clear while cutting, and store primers and powders separately.
For more details, check out the video tutorial:
Smart Storage and Organization Tips for Your Reloading Bench
A reloading bench works best when everything has its place. Good storage and smart organization save time, improve safety, and make the whole process smoother.
Here are some easy tips to keep your bench in order:
- Use wall space wisely: Pegboards are perfect for tools and small parts, while shelves keep powders and bullets stored safely above the bench.
- Separate components for safety: Never store powders and primers together. Keep primers in their own locked container, away from heat and sparks.
- Plan for quick-change mounts: Different press manufacturers use different bolt patterns. Designing your bench to accept quick-change plates will save time and effort.
- Organize small parts: Plastic drawers or compartment boxes work well for screws, springs, and dies. Label each drawer clearly to avoid mix-ups.
- Sort and store brass: Use bins, buckets, or trays. Keep brass separated by caliber and stage of processing, and always store dirty brass away from clean components.
Safety in Reloading Bench Setup
Reloading can take hours at a time, so the way your bench is set up directly affects comfort, accuracy, and safety.
Paying attention to details like height, lighting, and seating will keep you working longer without strain.
| Aspect | Tip |
|---|---|
| Bench height | Keep elbows slightly bent while using the press to reduce fatigue and maintain accuracy. |
| Lighting | Use LED strips or angled lamps to prevent shadows and avoid glare on scale displays. |
| Anti-fatigue mats | Cushion feet and legs during long sessions while also catching small dropped parts. |
| Ventilation | Run a fan or vent system to move air and limit powder residue buildup. |
| Chair or stool height | Choose an adjustable seat with back support to match bench height and prevent strain. |
By focusing on ergonomics and safety, your bench becomes a space that’s not only efficient but also comfortable and secure for every reloading session.
Common Mistakes to Avoid with Reloading Benches
When building or setting up a reloading bench, a few missteps can cause frustration, wasted money, or even safety risks. Keeping these in mind will help you create a workspace that lasts and works the way you need it to.
- Using weak materials: Particle board and thin plywood may sag or break under press torque. Solid wood or doubled-up plywood is a safer choice.
- Setting the wrong height: A bench that’s too high or too low leads to fatigue. Aim for a height where your elbows stay slightly bent while working.
- Neglecting stability: A bench that isn’t anchored or weighted down will wobble, which can throw off your accuracy and damage tools.
- Poor lighting setup: Shadows or glare around your scale and cases increase the chance of mistakes. Clear, even light is essential.
- Mixing powders and primers: Storing them together is dangerous. Always keep them in separate, secure containers.
- Skipping organization: A messy bench slows you down and increases errors. Use bins, pegboards, or drawers to keep everything in place.
Avoiding these mistakes ensures your bench is safe, durable, and comfortable to use every time you reload.
Final Thoughts
Your first bench doesn’t need to be perfect. Start with something solid, then improve it as you go. I’ve done the same, and each change made my setup better.
What matters most is safety, comfort, and keeping your tools and components organized.
The reloading bench ideas we covered give you options that work in small spaces, garages, or even full workshops.
Select the option that best suits your needs, and remember that incremental upgrades over time can make a significant difference.
I hope these ideas help you build a bench that feels right for you. If you want more tips and inspiration, take a look at some of my other posts on the website!