I’ve always loved how a simple bench can completely change the feel of a space. Whether it’s near the front door, in your garden, or at the dining table, the right bench design adds both comfort and personality to your home.
It’s one of those pieces that can be functional, stylish, and even fun to make yourself.
In this blog, I’ll share a mix of creative bench ideas, from modern slatted benches to rustic reclaimed-wood styles.
You’ll also find DIY step-by-step instructions, tips for choosing the right materials and measurements, and styling ideas to help you place your bench perfectly, indoors or outdoors, for a beautiful and practical finish.
Why Bench Designs Matter?
Benches do more than provide a place to sit; they define spaces. A sleek wood bench can elevate your dining area, while a cozy cushioned bench can warm up an entryway.
Outdoors, a sturdy metal or reclaimed-wood bench adds both charm and durability.
Key reasons to focus on design:
- Functionality: Adds seating and sometimes storage.
- Style Impact: Acts as a focal point in any room or garden.
- DIY Appeal: Many bench styles are beginner-friendly and budget-friendly.
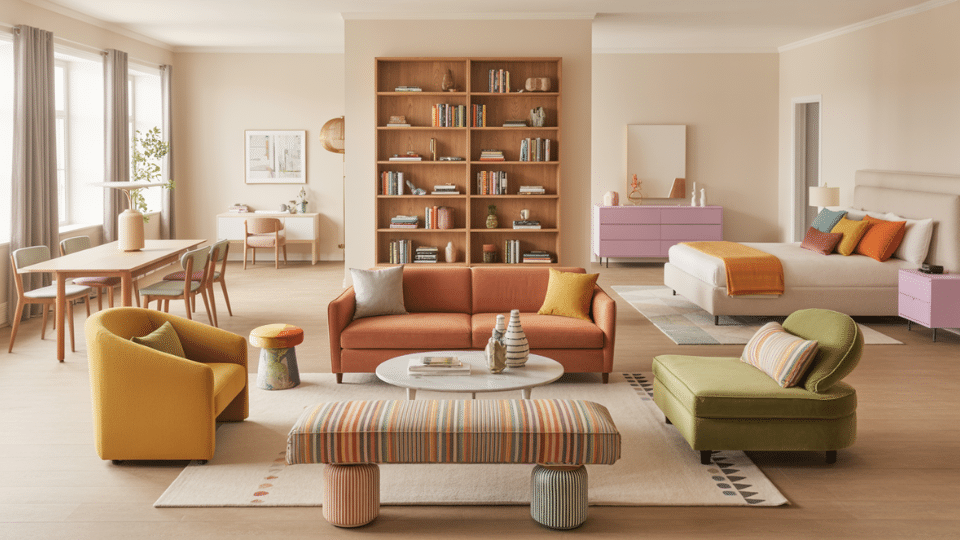
Creative and Easy DIY Bench Designs
Here are some creative and easy bench designs that blend style, comfort, and practicality, perfect for any space, whether you’re going for modern, rustic, or classic vibes.
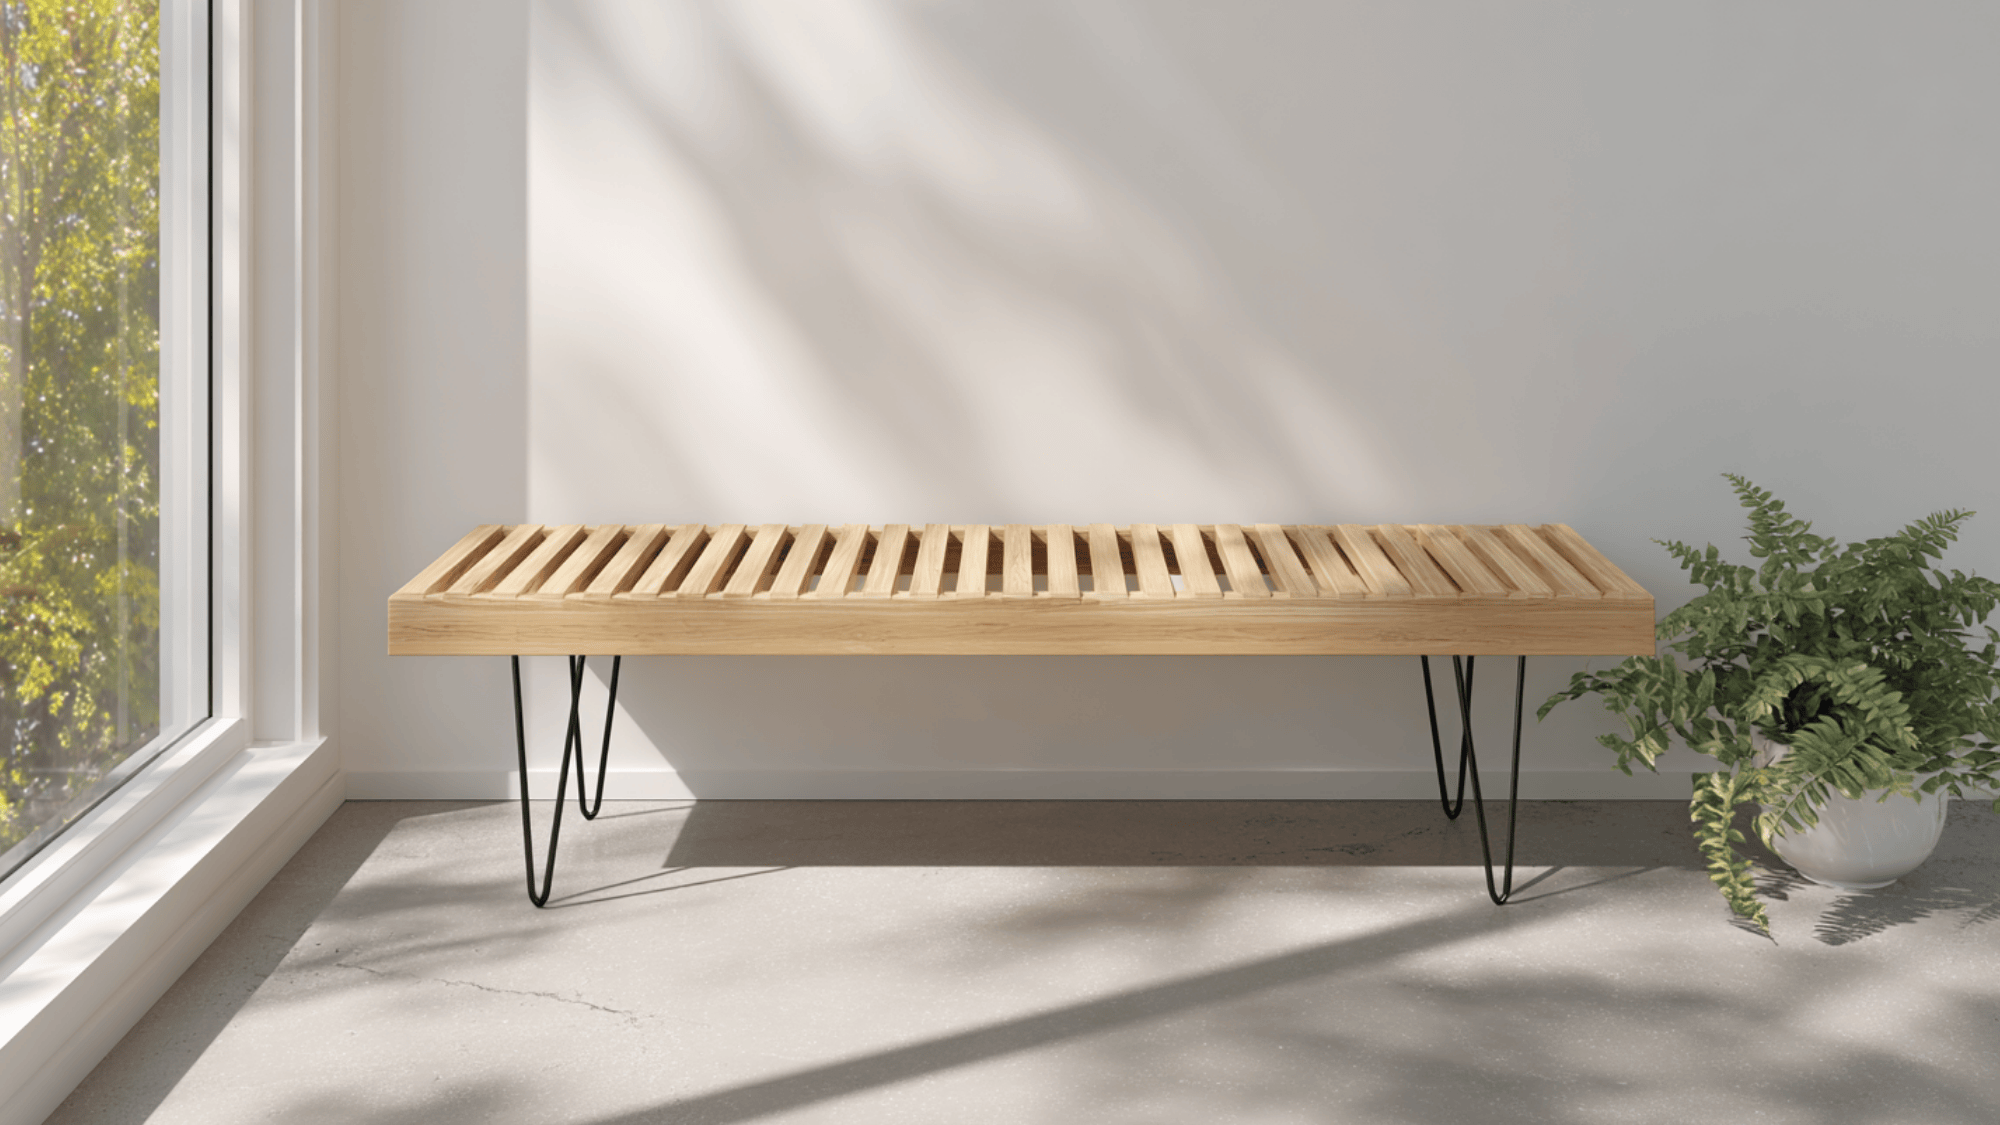
1. Modern Slatted Wood Bench
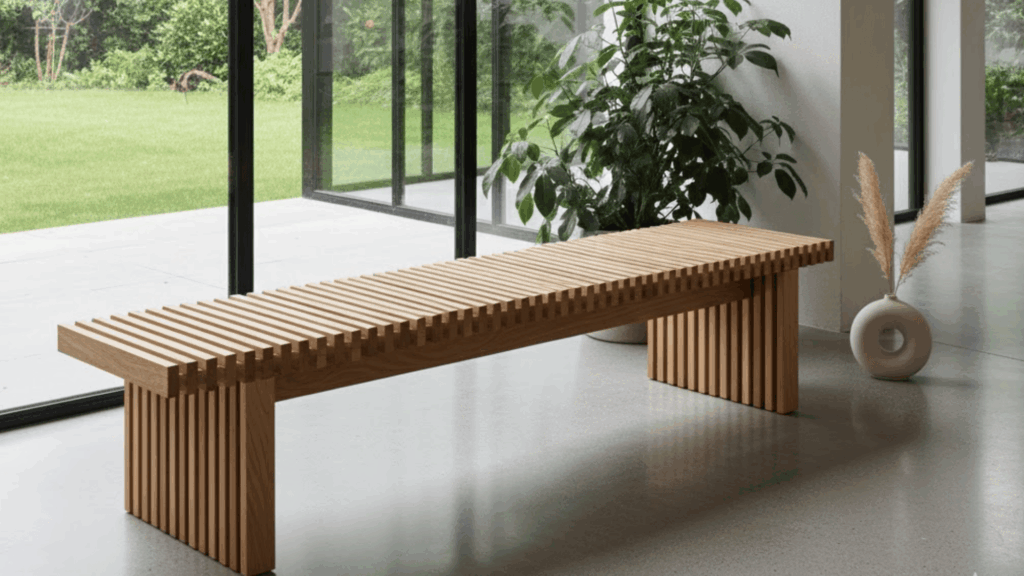
A sleek, modern slatted-wood bench offers a clean, minimal look that works beautifully in entryways or on patios. Made with narrow wooden planks and open gaps between slats, it creates an airy, contemporary vibe that feels light and uncluttered.
Perfect for Scandinavian or minimalist interiors, it’s easy to build using 2x4s or oak slats for durability. The simple design keeps costs low while delivering high visual impact in any space.
- Ideal for entryways, hallways, or patios where you need functional seating options
- Pair with metal hairpin legs for contrast and a mid-century modern appeal
- Apply matte sealant for a modern finish that protects against daily wear
2. Rustic Reclaimed-Wood Bench
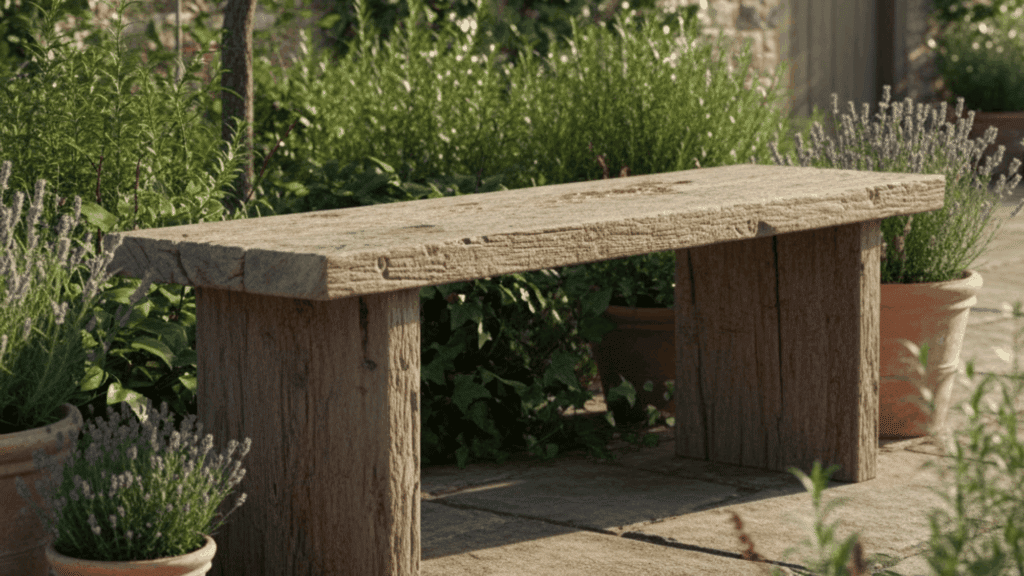
This rustic reclaimed-wood bench combines vintage charm and sustainability in one practical piece. Using old barn wood or pallet planks adds warmth and texture to your space that new materials simply can’t match.
Its rough-hewn surface looks perfect in farmhouse interiors or garden corners and costs next to nothing if you source materials locally.
Each bench tells a unique story through the wood’s natural patina and weathered character.
- Sand lightly to keep a natural weathered feel that highlights the wood’s history
- Seal with linseed oil for protection while maintaining the authentic reclaimed appearance
- Pair with woven cushions for a cozy touch that softens the rustic edges
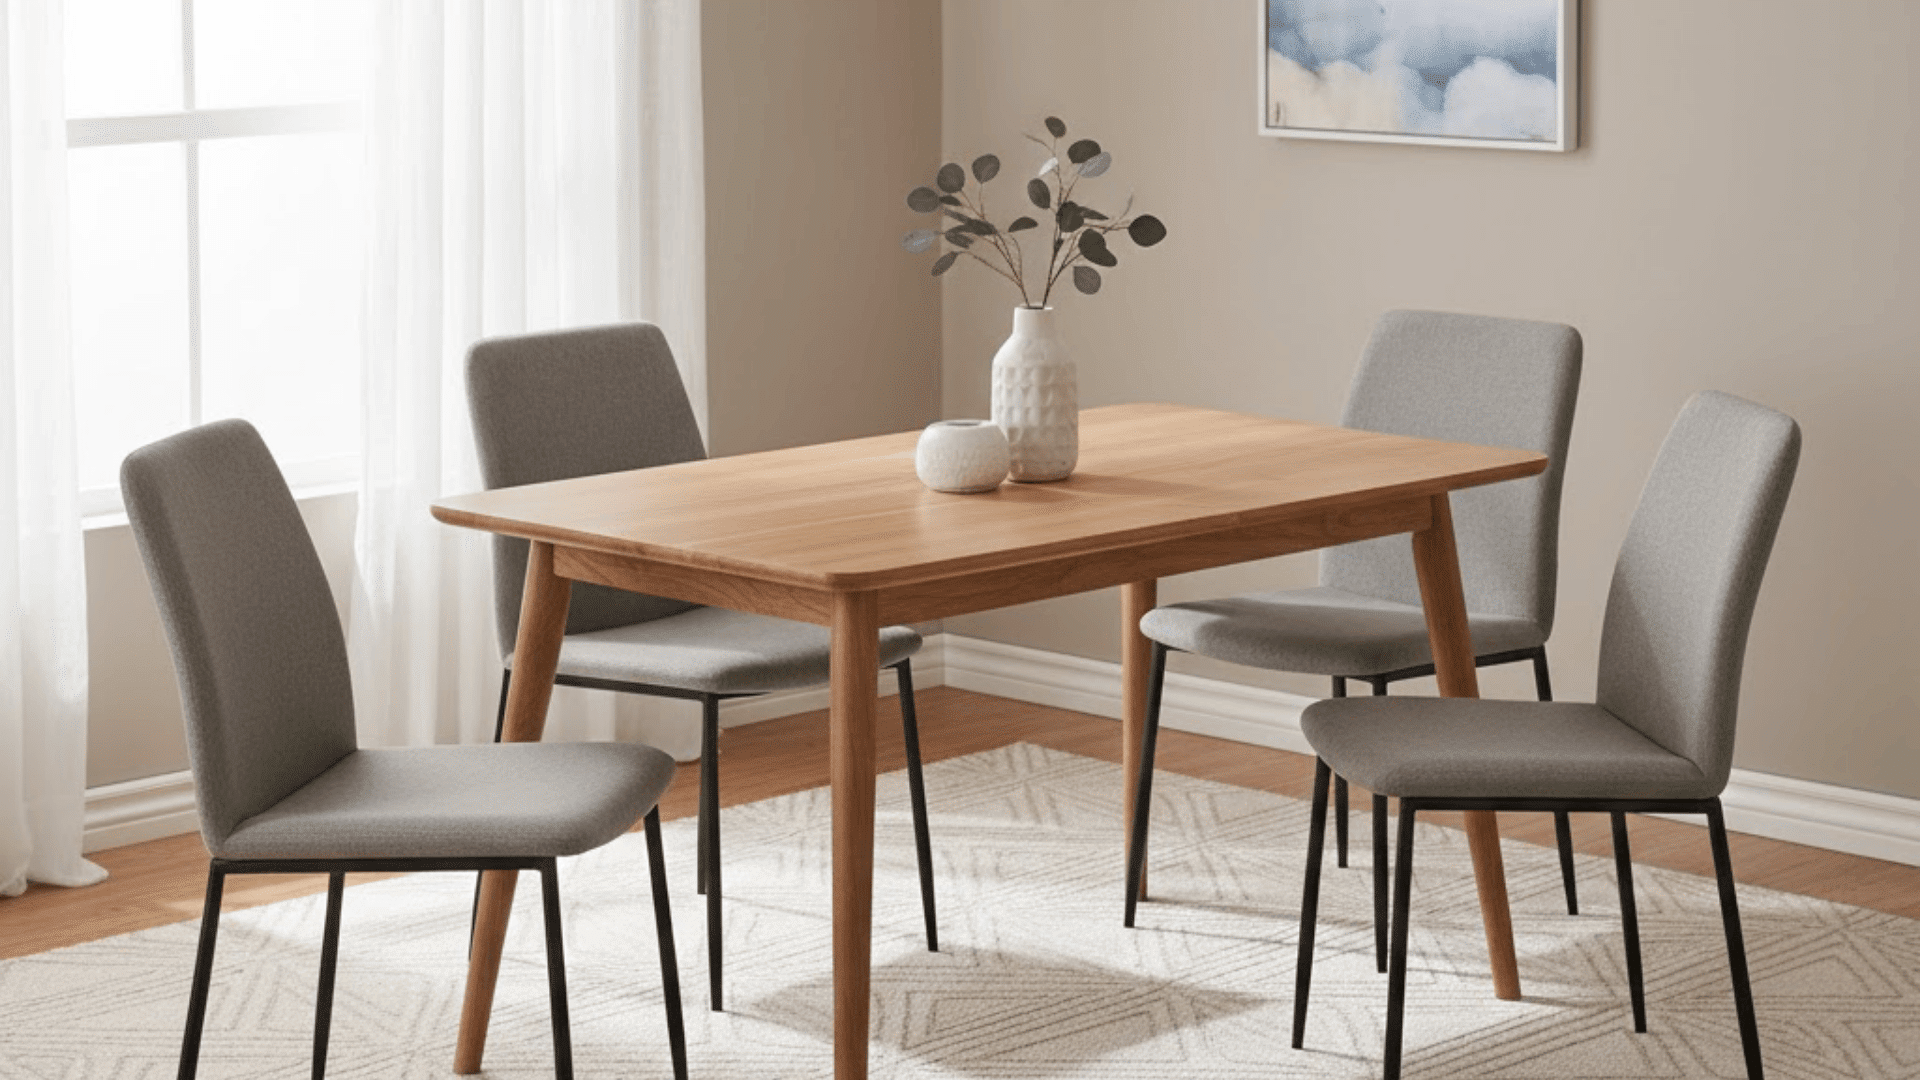
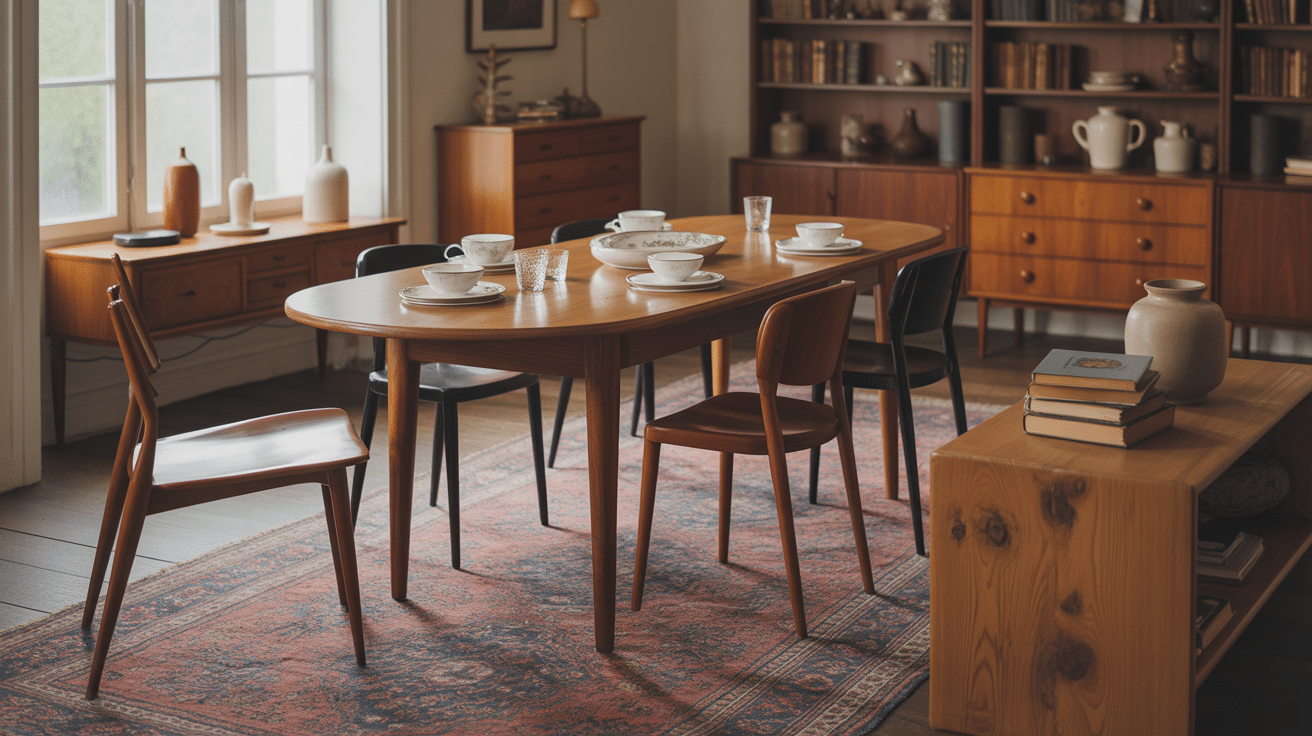
3. Dining Table Bench
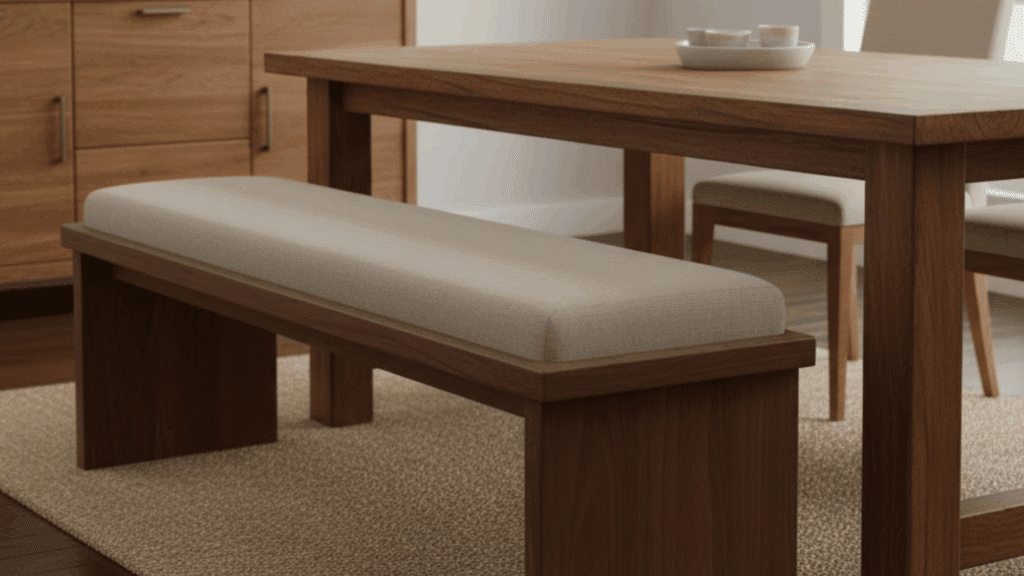
A dining bench instantly makes mealtimes more social and stylish while saving precious floor space. Built long and sturdy, it saves space while seating multiple guests comfortably around your table.
Choose solid wood like walnut or oak for strength, or upholster the seat for comfort during longer meals.
This versatile bench complements rustic, modern, or farmhouse tables with equal ease, making it a smart investment for any dining room.
- Match seat height to dining chairs, keeping it around 18 inches for comfort
- Add soft cushions for extra comfort during extended meals and family gatherings
- Use a dark wood finish for elegance that adds sophistication to your space
4. Entryway Storage Bench

An entryway storage bench keeps clutter at bay while providing a convenient seating spot for shoes or bags. With built-in drawers or cubbies, it’s ideal for compact spaces where every inch counts.
Customize it with paint, baskets, or soft cushions to match your existing décor style. This functional piece helps maintain organization right where you need it most, preventing mess from spreading throughout your home.
- Add hooks above for jackets and hats to create a complete entry solution
- Use durable wood like pine or birch that can handle daily use and weight
- Choose soft-close hinges for safety, especially if you have young children at home
5. Concrete Garden Bench
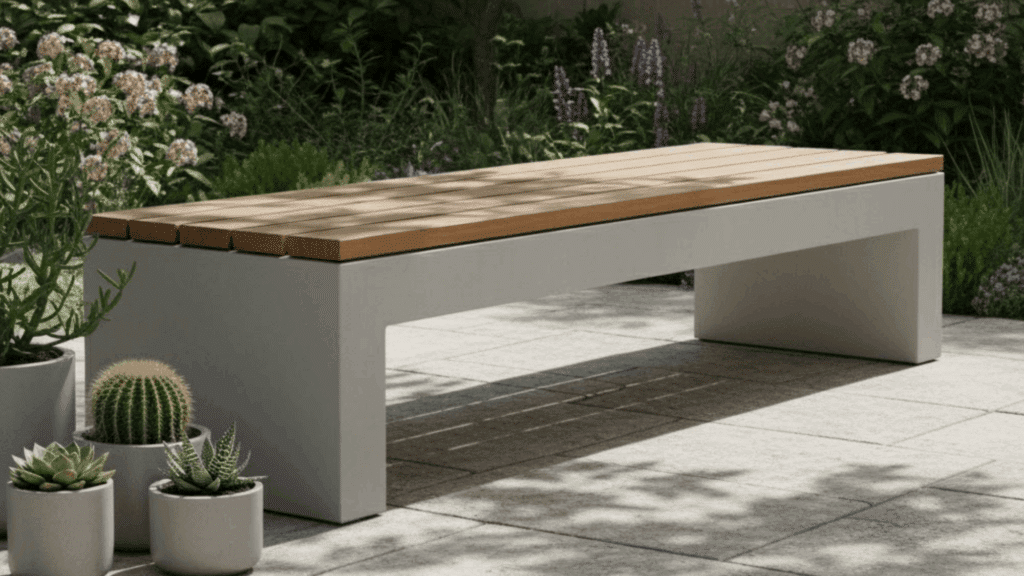
For a bold outdoor statement, a concrete bench adds strength and durability that lasts for years. It withstands rain and sun, making it perfect for gardens or patios where weather resistance matters most.
Pair with wood or metal details to soften its industrial look and add warmth to the design. The solid construction means it won’t blow away in storms or need constant maintenance like other outdoor furniture.
- Mold concrete with wooden or steel forms to achieve your desired bench shape
- Smooth edges before the final cure to prevent rough spots and ensure comfort
- Pair with potted plants for visual balance that softens the concrete’s hard edges
6. Upholstered Bedroom Bench
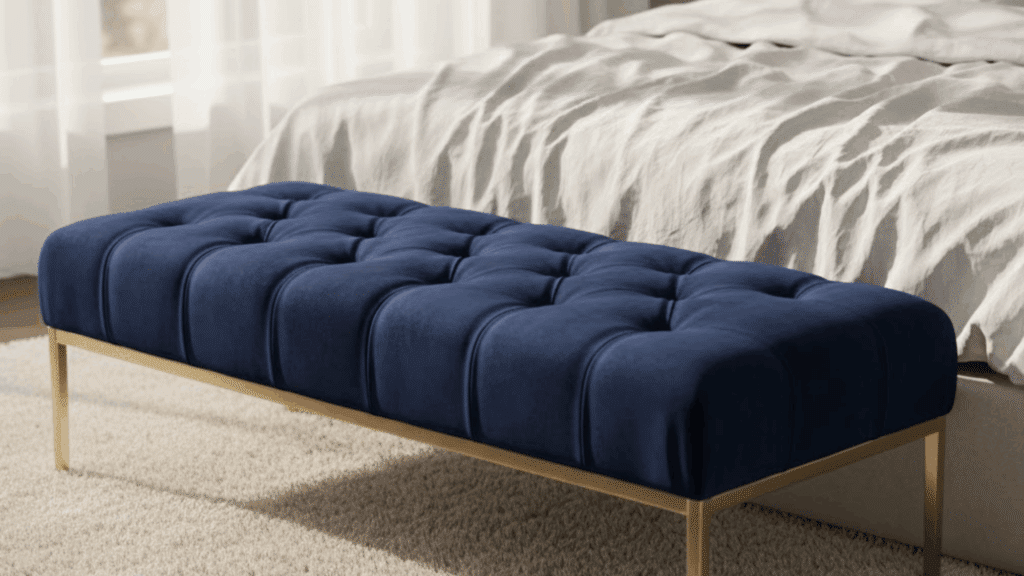
A bedroom bench adds luxury and function at the foot of the bed where you need it most. Upholstered in velvet, linen, or leather, it provides seating and storage in one chic piece that elevates your room’s style.
Use tufted designs for a soft, hotel-style look that transforms your bedroom into a retreat. It’s the perfect spot for getting dressed or laying out tomorrow’s clothes.
- Match fabric color to bed linen for a coordinated look throughout the room
- Use gold or brass legs for a glam appeal that adds a touch of luxury
7. Floating Wall-Mounted Bench
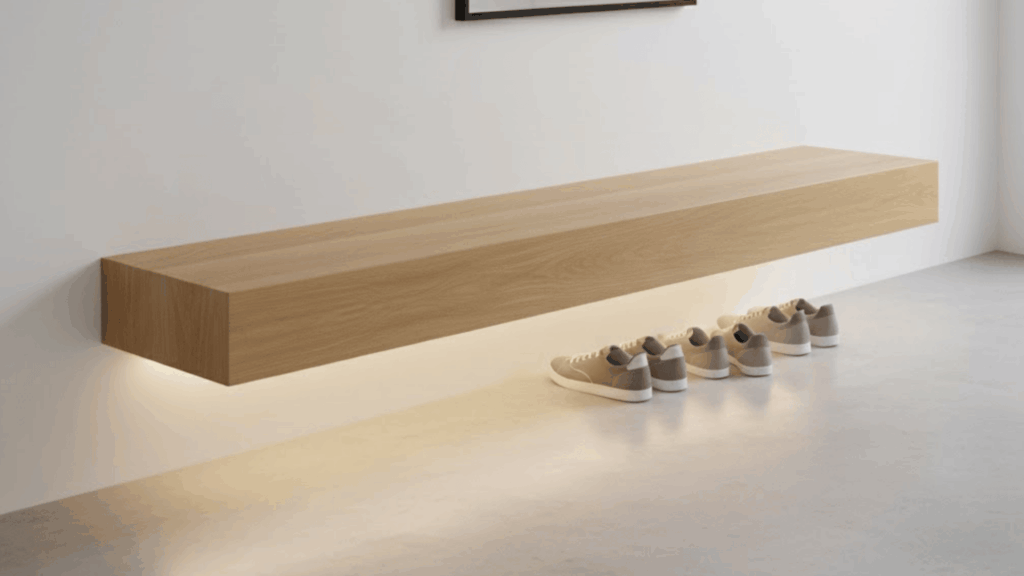
A floating bench creates a clean, space-saving look that works wonders in tight areas. It’s ideal for small entryways, mudrooms, or minimalist bathrooms with limited floor space.
Mounted directly to the wall, it offers a sleek, modern design without bulky legs, making the area look larger and more open. The minimal footprint makes cleaning underneath effortless while maintaining full functionality.
- Use heavy-duty wall brackets for support to safely handle weight and daily use
- Choose oak or plywood for strength that won’t sag or warp over time
- Add underlighting for a dramatic effect that creates ambiance in the evening hours
8. Outdoor Curved Bench
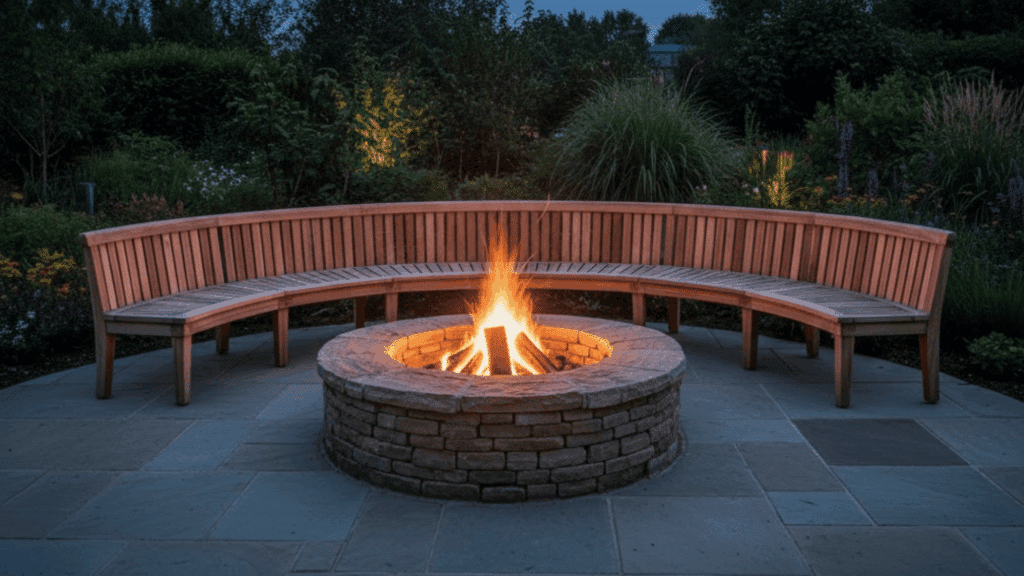
A curved outdoor bench adds movement and elegance to garden paths or fire pits with its flowing design. The rounded design encourages conversation and blends naturally with outdoor landscapes rather than fighting against them.
Use weather-treated cedar or teak for longevity and organic beauty that ages gracefully. The curved shape creates a welcoming gathering spot that draws people together in your outdoor space.
- Perfect for surrounding a fire pit where people naturally gather in circular formations
- Add a stone or paver base for stability that keeps the bench level and secure
- Combine with outdoor cushions for comfort during extended sitting sessions in your yard
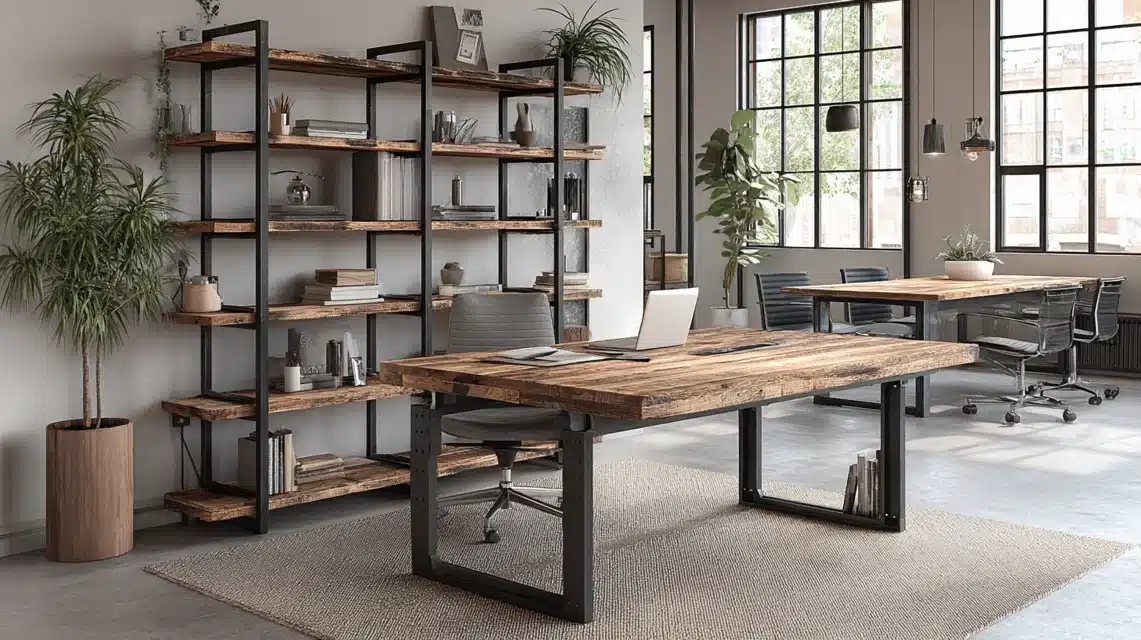
9. Metal Frame Industrial Bench
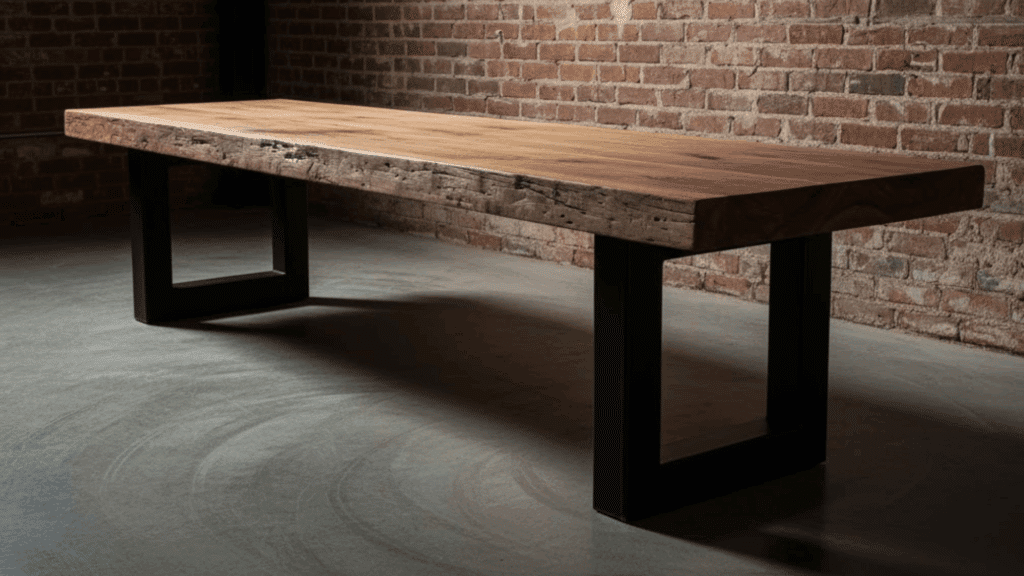
This industrial-style bench combines a solid wood top with black steel legs, offering durability with an edge. It’s a great fit for lofts, studios, or modern apartments that shows urban design elements.
The design is simple yet strong, making it ideal for both indoor and outdoor seating needs. The raw materials give it an honest, unfussy character that works in casual or classy settings alike.
- Pair with exposed-brick walls for contrast that highlights both materials’ natural textures
- Use reclaimed wood for authenticity that adds character and history to the piece
- Add clear lacquer for a polished finish that protects without hiding wood grain
10. Pallet Bench
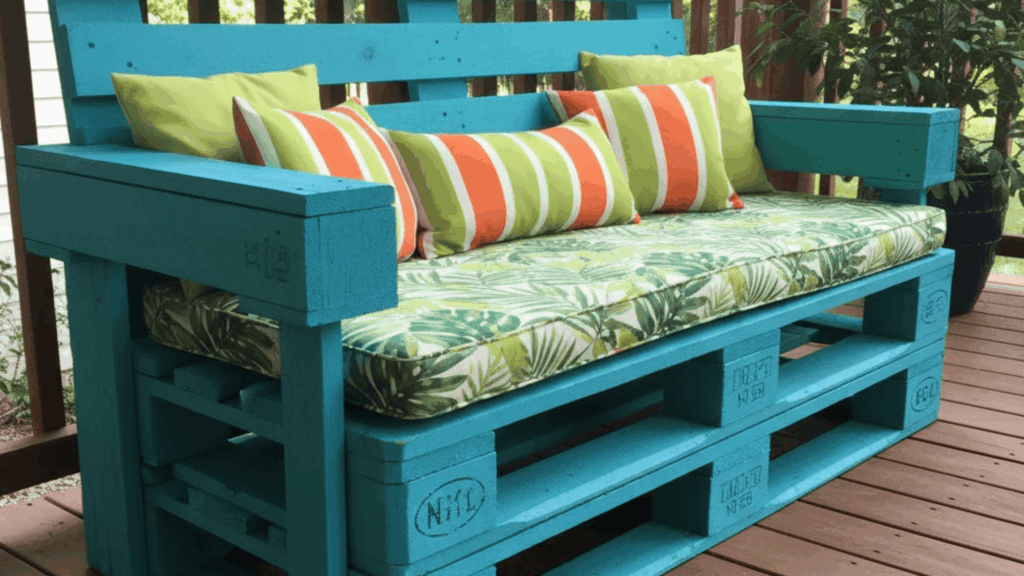
A pallet bench is an eco-friendly and budget-savvy DIY project perfect for beginners. Made from upcycled shipping pallets, it suits porches, gardens, or casual indoor corners where informal seating works best.
It’s lightweight, easy to build, and customizable with paint or cushions for added flair. This project lets you create functional furniture while keeping materials out of landfills and money in your pocket.
- Sand edges to avoid splinters that could snag clothing or scratch skin surfaces
- Add a backrest using an extra pallet layer for comfortable support during longer sitting periods
- Paint in bright, outdoor-safe colors that resist fading and add personality to spaces
11. Two-Tier Hallway Bench
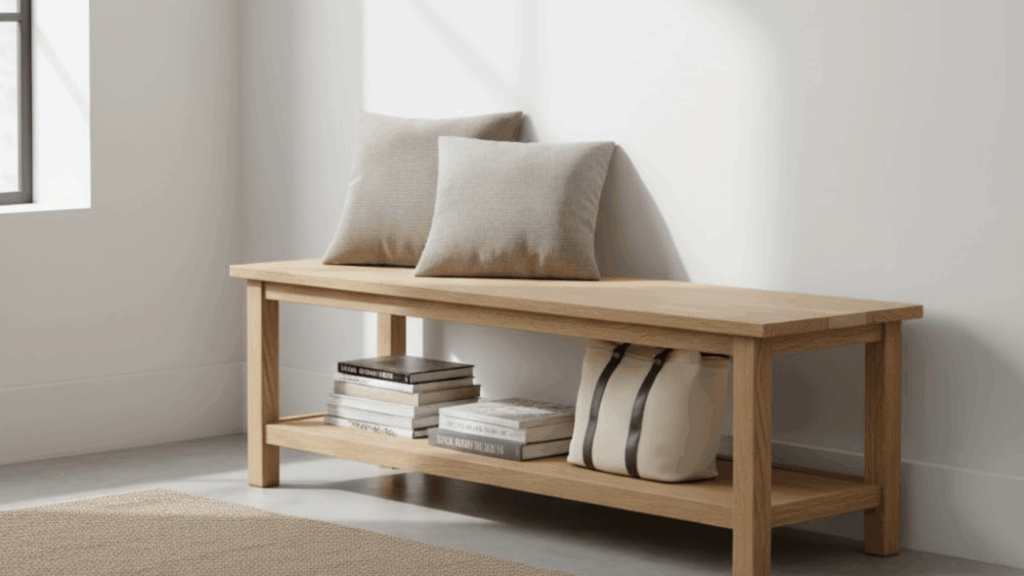
A two-tier hallway bench offers seating on top with a lower shelf for everyday items like books or bags. Built at standard chair height, it provides a comfortable spot to sit while keeping frequently used items within reach.
The open lower tier prevents the bench from looking heavy or cluttered in narrow hallways. This simple design works in entryways, bedrooms, or living rooms where you need flexible seating and display space.
- Keep the lower shelf 6 to 8 inches off the ground for easy cleaning underneath
- Use medium-toned wood stain to hide scuffs and scratches from daily household use
- Add decorative baskets on the lower shelf to contain small items and reduce clutter
12. Live-Edge Wood Bench
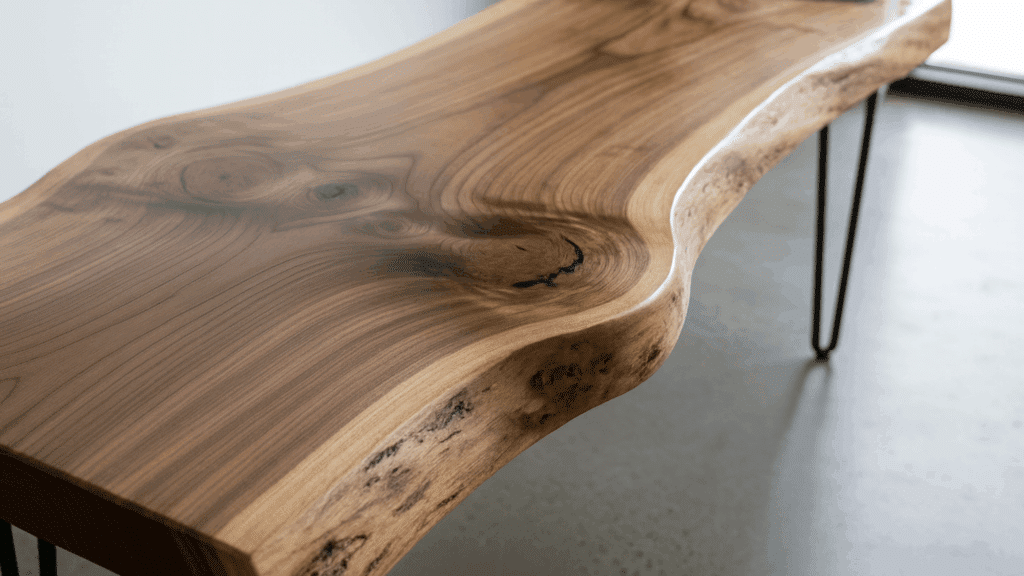
A live-edge bench highlights the natural beauty of raw wood in its most honest form. Each piece is unique, featuring the wood’s organic shape and grain that machine-cut lumber simply can’t replicate.
Ideal for rustic or contemporary spaces, it bridges the line between furniture and art with effortless style. The natural edge celebrates the tree’s original form, bringing nature indoors in a refined way.
- Finish with clear epoxy for durability that fills cracks and protects the surface
- Use steel legs for a modern twist that contrasts beautifully with organic wood
- Avoid over-sanding to retain texture and the character that makes each piece special
13. X-Frame Farmhouse Bench

An X-frame farmhouse bench brings rustic look with its signature crossed leg design that adds visual interest. Built with thick wooden planks and sturdy cross-bracing, it offers stable seating for dining rooms or entryways.
The classic farmhouse style works well with country kitchens or casual dining spaces where you want a relaxed feel. This design is forgiving for beginners since the X-frame provides natural support and balance.
- Use distressed finish techniques to create an authentic worn look with character
- Build with standard 2×6 lumber for a budget-friendly project that still feels substantial
- Add a lower shelf between legs for extra storage or displaying decorative items
14. Window Seat Bench

A window seat bench adds comfort and charm to any bay or corner window area. With a cushioned top and storage below, it’s perfect for reading or relaxing while enjoying natural light and views.
It also increases seating without taking up much space in the center of rooms. This cozy spot becomes a favorite retreat for quiet moments or watching the world go by.
- Match cushion fabric with curtains for a coordinated look that ties the space together
- Add drawers for extra storage of books, blankets, or items you want nearby
- Install soft lighting nearby for ambiance when you want to read after sunset
15. Simple Pine Garden Bench
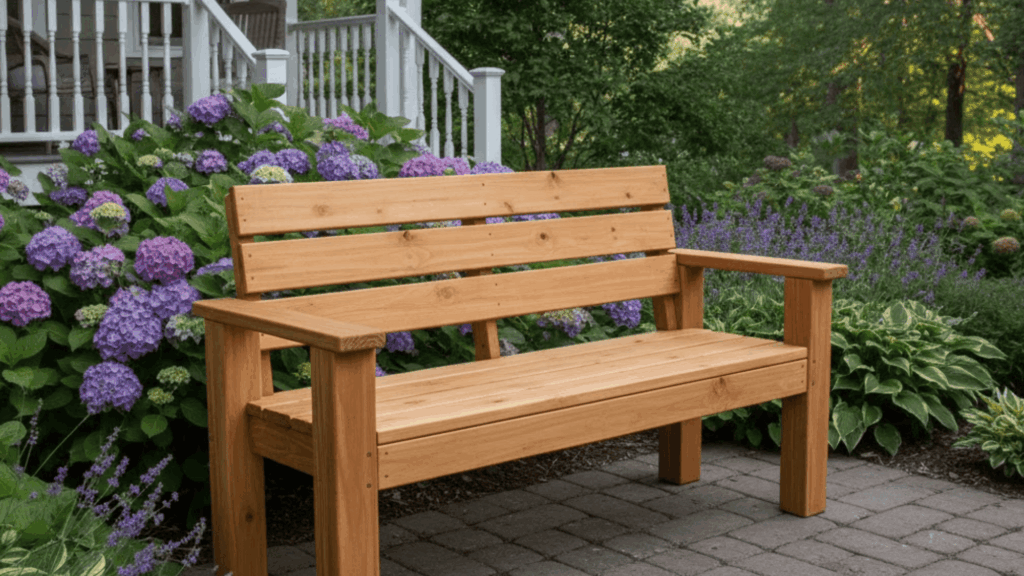
A simple pine garden bench offers straightforward beauty that fits any outdoor space without fuss.
Built from affordable pine boards, it provides sturdy seating for patios, gardens, or front porches where you want a classic look.
The natural wood grain adds warmth while the straightforward construction makes it an approachable weekend project. This timeless design never goes out of style and welcomes guests with unpretentious look.
- Stain in honey tones to bring out the natural pine grain and warmth
- Add armrests for extra support and comfort during longer outdoor sitting sessions
- Position near flower beds or under trees for a peaceful resting spot
Choosing the Right Bench Design for Your Space
Before you pick a style, consider space, use, and design goals.
| Space | Recommended Bench Type | Key Tips |
|---|---|---|
| Entryway | Narrow storage bench | Choose durable finishes; add hooks above |
| Dining Area | Long dining bench | Match table height (18″ seat height) |
| Garden | Teak or metal outdoor bench | Use rust-proof hardware |
| Bedroom | Upholstered or wooden storage bench | Add fabric for a cozy touch |
| Balcony | Compact foldable bench | Use weatherproof cushions |
Additional Tips:
- Match color tones to walls or furniture.
- Avoid overly large benches in small rooms.
- Add rubber feet or felt pads to prevent scratches on the floor.
- Bench Design Maintenance & Longevity Tips
Step-by-Step DIY Guide to Making a Bench
Ready to build your own bench? Follow these simple steps to create a sturdy, stylish piece you’ll be proud to use anywhere in your home.
Tools and Materials Needed
Before you start, gather these basic tools and materials to make your bench-building process smooth, safe, and efficient from beginning to end.
- Sanding Block
- Stain
- Polyurethane
- Lumber
- Miter Saw
- Drill and Impact Driver
- Tape Measure
- Safety Goggles
- Ear Protection
- Mask
Once everything’s ready, you can start cutting, assembling, and finishing your bench step by step for a professional-looking result.
Step 1: Cut the 2x4s to Size

Carefully measure and mark your 2x4s to determine all the required lengths, typically two long boards for the seat and four shorter segments for the legs and frame supports.
Use your saw to make clean, straight cuts so all pieces fit together smoothly later. This step’s accuracy ensures your bench will be sturdy and level, preventing unevenness or wobbling once the build is complete.
Step 2: Assemble the Legs
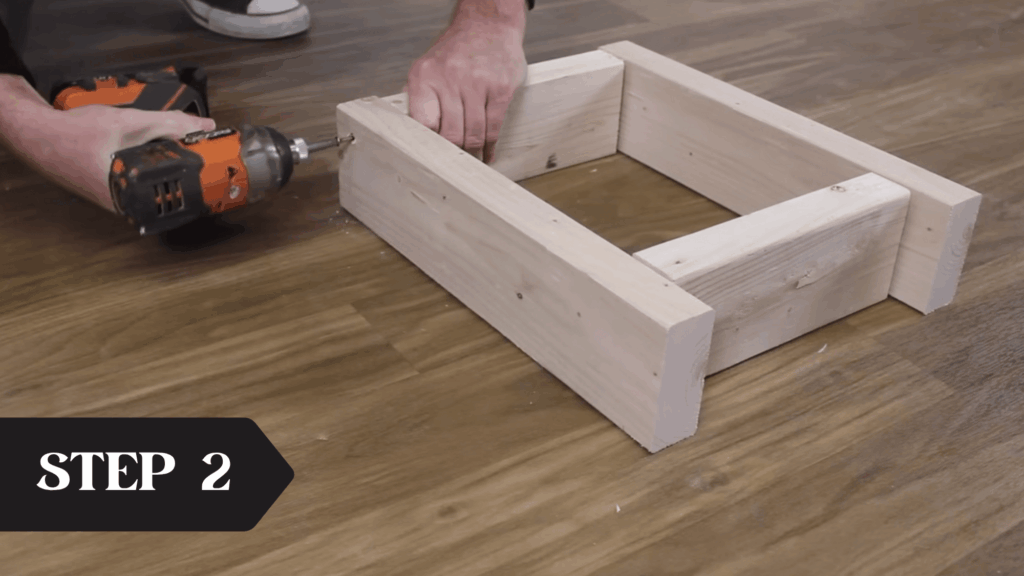
Place the four shorter pieces in pairs to create two solid bench legs. Fasten each leg assembly by arranging the boards in an L-shaped or boxed configuration and securing them with two screws at each joint.
This structural base provides stability and elevates the seat, so take time to ensure the legs are square and all fastenings are tight to avoid future wobbling.
Step 3: Attach the Seat Supports
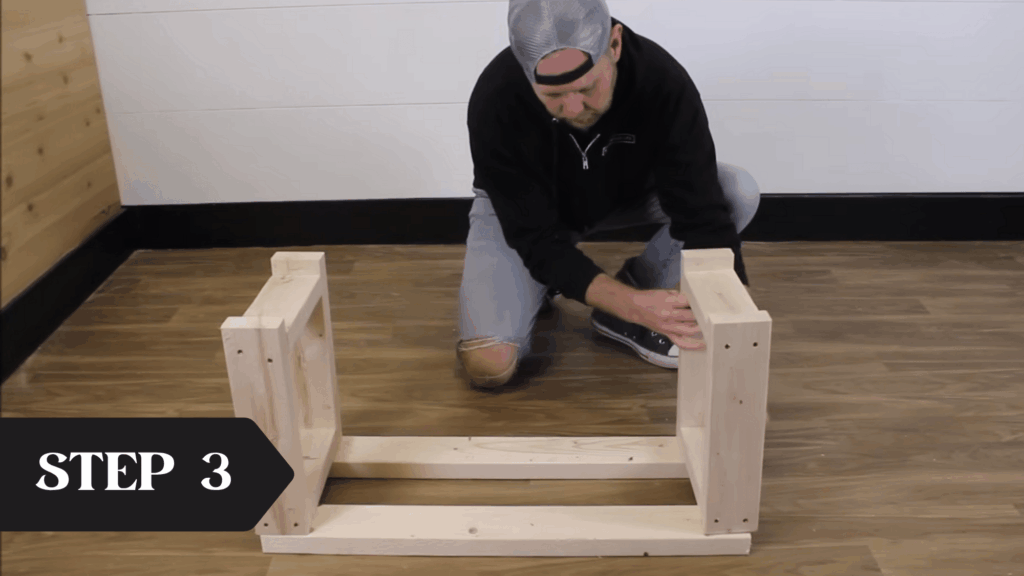
With the leg assemblies ready, position the long horizontal seat supports on top. Align each piece evenly and attach using screws, ensuring both seat supports are at equal heights to maintain stability.
These supports form the skeleton across which the seat will rest, so make sure everything is level and straight to create a strong foundation for your bench.
Step 4: Secure the Seat Boards

Lay the two longest cut pieces across the seat supports as the bench top. Secure each board firmly to the supports with screws, checking spacing and alignment for comfort and appearance.
A tight, flush fit reduces movement when sitting and results in a more polished, professional look, making this step vital for both durability and aesthetics.
Step 5: Sand the Entire Bench
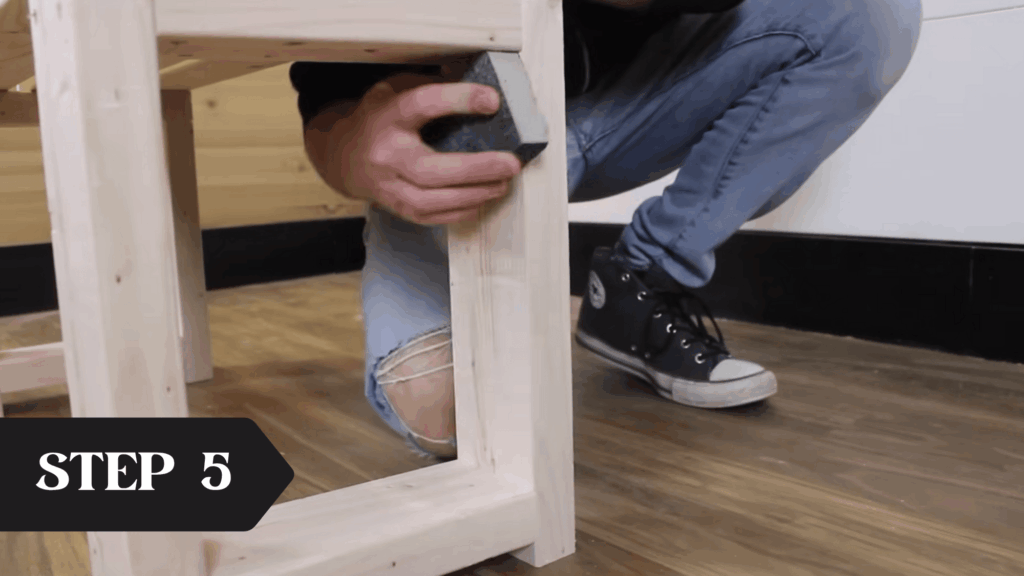
With all boards in place, use a sanding block or sandpaper to smooth out every edge and surface. Sanding eliminates splinters, rounds sharp corners, and preps the wood for stain or finish if you choose to apply it later.
Pay special attention to seat areas and outer edges, as this greatly enhances comfort and safety when using the finished bench.
Step 6: Apply Stain or Finish (Optional)
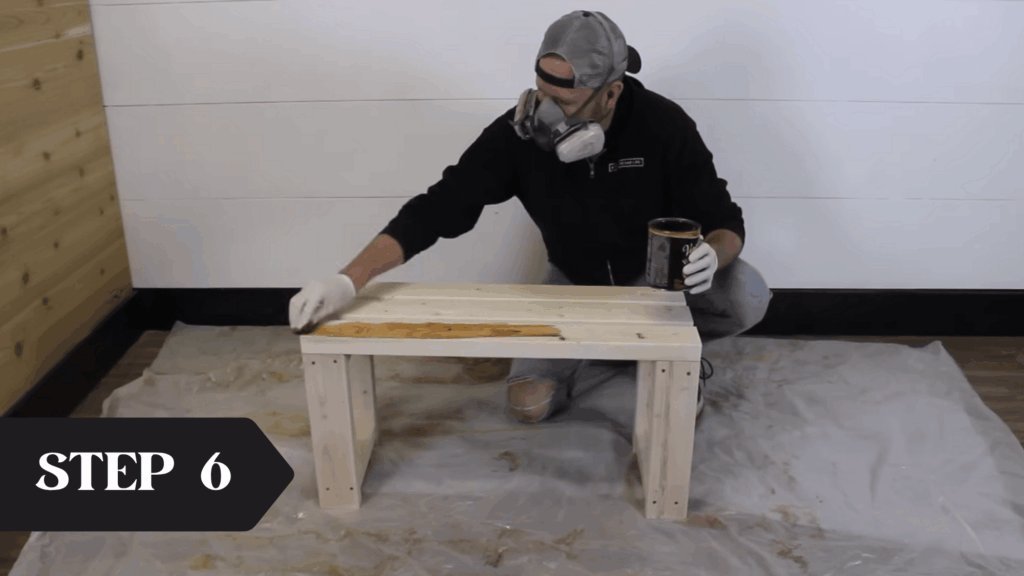
For added durability and a professional appearance, you can apply a wood stain or polyurethane finish. Using a brush or cloth, evenly coat all surfaces, following the wood grain.
Allow each coat to dry according to the product instructions before handling. This optional finishing touch protects the bench from moisture and wear while enhancing its natural color and grain.
Step 7: Final Inspection and Use
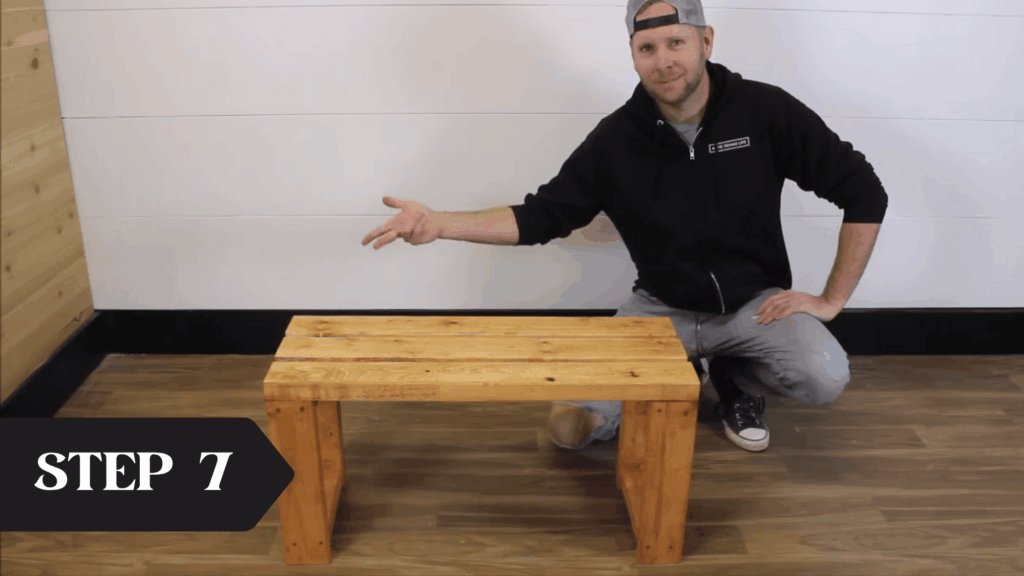
Before using your new bench, give every fastener a final check for tightness, and ensure all joints are secure. Wipe away any dust or residue from sanding and finishing.
Place your bench where desired, check for stability, and enjoy your functional, affordable creation, perfect for indoor or outdoor use, proudly made by you in just a few simple steps.
You can watch this guide video by The Rehab Life for a more precise instructions on the process.
Bench Styling & Placement Ideas
Once your bench is built or bought, placement and styling make all the difference. Think of it as the finishing touch that ties the entire space together.
Indoor Styling Tips:
- Add throw pillows or cushions that complement your color palette.
- Layer textures, soft fabrics, woven baskets, or a cozy blanket.
- Pair with wall art or mirrors above for a complete look.
Outdoor Styling Tips:
- Place benches along garden paths, trees, or patios to enhance the natural flow.
- Use potted plants or lanterns on each side for a balanced setup.
- Choose weatherproof accessories that stand up to the elements.
Whether indoors or outdoors, a well-placed bench can serve as both a statement piece and a practical solution, blending comfort, function, and design.
At the End
Building or choosing the right bench is one of those small projects that can make a big difference in how your space looks and feels.
I love how a bench can be both useful and stylish, a cozy reading spot, a dining seat, or a welcoming touch by the door.
With the right design, materials, and finish, your bench can last for years while adding character to any room or garden. If you decide to DIY or buy one, take your time and enjoy the process; it’s worth it.
If you found these bench design ideas helpful, share this guide or start planning your own project today!