Thinking of creating a simple yet eye-catching birdhouse for your garden? This birdhouse plan home project can be DIY in the shortest time and within budget. If you have an open garden or balcony, different kinds of birds visit the space due to the flowers and greenery. Building a birdhouse is one of the easiest projects with minimal tools.
There is no restriction and thumb rule for the size and shape of the birdhouse. All different types wood works blend easily with the surrounding. The birdhouses are perfect decorative and functional materials that can be added to the yard for an aesthetic look. Making a birdhouse plan for your garden is one of the most cost-effective home projects that require only a wooden panel, nails, and some basic tools.
You can choose to paint or stain the birdhouse to grab attention. The birdhouse plan should be customized as per their installation, whether it will be placed on a tree or hung on the front patio or balcony.
Here is a list of 11 DIY birdhouse plans that can be built at an affordable price. And give the space a creative touch.
How to DIY a Birdhouse Plan?
Here is a stepwise guide to making a birdhouse plan at home. This free DIY birdhouse plan covers all the important points like the manner of using materials, dimensions, cutting, and assembling the wood planks.
- With the help of measuring tape, mark the sides of the birdhouse on the plank. The plank usually comes 6 feet long and with one end square and the other blunt.
- Start by cutting the sides with the help of a saw for the birdhouse from the squared end. If you have a square, use it to draw a straight line on the plank so that it gets easier while cutting.
- For exact cutting, make the wooden plank clamped with the below surface. The clamp ensures the stability of the plank while cutting and seamless birdhouse sides.
- With the help of the cut side, use it as a reference to cut the remaining sides, this ensures that all sides are equal, and you do not need to mark the planks for the same purpose.
- With the above technique, cut out three other sides that will act as the roof and bottom.
- While considering the birdhouse plan, keep in mind that the front and back sides should be identical to each other and different from the rest of the sides, as they will be cut at a 45-degree angle.
- Now that you have all the pieces ready, decide on the birdhouse plan, like the roof layout, etc. You can have many combinations of the birdhouse roof in order to make it look elegant.
- If you are placing the roof cuttings side by side, there will be differences in the length of both boards. Place one roof board on top of the other in a 90-degree fashion, and mark a line that needs to be cut out.
- Before assembling all the wooden boards, cut the center hole on the front board with the help of the Forstner bit or hole saw. You can make the hole bigger or smaller as per the bird’s size that visits the space.
- Avoid making too bigger circles to prevent larger birds and squirrels from occupying the place.
- Whenever dealing with woodwork, make sure to use eye and ear protection.
- The final assembly of all the boards requires a hammer and finish nails. Start by securing the roof with the help of nails.
- Furthermore, attach the sides, front, and back of the birdhouse one after the other. Make sure that the bottom of the boards are flushed, as the whole birdhouse plan will be sitting on a flat piece of wood. The bottom board will have a few inches sticking out to the front, acting as a nice place for the birds to stand or free sitting.
- After assembling all four sides and bottom, secure the roof with nails. You can choose the roof to be in line with the back wood board or place it in the center. Any of these will look visually appealing.
- You can either have a wall-mounted birdhouse on the front patio or use metal hangers and attach the birdhouse to it so that the shelter hangs beautifully on the trees.
[amazon box=”B083143LDY”]
[amazon box=”B0928MP18P”]
1. Simple Birdhouse
Birdhouse plans are a great source to begin woodwork at home. From adults to children, anyone can build a simple birdhouse. With less material and time, you can build this shelter home that will last for several years. Furthermore, you get the chance to customize the birdhouse when you are DIY at home, with the shape, size, and color.
With the help of tools like measuring tape, hammer, handsaw, drill, and nails, you can begin building the birdhouse at home. When it comes to selecting the wooden plank, choose a cedar plank for this project. Cedar is a great choice for a birdhouse plan as it is naturally rot-resistant and insect-resistant. This increases the shelf life of the shelter home as it can sustain in the open space without any finishings. Follow these steps to build a perfect shelter home for the birds.
[amazon box=”B0BGK82BSP”]
2. Single-Board Birdhouse
A birdhouse plan is easy to execute and install in any open space of the house. Making a birdhouse with minimum material has made this home project worth trying by naive woodworkers and experienced ones too. Try to make the birdhouse plan with a simple design, as it will be easier to clean and maintain from the inside.
This single-board birdhouse is made from a pine wood panel and a few screws and nails. After taking the measurements of the board, cut the sides as per requirement. Screws are used for securing the front of the birdhouse so that you can remove the screws for cleaning purposes. You can make more than one center hole for ventilation, and apart from this, add drainage holes on all four corners.
[amazon box=”B07WDRM9FX”]
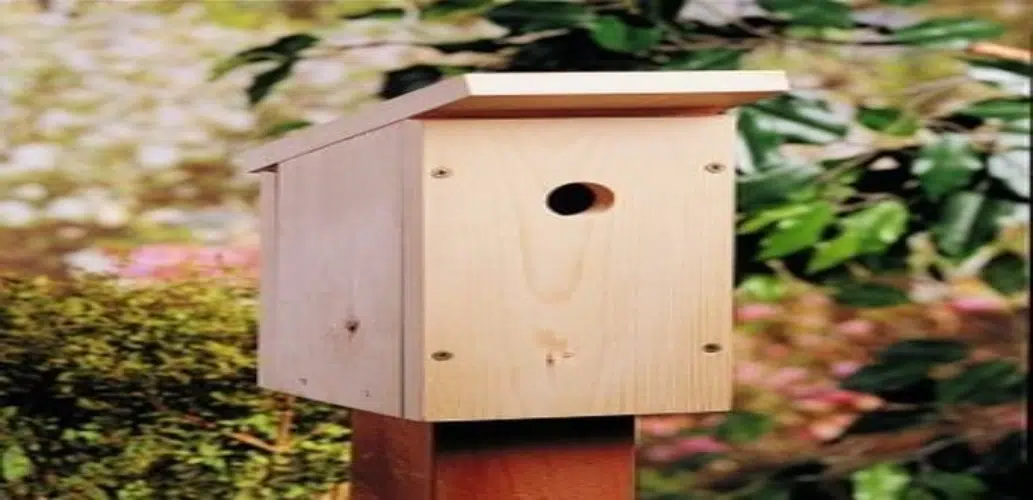
3. Birdhouse with a Flat Roof

The Birdhouse plan is one of the most efficient DIY home projects, as you can use leftover wood to create a whole new look. It becomes a lot easier to work with a single piece of wood, as you do not have to worry about the difference in thickness. As you can see, this birdhouse plan is a simple wooden box with a flat and catchy roof and perch. Measure and cut the wooden boards as per requirement. You can use wood glue to stick all the sides, and with the help of clamps, hold the glued sides till the glue dries. Apart from this, you can also use nails to secure the boards and provide additional support.
Use a larger board as the roof and secure it will glue and nails; you can choose to paint it to grab attention. Apart from this, attach eye screws on the back of the birdhouse so that it can be hung on a tree or wall-mounted.
[amazon box=”B0BW8794XD”]
4. Modern Birdhouse
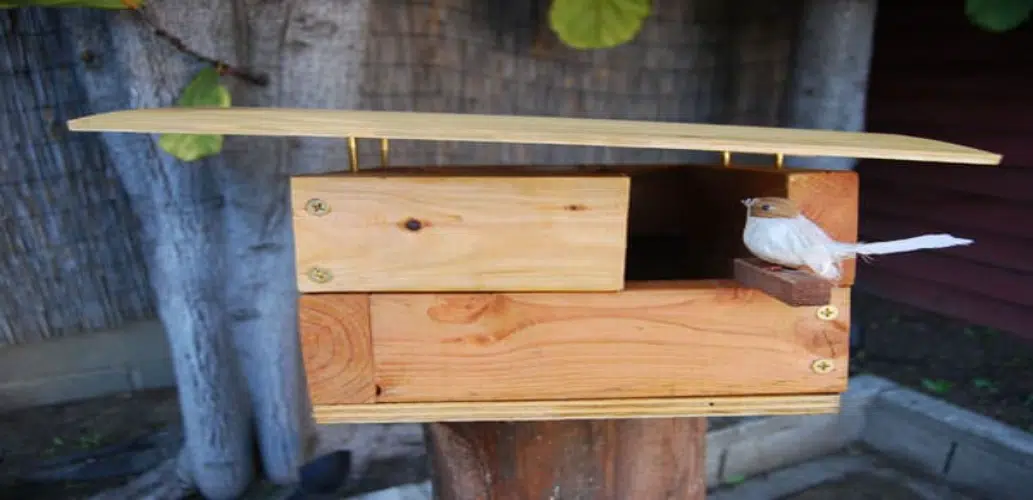
The birdhouse plan can take inspiration from our current architectural designs and how to use the most out of a small area. The advantage of taking a birdhouse plan as a DIY home project is that you can use any wood material to make the shelter home look creative. Apart from this, the birdhouse does not require a mandatory stain or paint; the original wooden texture is enough to give a natural touch.
This modern birdhouse has two different levels that have been secured with nails. Cut the wood panels into small blocks after measuring. If you are using any other wood, sand the surfaces so it becomes smoother. The roof can be cut from a different wood for a visually appealing look. Assemble the sides with wood glue and screws. The topmost block in the front is cut shorter and attached with hinges. This provides room for more birds.
5. Green Roof on The Birdhouse
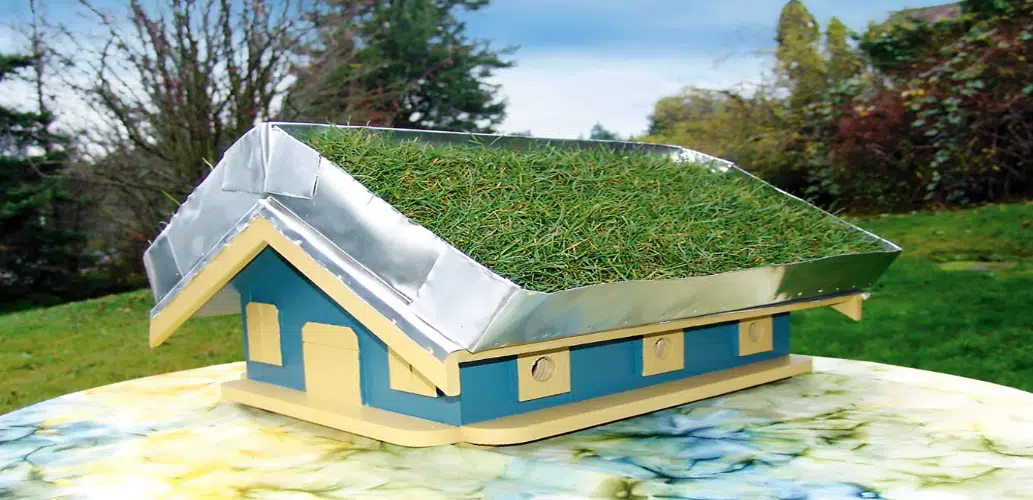
The birdhouse plan can be made creative with different shapes, colors, and wood types and by adding decor items to increase their aesthetic appeal. As seen above, this birdhouse has a green cover of natural grasses.
Not only does this look unique and beautiful, but it also helps attract more birds due to the green texture. You can make the birdhouse with flat wood or attach log sticks for an aesthetic look.
Cut an oversized wooden panel for using it as a roof and cover it with polyethylene that acts as water-resistant. With the help of a knife, cut a small area of natural grass or artificial grass and place it on the roof. This type of birdhouse can be easily made by following a few steps.
6. The Oversized Roof on The Birdhouse

The birdhouse plan can be used for multi purposes like shelter, bird feeders, etc. This simple DIY home project adds more life and color to the garden and outer patio. The budget-friendly project can be made creative by adding character to the birdhouse. As seen in the picture, this oversized roof on the birdhouse is an attraction. Not only can the roof be used to grab the bird’s attention, but it also can be used for planting different plants.
The birdhouse is a simple rectangle box that can be measured and cut from a single wooden panel and secured with nails. The roof consists of two sections, one is the flat wooden surface, and the second is the smaller wooden blocks arranged in the form of a border. The oversized roof can also be used to store bird food and water.
7. Birdfeeder and Birdhouse in One
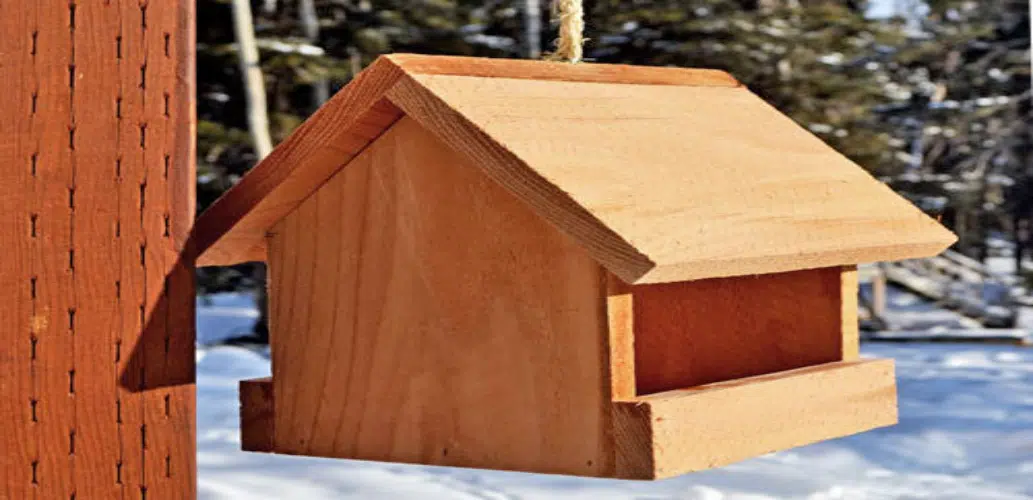
The purpose of a birdhouse plan is to attract birds and provide them shelter. It is necessary to design a plan that can be easily accessed for cleaning inside the birdhouse. Proper ventilation, drainage, rot-resistant, water-resistant, and appropriate center hole are certainly important factors, as the birdhouse will be placed in the open.
This two-in-one birdfeeder and birdhouse are multifunctional in nature. Cut the wooden boards after the required measurement has been taken. This shelter home will only need a roof and 2 boards, front and back. Drilling a center hole is not necessary, as the sides will be partially open. Secure the wooden boards with nails and glue.
Add 2 small wooden blocks on the sides to store food and water. This simple birdhouse can be made at home in a few steps.
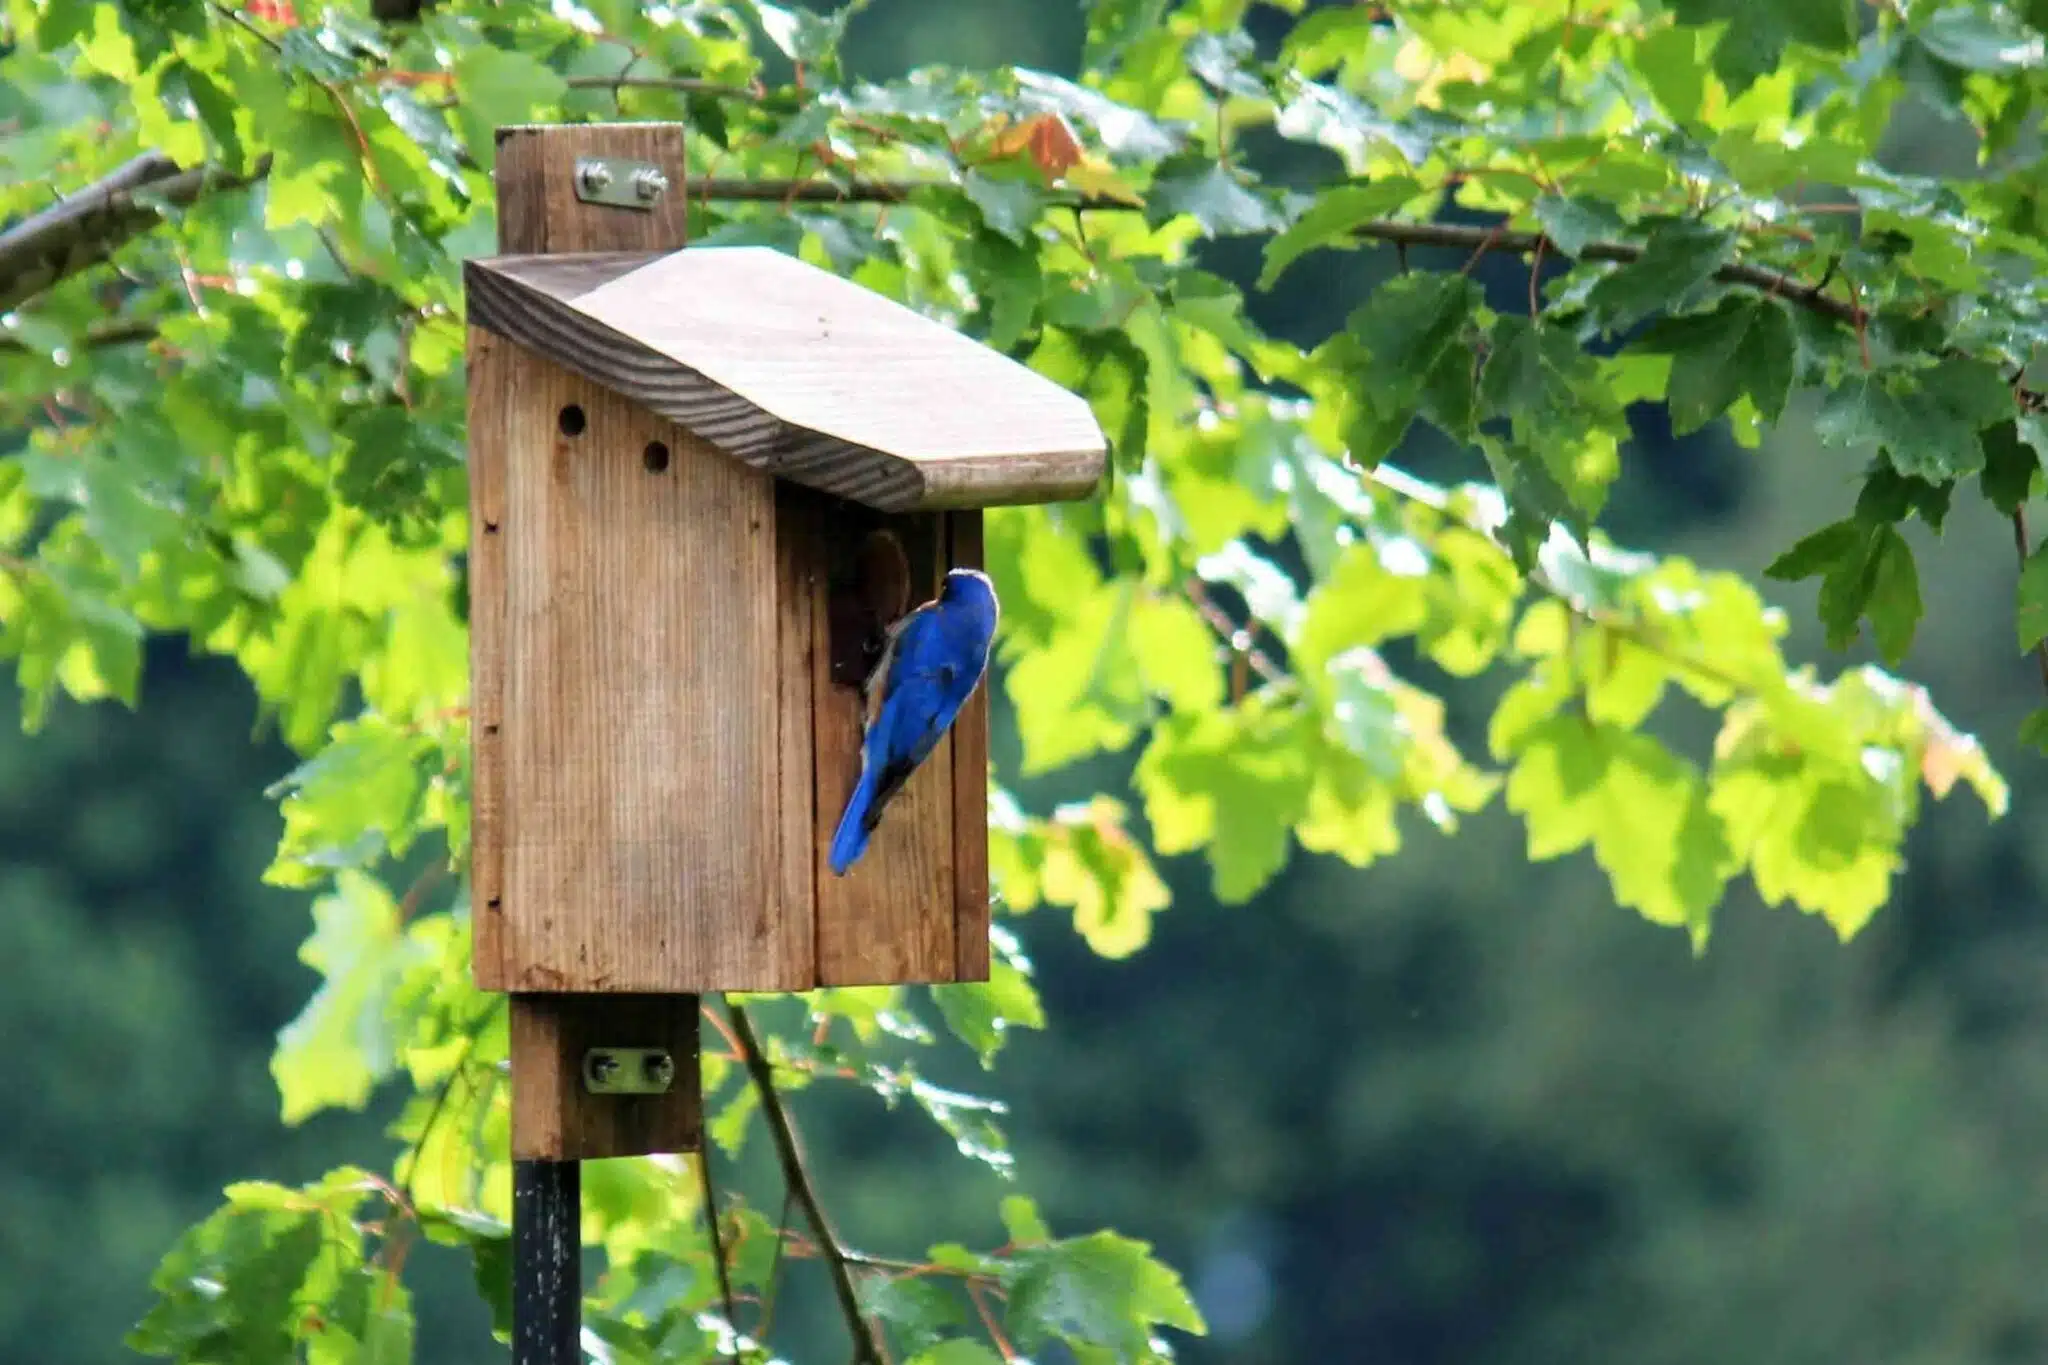
8. Bluebird Birdhouse

The birdhouse plan is one of the simplest and fastest DIY projects that can be done by any woodworker. The small sizes of these shelter homes make it feasible to use a single wood plank for a spacious birdhouse or make many small birdhouses like the bluebird birdhouse. The name comes after the bird species Bluebird, but many small-sized birds can easily use this birdhouse.
This birdhouse plan has a simple technique of measuring, cutting, and securing the sides. The back wooden board is slightly taller than the sides, which catches the attention and can be used to wall-mount the birdhouse.
You can be creative with this birdhouse by securing the topmost wood in the front with nails and leaving the bottom open for easy cleaning.
9. Boxed Birdhouse
The birdhouse plan should be made in a manner that accommodates the maximum capacity of birds. As this DIY home project is simple to make, you can build birdhouses in bulk and even sell them online. The birdhouses can be made from any wooden material and easily blend with the natural surroundings.
This boxed birdhouse is specially designed for birds like sparrows. Cut the wooden planks as per the requirement. This birdhouse will require wooden planks to be cut for partitions, too, apart from the roof, sides, and bottom.
You can choose to keep the front open, which acts as a birdfeeder and birdhouse, or you can also cover the front with the wooden board and give three different center holes. Two smaller wooden blocks are attached to the back for hanging purposes.
10. Metal Roof on The Birdhouse
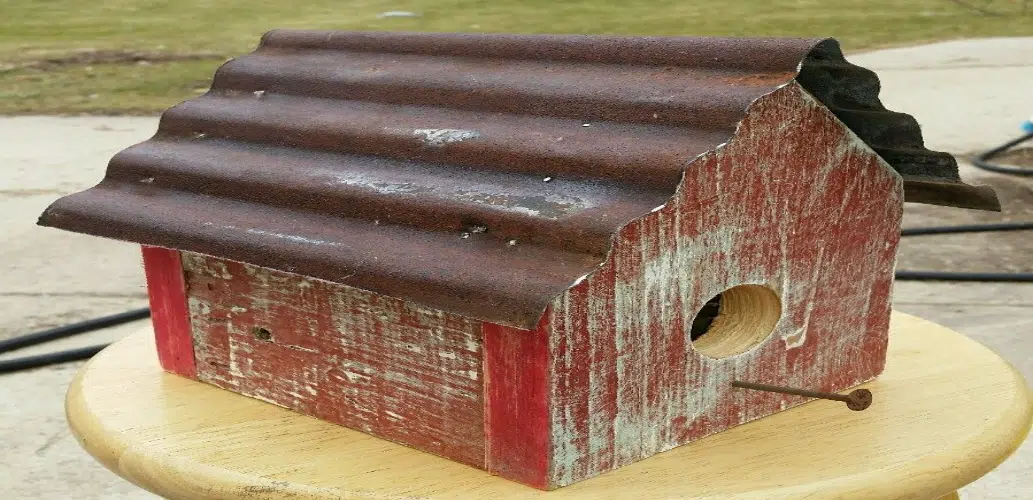
Birdhouse plans can be made with any given material and still give the garden an elegant look. The wood scraps, metal scraps, and nails can be used to make a rustic birdhouse in no time. As the birdhouse will be kept outdoors, it will constantly be in touch with water and insects.
Certain wood types require a coat of acrylic paint to remain water-resistant. Apart from this, these shelter homes are used for nesting too. So after the nesting season ends, the birdhouse needs to be cleaned, so the birdhouse plan should be easily accessible.
This metal roof on the birdhouse is reused, which helps keep the place free from water problems. Apart from this, the wood planks can be cut, measured, and secured with nails, screws, and glue to form a nice, square birdhouse. A nail is also attached beneath the center hole as a perch.
11. Deck on The Birdhouse
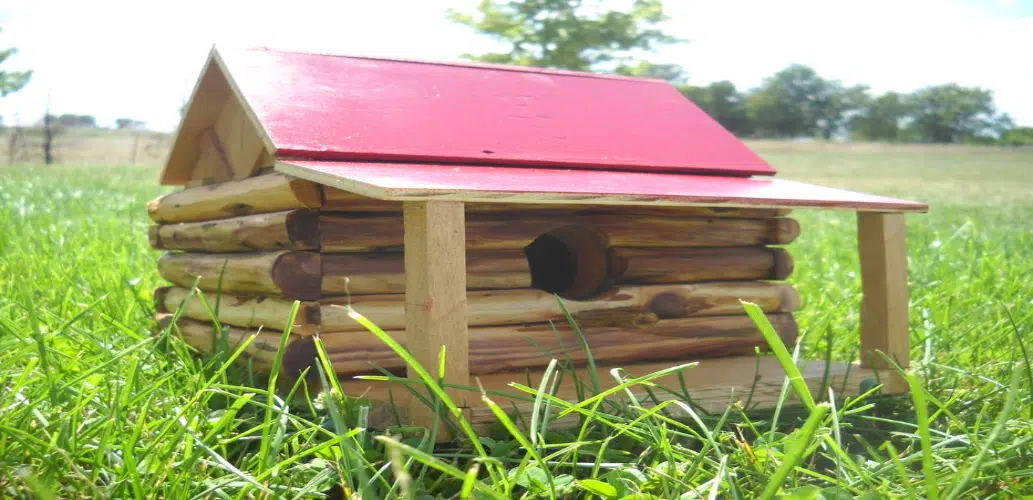
The birdhouse plan can include all types of creativity that can be seen in a home. The original wood and its color add a natural touch to the space and attracts many birds for shelter, nesting, and eating. For a visually appealing look, you can add wood logs or branches on the front side of the birdhouse.
They easily stick to each other with wood glue. As in the birdhouse in the picture, you can cut the sides and roof as per the requirement and secure them with nails. Keep the bottom wood plank bigger than the rest sides, which makes it the perfect place for a deck or outer patio in the birdhouse.
Add a single, small-sized roof and two vertical wooden bars to create a shed. The deck proves to be helpful as it will protect the birds from extreme sun, rain, and winds. It becomes the perfect sitting spot and can equip many birds at a single time. You can take inspiration from this technique and build a birdhouse at home.
Conclusion
These birdhouse plans can be easily built for $3 and yet look elegant. With materials like wood plank, nails, hammers, and glue, you can create a spacious shelter for the birds. Moreover, the birdhouses are multi-functional in nature; you can transform the small space to harbor bird food, water, and other decor items.
There is no limit to the shape and size of the birdhouse plan; you can create numerous designs other than square and rectangle for an eye-catching birdhouse. Apart from this, you can also use materials and decor items like flower pots, old clocks, teapots, stones, etc., to make a unique birdhouse. The birdhouse plans come in a range of styles, from rustic to modern, that are highly efficient, functional, and accessible.
The birdhouse plans are the ones that grab attention, as they come in different shapes, sizes, materials, and colors. You can easily implement these 11 free DIY birdhouse plans built for $3 and give a refreshing look to your yard and a new character.