Tired of wet shoes and wondering if building your own stepping stone path is actually doable? A stepping stone path is a walkway made of individual stones spaced across your yard or garden.
These paths create designated routes through your outdoor space without covering the entire ground with concrete.
Each stone provides a stable place to step while letting grass or decorative materials fill the gaps between.
You can customize your stepping stone path with different materials, shapes, and creative designs that match your style. I’ll show you exactly how to build one that enhances your yard’s beauty and functions easily.
Why Install a Stepping Stone Path in Your Yard
A stepping stone path makes walking through your yard much easier and keeps your shoes clean and dry. You won’t track mud into your house after walking through wet grass or garden beds anymore.
These paths add visual interest and help guide people through your outdoor space in an intentional way. They create natural flow between different garden areas and make your landscape look more polished and planned.
Installing stepping stones is much simpler than pouring concrete walkways that require heavy equipment and professional skills. Stepping stone paths require very little maintenance once installed and last for many years without needing repairs.
Materials and Tools You’ll Need
Gathering your materials before starting makes the project run smoothly without unnecessary trips to the store. Here’s what you’ll need and what it typically costs:
| Material | Estimated Cost Range (USD) |
|---|---|
| Garden hoe and shovel | $15 – $40 (each) |
| Weed killer spray | $8 – $25 |
| Crushed rock (aggregate) | $3 – $50 per bag (20-50 lbs) |
| Weed barrier fabric | $12 – $40 per roll |
| Yard pins or stakes | $5 – $15 per pack |
| Leveling sand | $4 – $25 per bag |
| Flexible landscape edging | $15 – $40 (10-20 ft. pieces) |
| Stepping stones or pavers | $2 – $8 each |
| Outdoor paint (optional) | $8 – $25 per can |
| Paint sprayer or brush | $5 – $30 each |
| White marble chips | $5 – $20 per bag |
| Hand tamper | $25 – $50 |
How to Lay a Stepping Stone Path?
Building a stepping stone path is straightforward when you follow the right steps in order. Here’s how to create a beautiful walkway that lasts:
Step 1: Clear the Land

Start by clearing all the weeds, grass, and overgrowth using a hoe and shovel. You want the area completely clean before building your path. After removing the plants, spray weed killer over the entire space to keep anything from growing back.
Work slowly and double-check corners and edges. Once done, the ground should look smooth and bare, like a clean dirt base ready for your walkway.
Step 2: Plan and Dig the Path
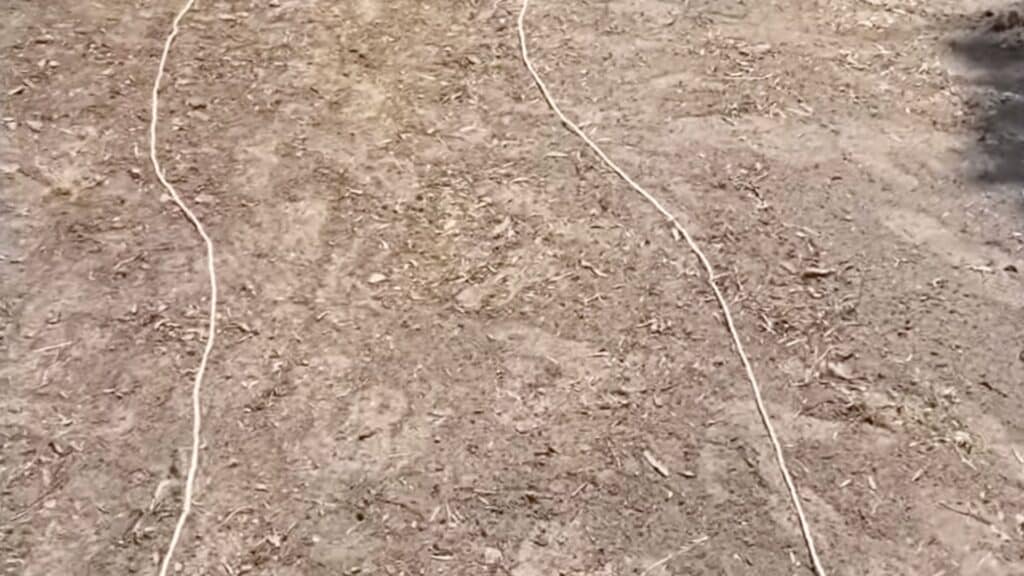
Decide where you want your walkway to go and mark the outline using a rope or spray paint. Then dig out the marked area to a depth of about two to four inches. Go deeper if your ground slopes or feels uneven.
This will make room for the layers of gravel and sand you’ll add later. Try to keep the surface even and remove any leftover roots or rocks as you dig.
Step 3: Add the Base and Weed Barrier
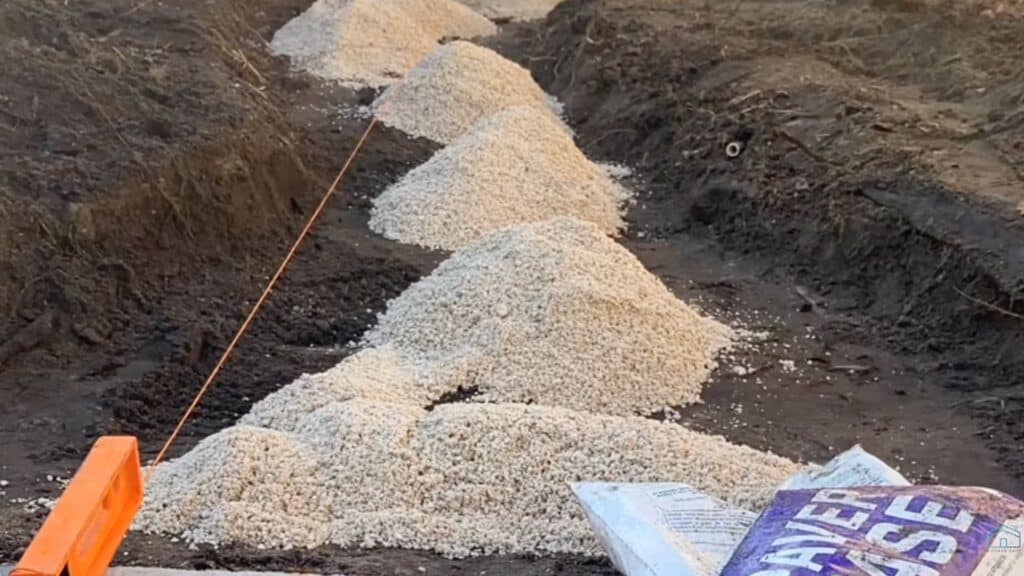
Pour a layer of crushed rock into the trench to make a firm foundation for your walkway. Use a hand tamper to press it down tightly so it doesn’t shift later. After that, roll out your weed barrier fabric to cover the full width of the walkway.
Secure it with yard pins along the edges. This simple layer keeps weeds from poking through and helps your walkway last longer.
Step 4: Spread Sand and Add the Border
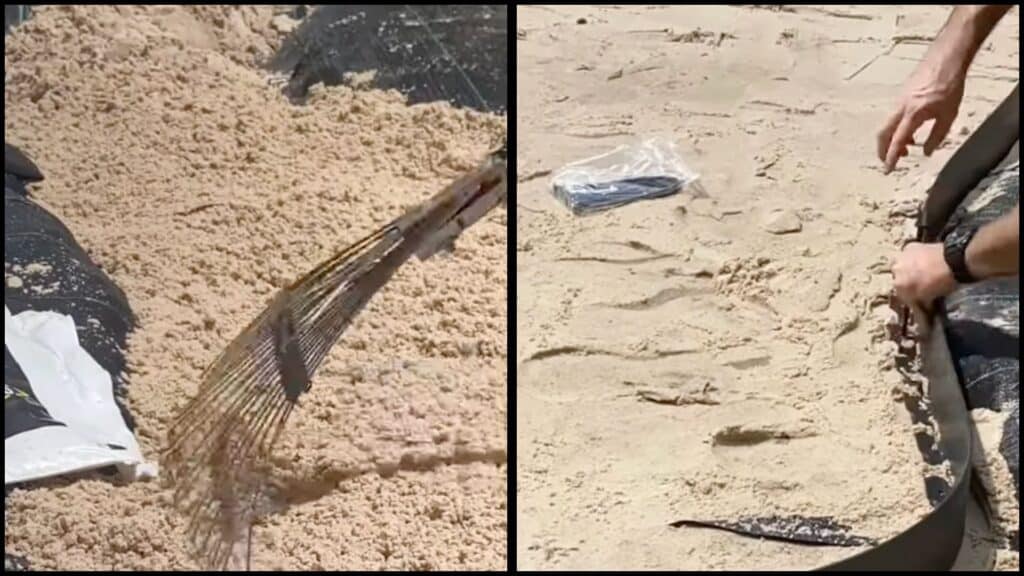
Next, add a layer of leveling sand on top of the weed barrier. Smooth it out evenly with a rake or board so the stones will sit flat. Then install flexible landscape edging along the sides of the path.
This keeps the sand and stones in place and helps define the shape. If you dug too deep, use a taller border so the walkway looks even with the yard.
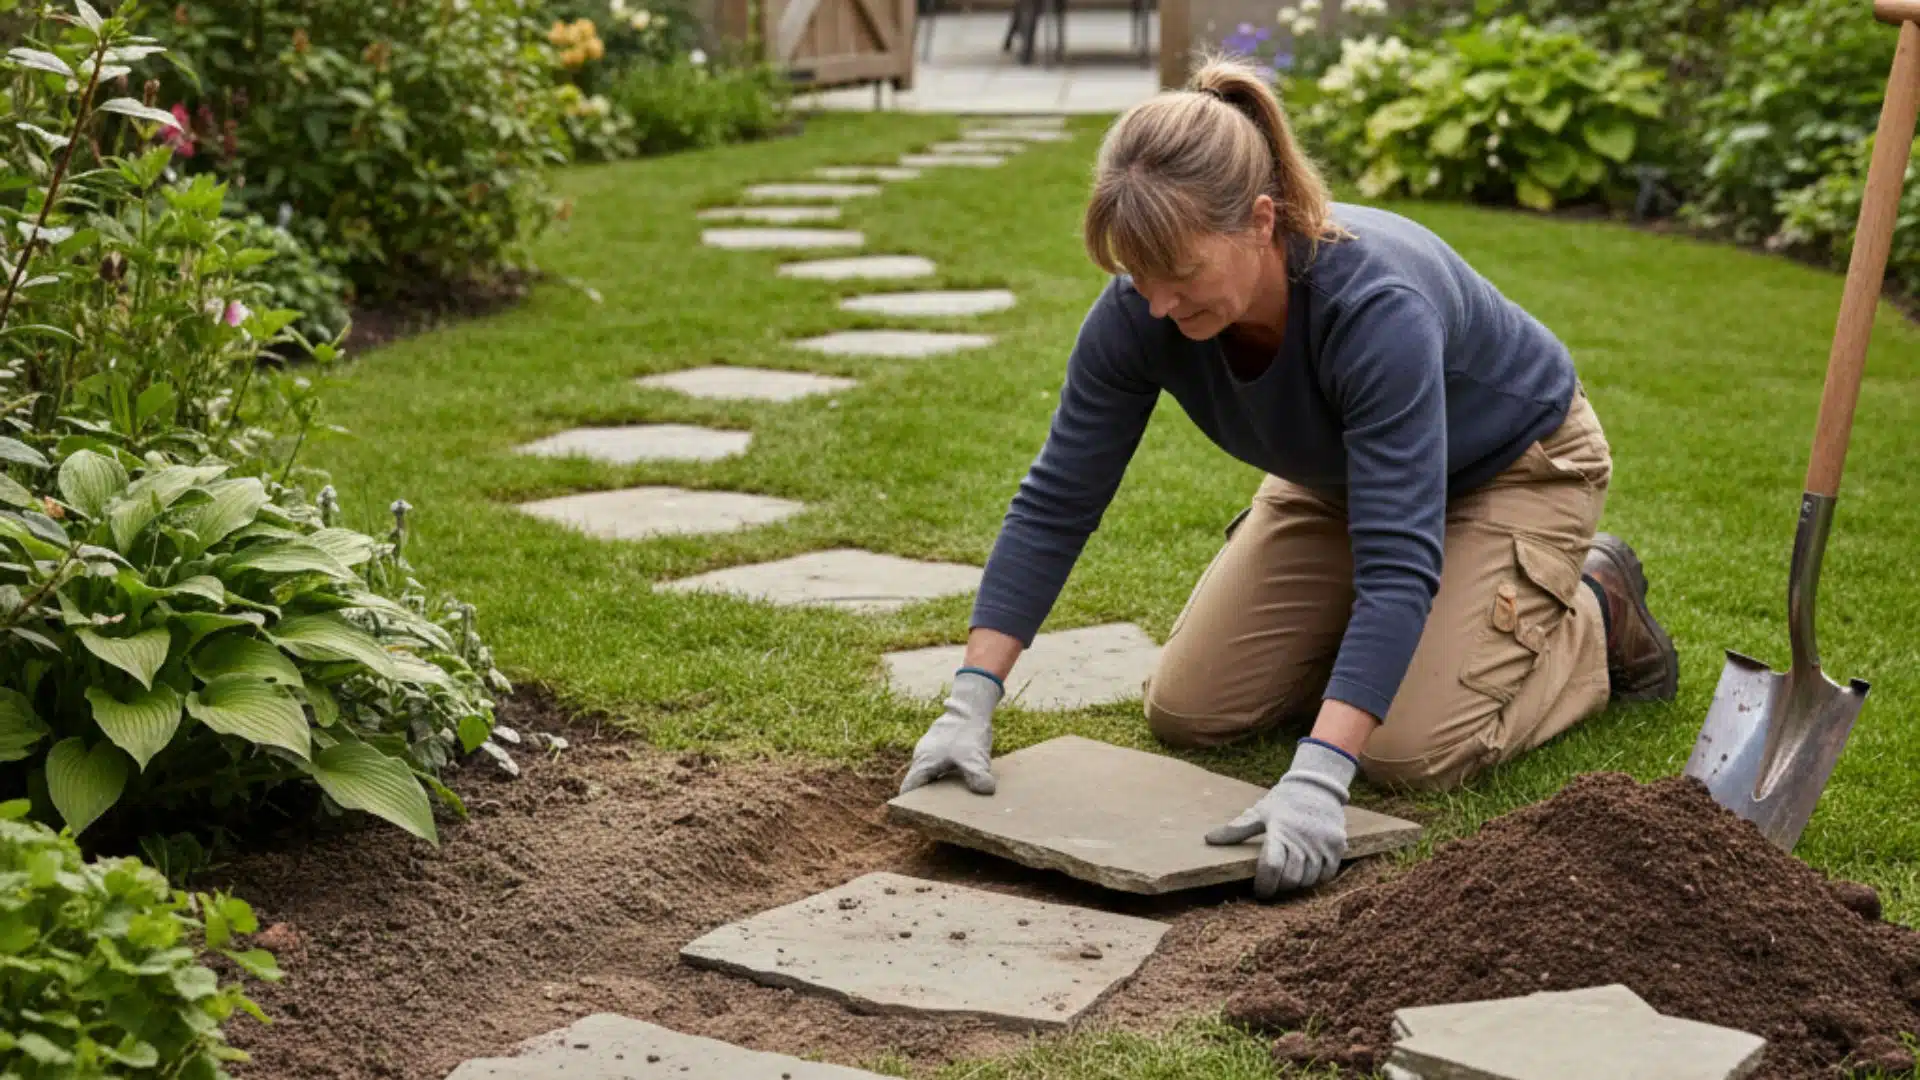
Step 5: Paint, Place, and Finish
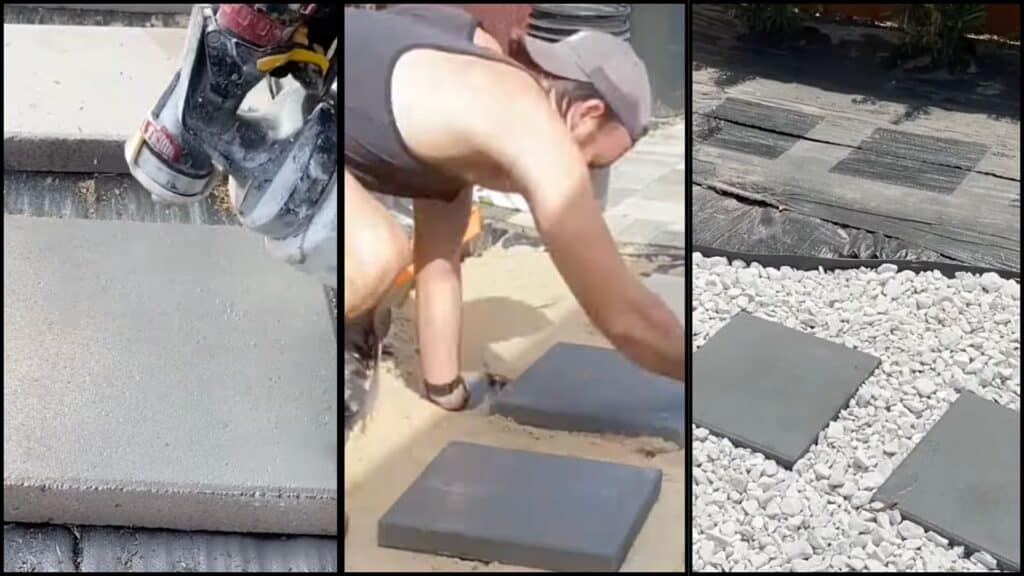
If you’d like to add some personality, paint your stepping stones before placing them. Use outdoor paint and let it dry fully. Then set each stone carefully on the sand, checking that every one is level with the ground.
Follow the slope of your yard naturally. Once all stones are in, fill the gaps with decorative marble chips to finish the walkway. It’ll look clean, neat, and balanced.
For more details, watch the complete video explanation by DIY for Home and Life.
Common Mistakes to Avoid
Many DIY projects fail because people skip important steps or rush through the installation process. Watch out for these common errors when laying your stepping stone path:
- Uneven stone placement causing tripping hazards: Make sure each stone sits level with the ground to prevent accidents and falls.
- Skipping the base layer leads to instability: Without proper crushed rock and sand, your stones will shift and sink over time.
- Poor drainage leading to mud or moss buildup: Water needs somewhere to go, or your path becomes slippery and unusable after rain.
- Stones placed too far apart or too close together: Space them at a comfortable walking stride for easy, natural movement along the path.
Avoiding these mistakes ensures your stepping stone path looks professional and lasts for years. Taking extra time during installation prevents frustration and costly repairs down the road.
Creative Ideas for Your Stepping Stone Path
Stepping stone paths don’t have to be boring or look the same as everyone else’s walkway. Here are creative design ideas that add personality and style to your outdoor space:
1. Winding Natural Stone Pathway
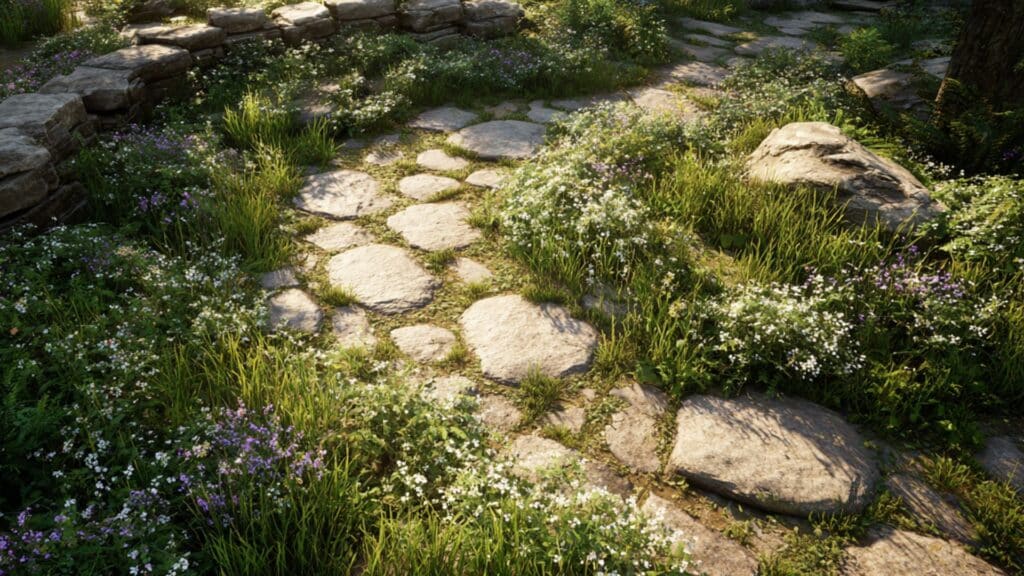
This path winds gently through a garden, using irregularly shaped stones for an organic and relaxed look. The stones seem almost random, but invite you on a pleasant stroll.
Each curve feels inviting and works well in landscaping that mimics nature. Its uniqueness comes from its flowing shape and natural materials, making every installation different from the rest.
2. Circular Marble Stones Across Water
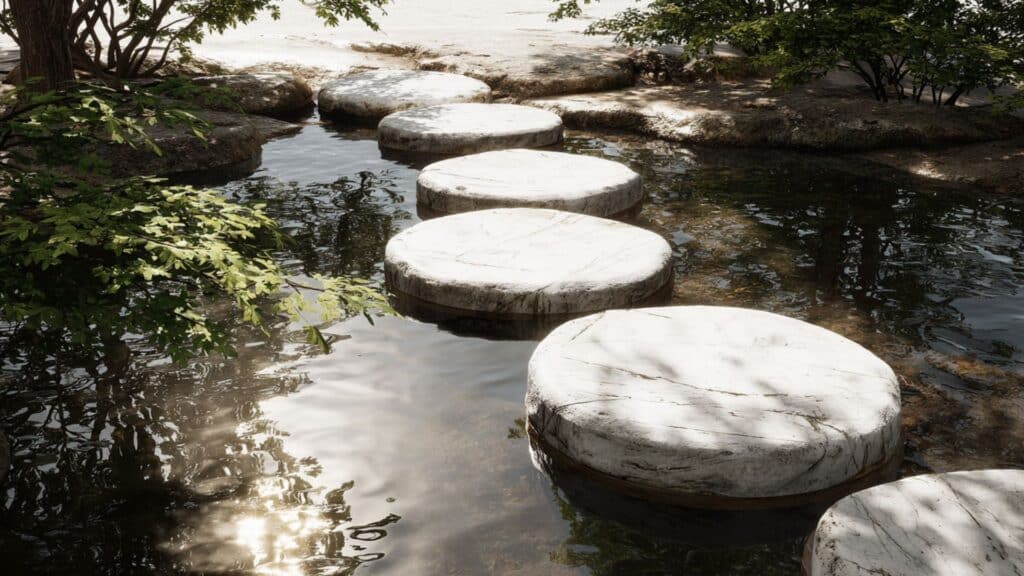
Large, round marble stones create bold stepping points as they cross a small pond or stream. The glossy surface reflects sunlight and water, giving a bright touch.
Each stone is evenly spaced, so you skip across the water easily. This idea stands out because of the shape, smooth texture, and the fun experience of crossing water.
3. Geometric Pavers That Spell a Word
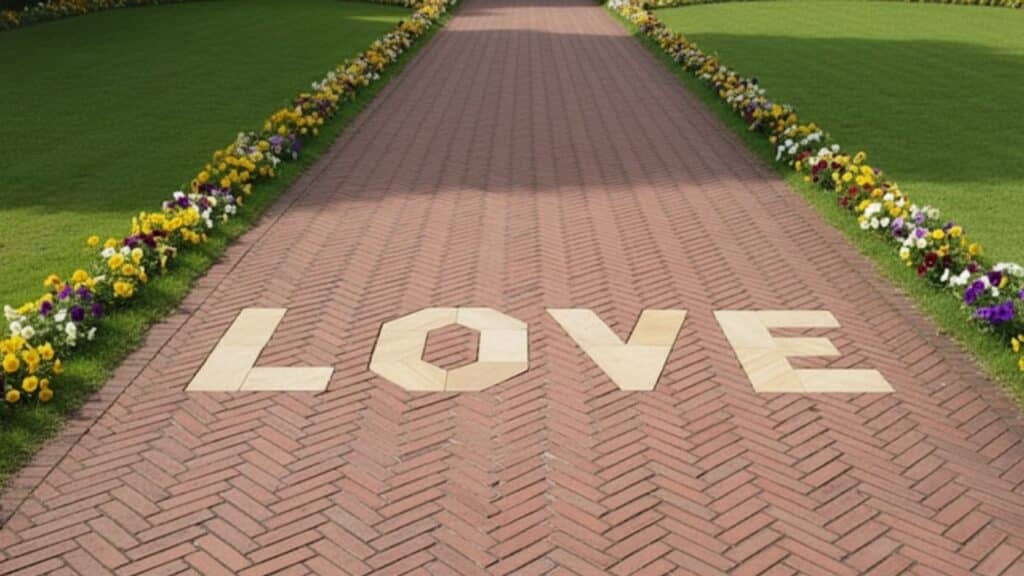
Each paving stone is shaped and placed to form readable letters, spelling out a word along your path. It adds personality, guiding guests playfully through your yard.
No other pathway is exactly like this, since your message is yours alone. The effect is bold, custom, and eye-catching, making every step along this path truly personal.
4. Glow-in-the-Dark Stepping Stones
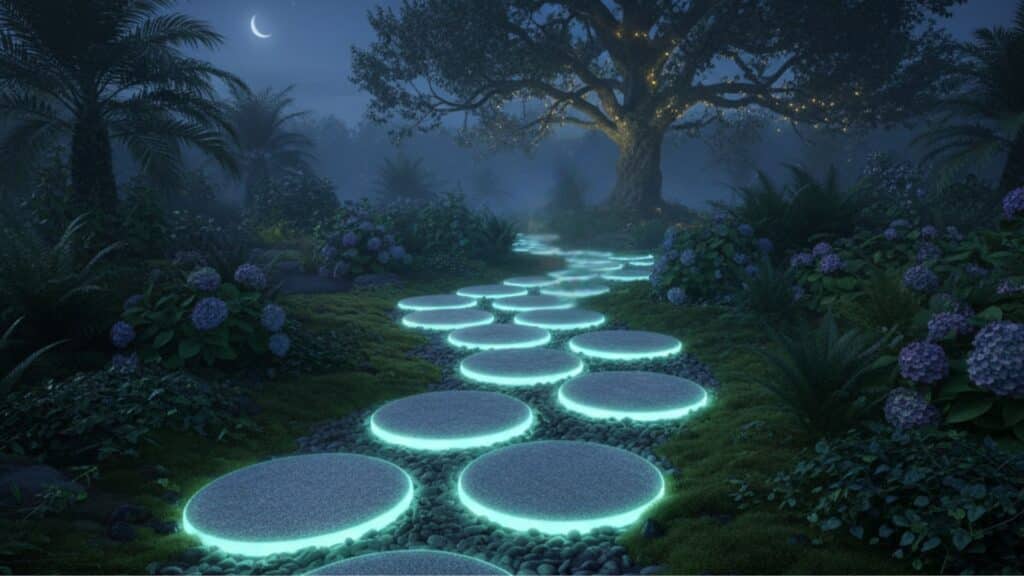
During the day, these stones look like regular path slabs, but at night, they glow softly. They guide you along your route after dark.
This glowing feature adds magical appeal, making evening strolls more fun and safe. Their uniqueness comes from the ability to shine at night, creating a gentle, inviting glow for your path.
5. Stones Surrounded by Glass Mulch
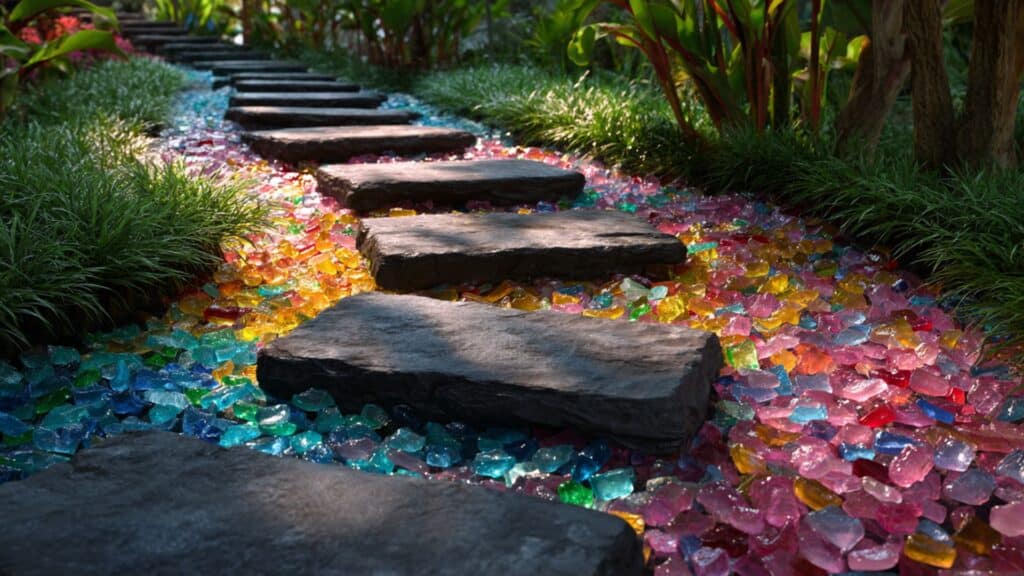
Flat stones are placed along your route, but the gaps are filled with vivid, recycled glass mulch. The colors catch sunlight, giving each step brightness.
Glass mulch reduces weeds and adds sparkle. Each path adapts to your color choices, so none look quite the same. This idea offers both beauty and good practicality for garden maintenance.
6. Wood Log Slice Path Under Trees
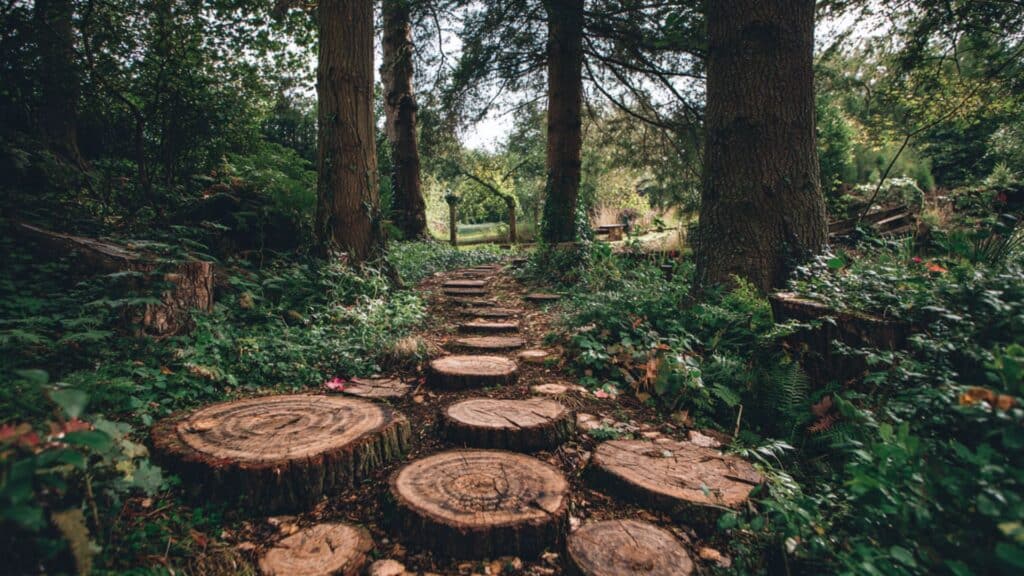
Round slices cut from old tree trunks form a rustic trail beneath leafy branches. The wood blends into the natural setting and feels gentle to walk on.
Each log slice shows its own pattern and grain. These natural textures are unique, and over time, the wood weathers for a classic woodland look.
7. Concrete Leaves for a Botanical Walk
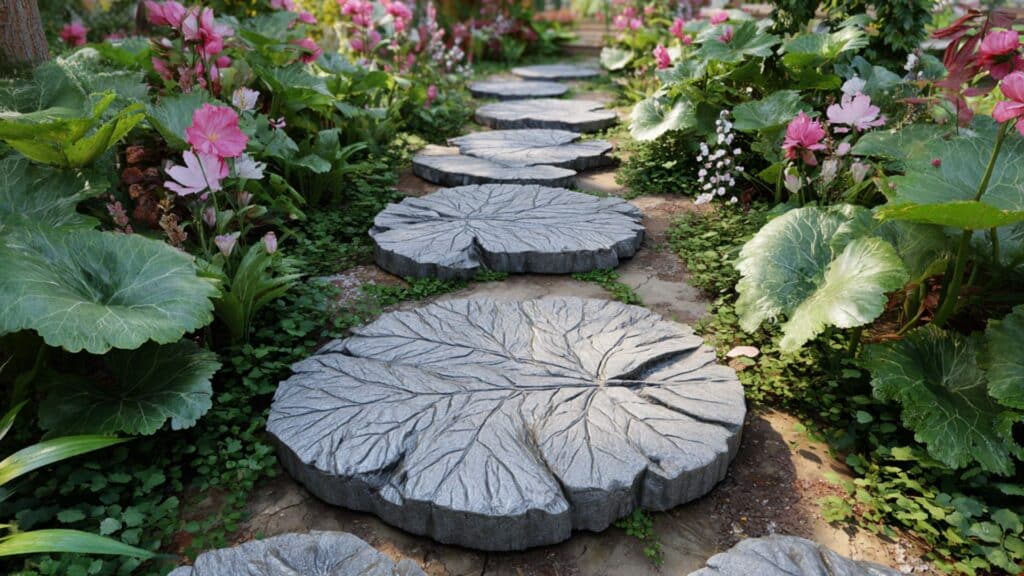
Stepping stones are cast from actual leaves, keeping the detailed veins and shapes in concrete. The pathway looks like scattered garden leaves, blending in beautifully among flowers. Each concrete leaf is one-of-a-kind.
This idea stands out because it mimics nature, but is sturdy and long-lasting. Every step feels like walking through a leafy path.
8. Checkerboard Path With Mixed Shapes
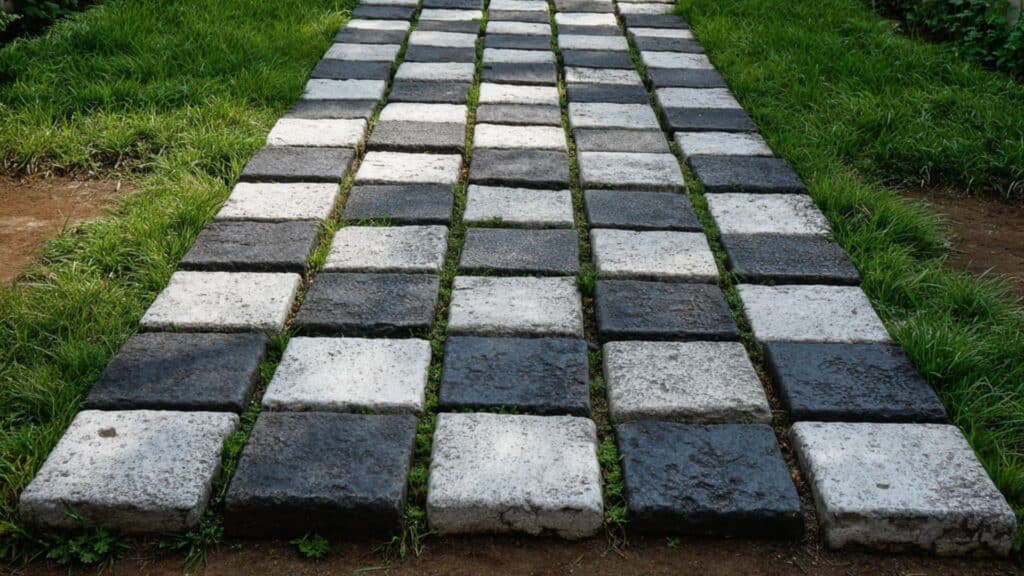
Square and rectangular stones alternate like a checkerboard down the path. The mixed shapes create a fun, patterned look that people notice right away. Contrasting stone colors make the pattern pop even more.
Each layout is different, based on your color and size choices. This playful, geometric design is very different from plain stone rows.
9. Pebble Mosaics in Animal Patterns
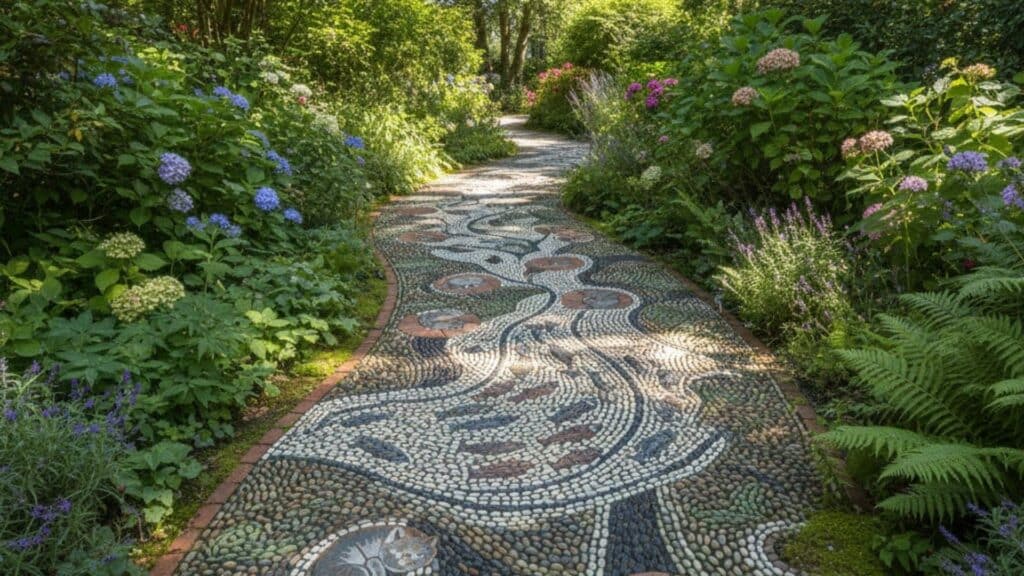
Artists arrange pebbles in patterns that form animals, like birds or fish, right in the stepping stones. Each mosaic is a small work of art, and every path has its own wildlife theme.
The look is detailed, colorful, and unique to every garden. No other idea mixes art and nature this closely for a stepping path.
10. Bricks Engraved With House Numbers
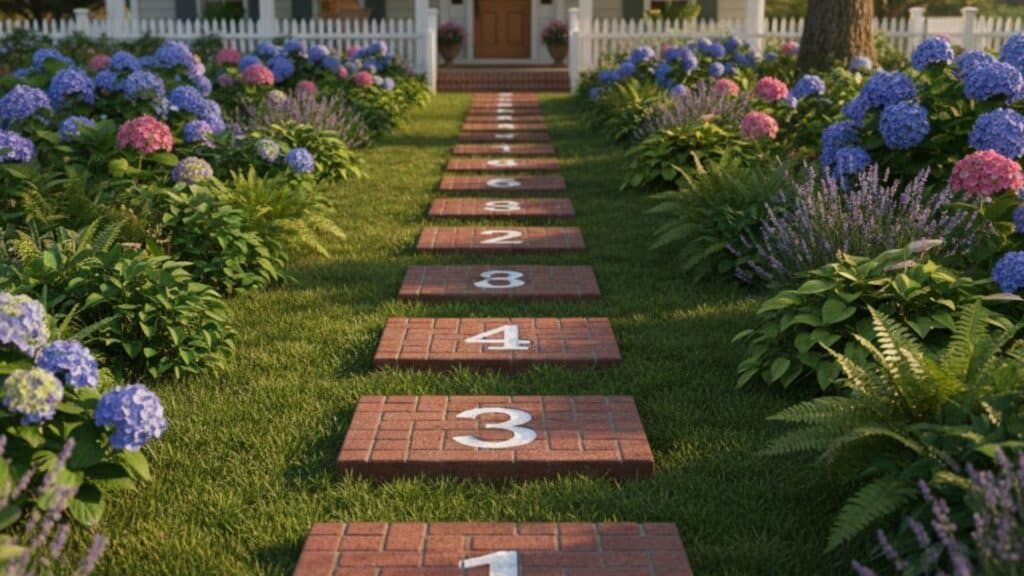
Stepping stones are made from thick bricks, with your house number or other information engraved on them. Each one marks the way to your door, helping visitors find your address.
These stones combine usefulness and beauty. You can change the words or numbers to suit your family, making the path personal and truly different from others.
11. Slate Tiles Set on Moss Bed

Dark rectangular slate tiles sit over a lush, green moss carpet, creating a cool and calming pathway. The contrast between sleek slate and soft moss makes each step feel gentle and welcoming.
This idea feels modern and natural at the same time. The moss adds unique life and softness that stone alone cannot give.
12. Granite Stones Over Sand Zen Trail
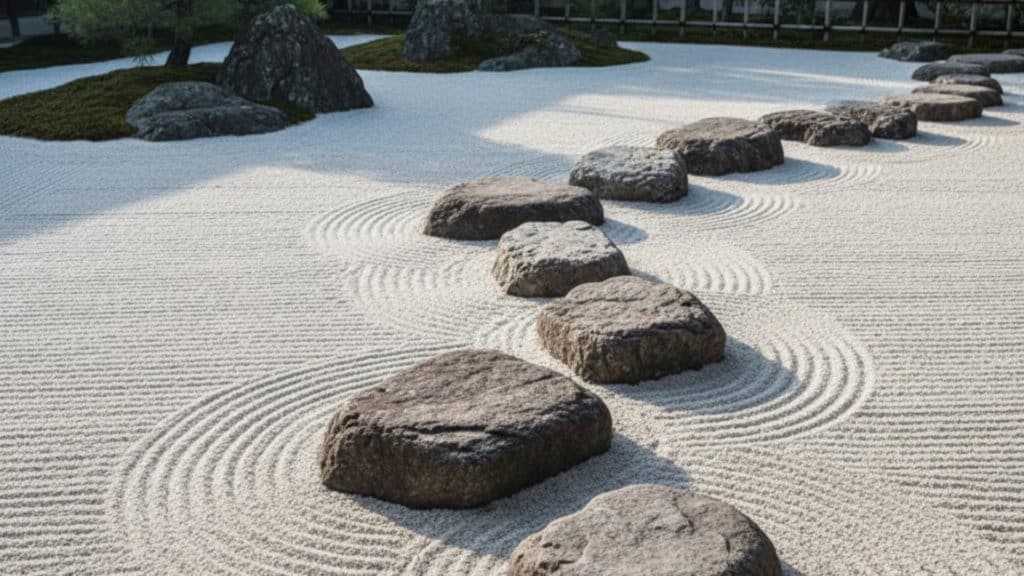
Large granite stones are spaced carefully over smooth sand, reflecting a peaceful Japanese Zen garden style. The trail feels simple and meditative as you walk slowly across.
Its uniqueness stands out in how it combines raw granite shapes with clean, raked sand. This design brings calm and focus to any garden space.
13. Honeycomb-Shaped Hexagonal Pavers
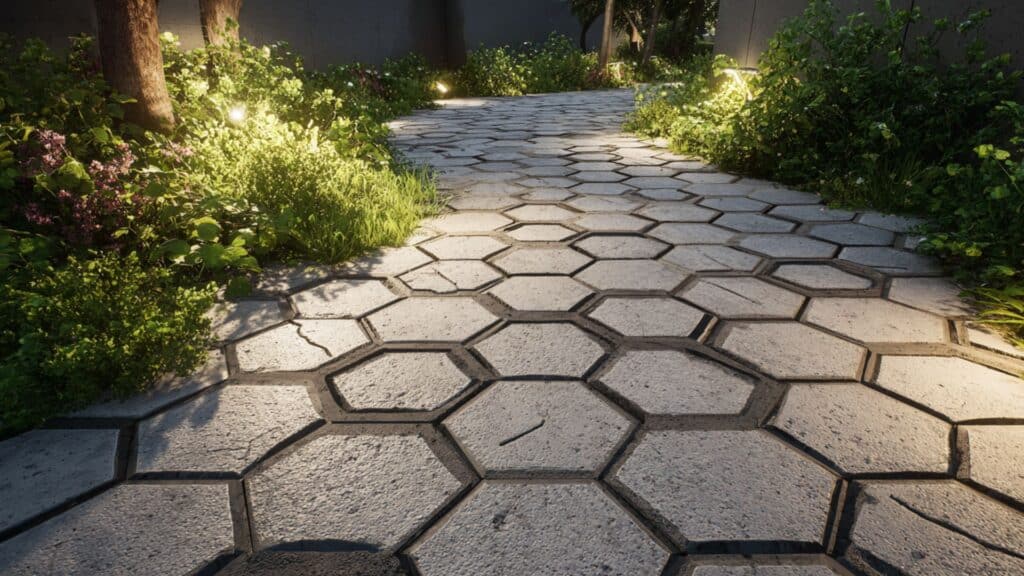
Hexagonal pavers nest together in a honeycomb pattern, creating a striking geometric look. Each step connects perfectly with the next, making a pleasing visual rhythm.
This idea is unique in both shape and layout. The pattern draws attention and makes your garden look organized while staying fun and creative.
14. Fossil-Stamped Tiles for Nature Lovers
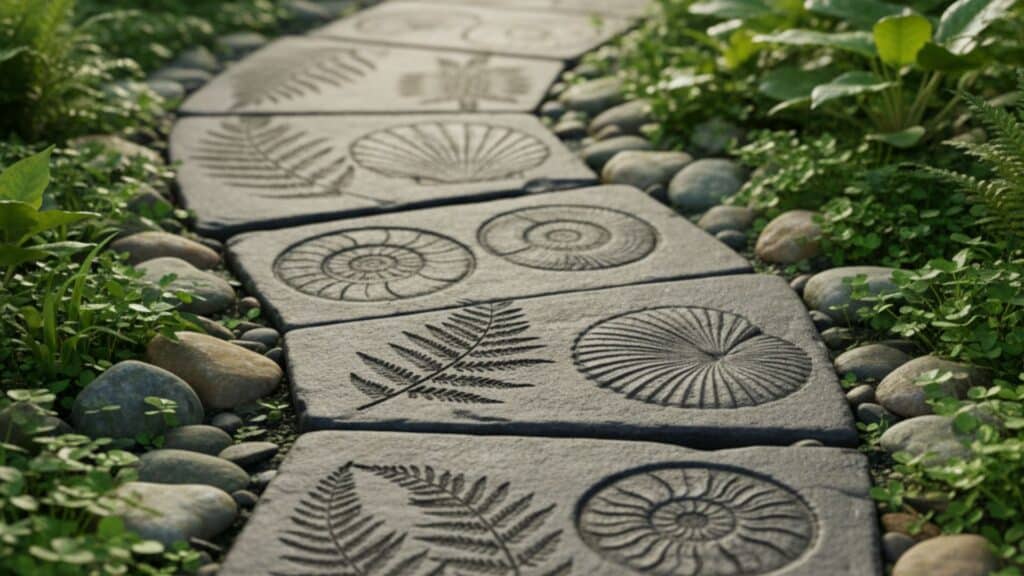
Tiles are decorated with fossil patterns, like ferns or shells, adding a love of ancient nature to each step. The design feels educational and artistic, inviting you to discover new details with every walk.
Fossil-stamped tiles are rare, making each path feel personal and full of character. It’s a tribute to natural history.
15. Painted Stepping Stones With Flowers
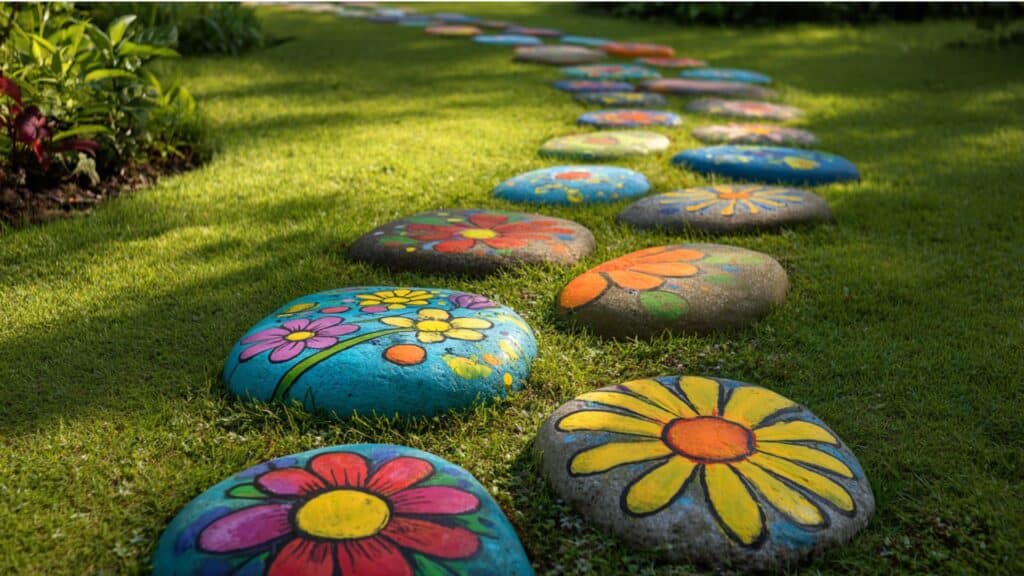
Smooth stones are hand-painted with bright flower designs. Each one turns into a piece of art along your walkway. This idea is different because each stone has its own color scheme.
Painted stones let you customize and refresh the path as much as you want, helping express your style directly in the landscape.
16. River Cobbles Mixed With Pavers
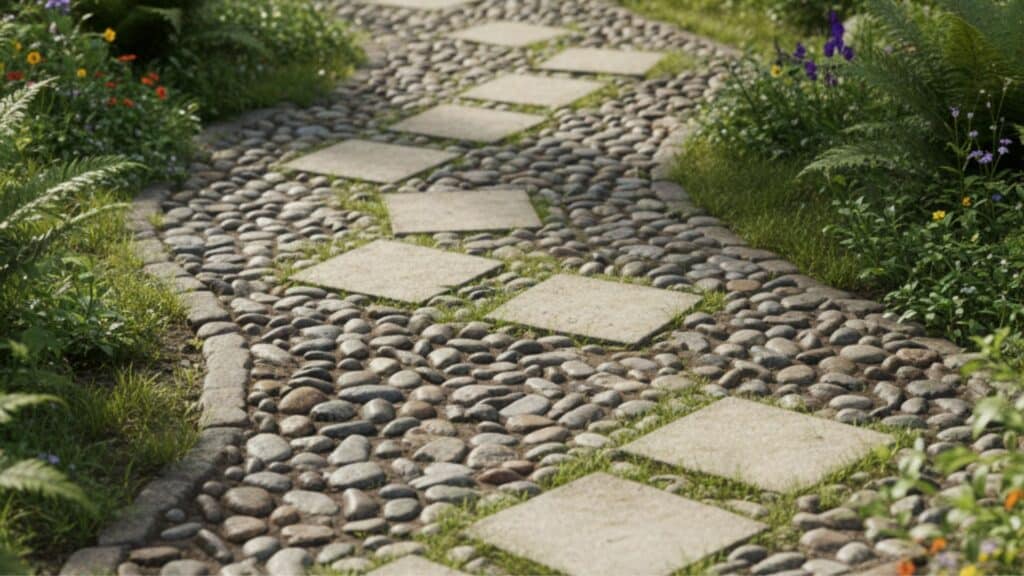
Large river cobbles alternate with regular square pavers for a playful look. The rounded stones feel ancient, while pavers add a touch of order. Each step changes texture underfoot.
This idea stands out by mixing shapes and sizes. It’s a great way to add interest and keep paths from looking too uniform.
17. Glass Bottle Bottoms in Concrete
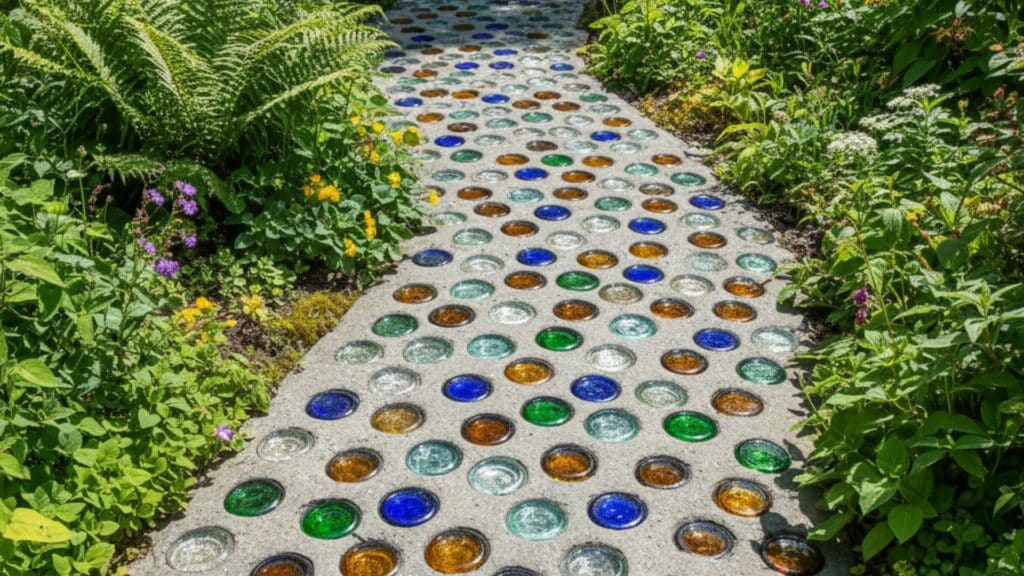
Clear and colored glass bottle bottoms are set into concrete, creating a sparkly walkway when the sun hits. Each step catches light from a new angle. This idea is unique because it uses recycled material.
Glass bottle paths look modern but are fun for families to make together, and each section is never the same.
18. Terracotta Discs in Vegetable Garden
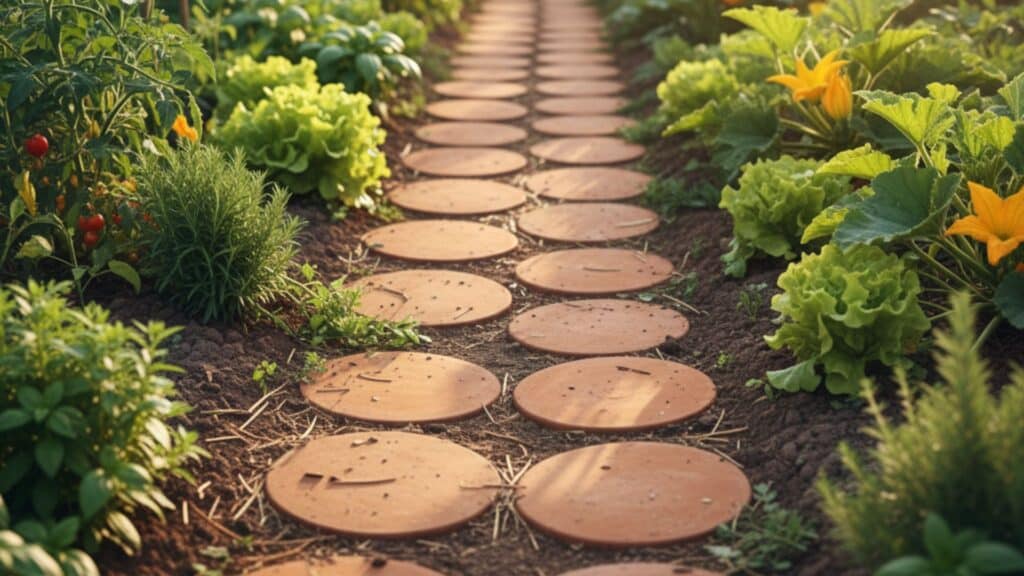
Uneven, handmade discs of terracotta clay form winding paths between garden beds. The clay’s warm color pops against green vegetables and dark soil. Differences in disc size give a playful, rustic feel.
This idea works uniquely well in edible gardens, making harvests easier and adding earthy appeal around growing plants.
19. Colorful Recycled Tile Mosaic Path
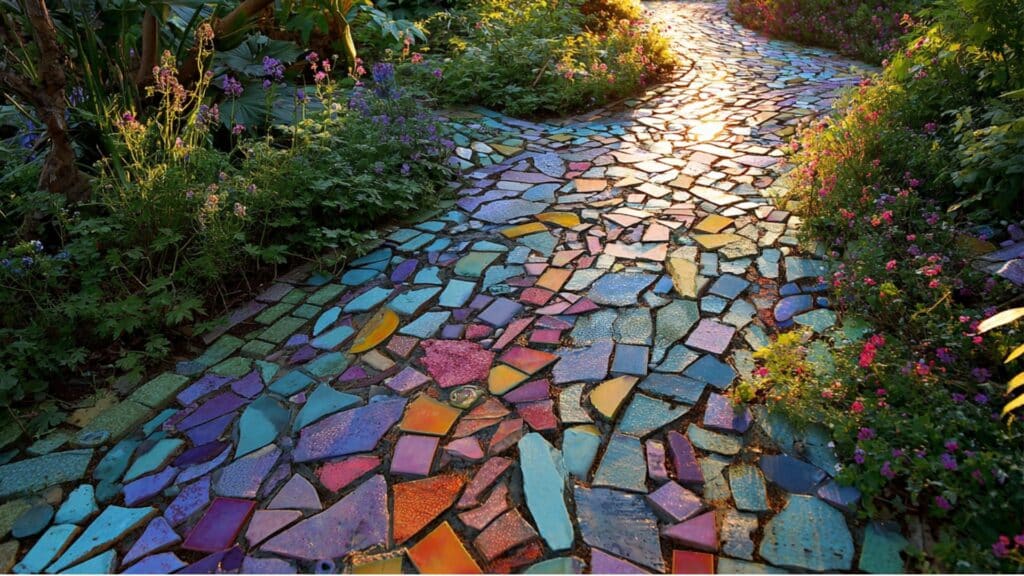
Broken tile bits in every color are set in patterns, turning the walkway into a mosaic. The colors form pictures or abstract shapes that change as you move along.
This path is unique since every mosaic is made by hand, reflecting your personality and creativity. Recycled tile helps the planet and makes gardens more vibrant.
20. Porcelain Squares Bordered by Lavender
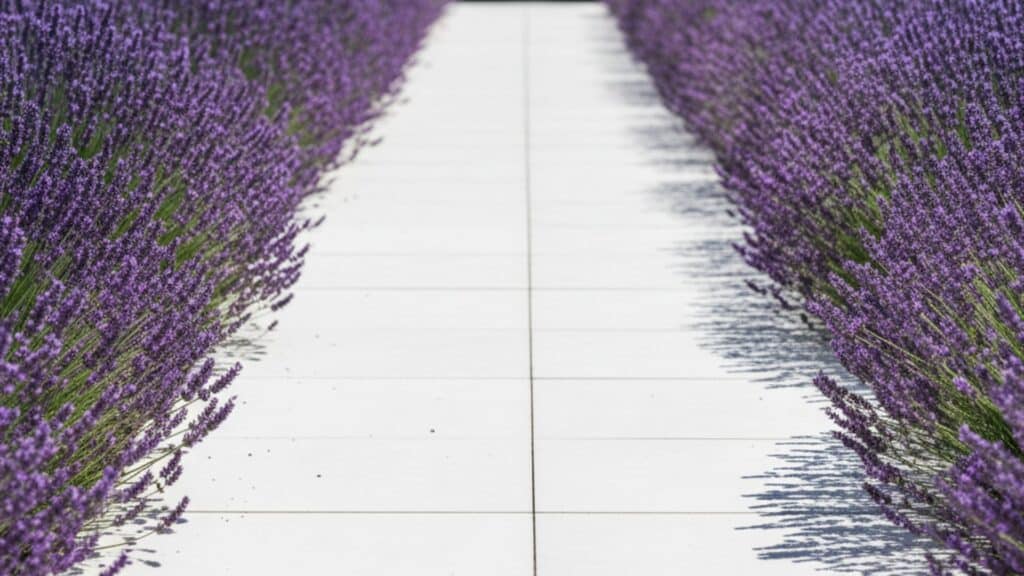
Clean, white porcelain squares make up the path and are surrounded by rows of deep purple lavender. The fragrance and color bring instant joy with each step.
Porcelain’s smooth texture looks high-end, and lavender’s scent is calming. This combination is unique because it blends garden beauty with luxury for truly memorable walks.
21. Ceramic Bird-Shaped Stepping Stones
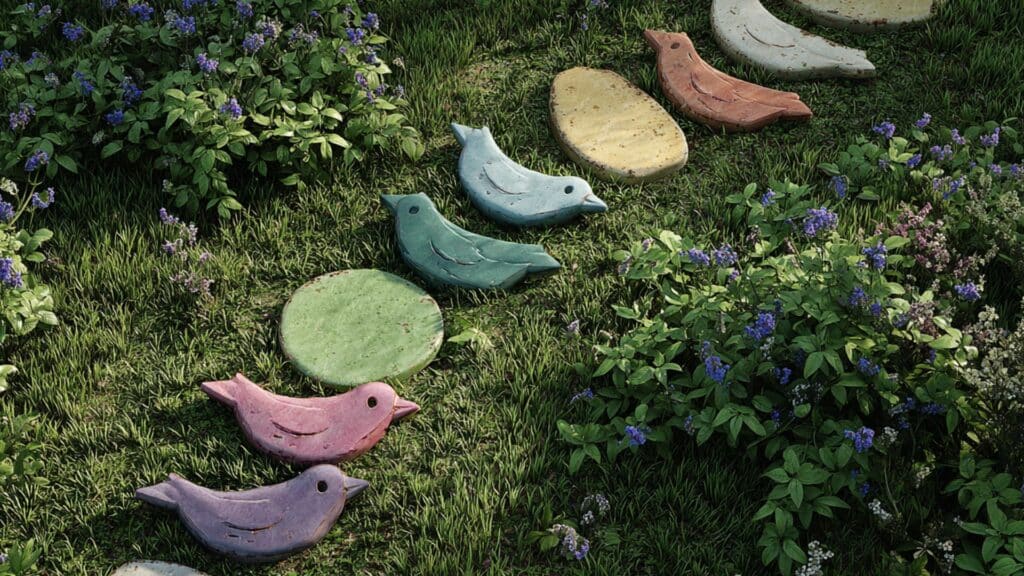
Hand-molded ceramic birds line the path, each one painted or glazed with unique patterns. These stones feel playful and welcoming, especially for children. The bird shapes are rare and not found in regular garden stores.
This idea is different because it brings nature’s inspiration directly underfoot, celebrating creativity and life in gardens.
Maintenance Tips for Stepping Stone Paths
Keeping your stepping stone path looking great requires minimal effort throughout the year. Follow these simple maintenance practices to extend your path’s lifespan:
- Remove weeds and debris regularly by pulling any weeds growing between stones and sweeping away leaves or dirt.
- Refill joints with sand or gravel as needed, since the material between stones washes away over time and needs replacement.
- Reset stones that shift over time by checking for wobbly or uneven stones and adjusting them back into place.
- Rinse or pressure wash occasionally to keep the surface clean and remove built-up dirt, moss, and algae.
These basic tasks keep your path safe, attractive, and functional for many years ahead. Spending a little time on maintenance prevents bigger problems and costly repairs later on.
Final Thoughts
Now you have all the knowledge needed to design and build a beautiful stepping stone path yourself. Your yard will look more polished and function better once you add this simple but effective feature.
A stepping stone path changes how you experience your outdoor space while solving practical problems like wet shoes.
The installation process is straightforward enough for beginners yet offers endless creative possibilities for personal expression outdoors.
Remember that proper preparation and base layers make the biggest difference in how long your path lasts.
Your dream walkway is just a weekend project away with the right materials and motivation ready. Drop your questions about building stepping stone paths in the comments below!